


Introduction to connectors
Connectors are used to send and retrieve data from various third-party sources. Using connectors, you can connect to external cyber security tools and perform various automated interactions using FortiSOAR™ playbooks.
FortiSOAR has already developed a number of connectors that can be used to integrate with a number of external cyber security tools like SIEMs, such as Splunk and Ticketing systems such as Jira. Connector-specific documentation that is included with each connector covers the process of installing, configuring, and using these connectors. You can see a list of published connectors on the Fortinet Support Site.
FortiSOAR also provides you with a number of pre-installed connectors or built-ins that you can use within FortiSOAR playbooks, as a connector step, and perform automated operations. For more information on FortiSOAR Built-in connectors, see the "FortiSOAR Built-in connectors" article.
You can write a custom connector that can retrieve data from custom sources. You can then use the connector either standalone or within FortiSOAR playbooks and perform automated operations. You can write a custom connector manually, or you can use the FortiSOAR Connector SDK to develop your custom connector. For more information on writing custom connectors, see the Building your own connector chapter.
A Connector Store is part of the FortiSOAR UI. Use the Connector Store to easily view, search, install, update, and uninstall connectors that are part of the FortiSOAR repository. You can go to the connector store by clicking the Connector Store link that appears on the top-right corner on the Connectors page. For more information, see Connector Store. You can also specify connector configuration using a jinja variable that contains the connector configuration name.
Installing a FortiSOAR connector
All connectors provided by FortiSOAR are delivered using a FortiSOAR repository. Use the Connector Store to easily install, update and install connectors that are part of the FortiSOAR repository.
|
|
The recommended way to install a connector is by using the Connector Store. |
To install a connector, you must be assigned a role that has a minimum of Read and Create access to the Connectors module.
|
|
You must ensure that update.cybersponse.com is reachable from your FortiSOAR instance. Otherwise, you will see a blank page when you click the Connector Store link. |
You could also set up your FortiSOAR repository and use the yum command to install connectors as a root user:
# yum install cyops-connector-<connectorname>
|
|
After you install a connector using the |
To update a FortiSOAR-provided connector use the following command:
# yum update cyops-connector-<connectorname>
To remove a FortiSOAR-provided connector use the following command:
# yum remove cyops-connector-<connectorname>
|
|
If you delete a FortiSOAR-provided connector using the Connector page in FortiSOAR then you cannot reinstall the RPM of the same connector because the RPM of the connector does not get deleted. Therefore, to remove a FortiSOAR-provided connector, you must use the |
Some of the connectors have dependencies on additional python packages. During connector installation, these dependencies are also installed using pip. The default pip settings point to the pypi.python.org repository for downloading these packages. We have also added an alternate repository on update.cybersponse.com to host the connector dependencies. If your instance restricts access to pypi.python.org, the installer fallbacks to this alternate repository for installing the dependencies. However, the connector installation might take longer if there are multiple dependencies since it first tries to fetch each of those from pypi.python.org. In such a case, it is recommended to switch to update.cybersponse.com as the main repository for the python packages also. You can switch the main repository to update.cybersponse.com so by editing the pip.conf file located at: /opt/cyops-integrations/.env/pip.conf as follows:index-url=https://update.cybersponse.com/connectors/deps/simple/
You can also change other relevant pip settings such as altering the timeout or retry count setting. See https://pip.pypa.io/en/stable/user_guide/#config-file for a listing of the relevant pip settings. For example, to increase the timeout value add the following in the pip.conf file: timeout = 60.
Connector Store
Use the Connector Store to easily view, search, install, upgrade, and uninstall connectors that are part of the FortiSOAR repository. Therefore, you can now perform these operations using the FortiSOAR UI instead of required CLI access.
Following are the permissions that you must be assigned to perform operations on connectors:
- To install a connector, you must be assigned a role that has a minimum of
CreateandReadaccess on theConnectorsmodule andReadaccess on thePlaybooksmodule. - To upgrade or configure a connector, you must be assigned a role that has a minimum of
UpdateandReadaccess on theConnectorsmodule andReadaccess on thePlaybooksmodule. - To uninstall a connector, you must be assigned a role that has a minimum of
DeleteandReadaccess on theConnectorsmodule andReadaccess on thePlaybooksmodule. - To view connectors and to use the connector as a step in the playbooks, you must be assigned a role that has a minimum of
Readaccess on theConnectorsandPlaybooksmodule.
To go to the connector store, click Automation > Connectors. On the Connectors page, click the Connector Store tab. The Connector Store page appears as shown in the following image:

You can search for a connector by its name in the Search by connector name field.
The Connector Store page contains a filter for installed and not installed connectors. You can filter connectors by clicking the Filter drop-down list and choosing between All, Installed or Not Installed filters. The chosen filter applies only to the Connector Store page.
Connectors that you can install appear with an Install (blue) icon as shown in the above image. To install a connector, click the connector card of the connector that you want to install, for example, AlienValult OTX, which opens a popup with the connector name:

The connector popup contains details such as, a brief description of the connector, whether the connector is certified or not, who is the publisher of the connector, a list of actions the connector can perform, link to the connector documentation, etc.
Click Install in the connector name popup to begin the installation of the connector, as shown in the following image:

Once installation is complete, FortiSOAR displays the "Connector Installed successfully" message, Active is displayed on the popup, and on the main connectors page you will see the installed connectors number increase by 1. After installing the connector, you must configure the connector by entering the required configuration details in the connector popup:
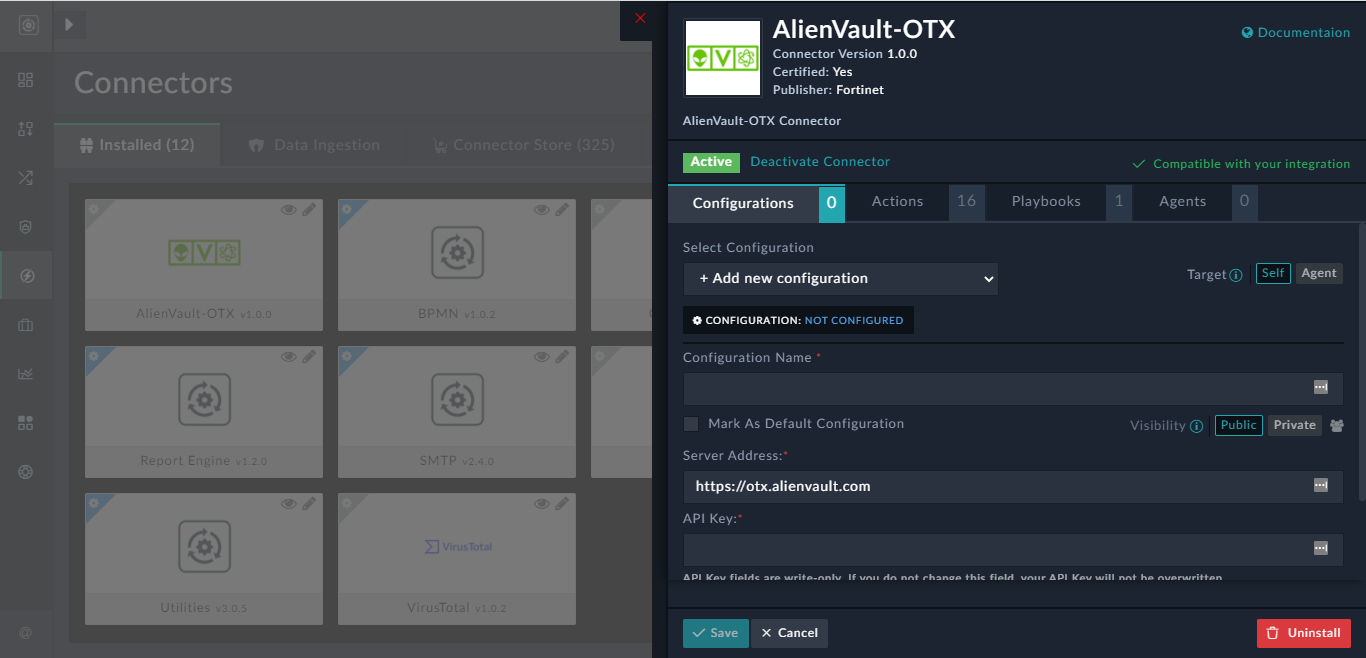
You can also configure the connector on the Connectors page by clicking the connector name card, which will also display the same connector popup.
To uninstall a connector, click the Uninstall Connector icon, in the connector popup. FortiSOAR displays a Confirmation dialog, click Confirm to uninstall the connector. FortiSOAR displays the "Connector uninstalled successfully" message and the installed connectors number decreases by 1.
Installing or importing and configuring a connector in FortiSOAR
Use the Connector Store to install and configure connectors in FortiSOAR. To install a connector, you must be assigned a role that has a minimum of Create access to the Connectors module. To configure connectors into FortiSOAR, you must be assigned a role that has a minimum of Update access to the Connectors module.
- Log on to FortiSOAR.
- On the left navigation pane, click Automation > Connectors > Installed.
OnInstalled Connectorspage, you will see the list of installed connectors, either in grid/list view or in the card view. You will also see a Data Ingestion tab on theConnectorspage, which displays the connectors that are enabled for the data ingestion wizard. For information on the Data Ingestion tab, see the Data Ingestion chapter.
Following is an image of theInstalled Connectorpage in the Card view:
In the top bar of theConnectorspage, you can see the number of connectors that are installed, for example, in the above image 11 connectors are installed. In the top bar, you can also view if any connector that is installed and configured on your system has an upgraded version, for example, if you have version 2.1.0 of the Anomali ThreatStream connector installed on your system and Fortinet has released a newer version of this connector, i.e., version 2.2.0 of the Anomali ThreatStream connector, and similarly there is an update to the HP ArcSight connector also, then the Updates button will display 2. To update a connector that you have installed and configured on your system, click the Updates button, which will display the connectors with the updated version. You can choose to then install the updated connector by clicking on the connector card and then clicking the Update to 'version' button on the connector configurations page. From version 6.4.1 onwards, when you click on a connector that has an updated version, you will see a 'What's new?' section on the configuration page, besides the Update to version button. Clicking the What's New? link displays the highlights of the new version, which you can view to understand what you can expect when you upgrade your connector version.
Also, you can see the status of the connector, based on the icon present on the top-left of the connector card. A connector that is installed but not configured appears with a Settings icon on a gray background, for example, the AlienVault-OTX connector. A connector that is installed and configured, for example the HP ArcSight connector, or a connector that does not require any configuration, for example the Utilities connector, appears with a Settings icon on a blue background.
Click + > Upload Connector to import a connector (.tgz) file into FortiSOAR, which displays the Add Connector popup as shown in the following image:
You can drag-and-drop the connector .tgz file onto the popup or browse to the .tgz file to install the connector in FortiSOAR. You must check that all the connector dependencies are available or install the dependencies additional to ensure that the connector functions as expected.
Note: In case your FortiSOAR configuration is a High Availability (HA) cluster, then if you install a connector using a.tgzfile, you will need to install it separately on all nodes of the HA cluster.
If you want to create a new connector, click + > Create New Connector. For more information on creating new connectors, see the Building your own connector chapter.
You can search for a connector by connector name in the Search by connector name box. You can also filter connectors by clicking the Filter drop-down list and choosing between All, Configured or Not Configured filters. The chosen filter applies only to theInstalled Connectorspage.
On a connector card you can also see View Connector and Edit Connector icons: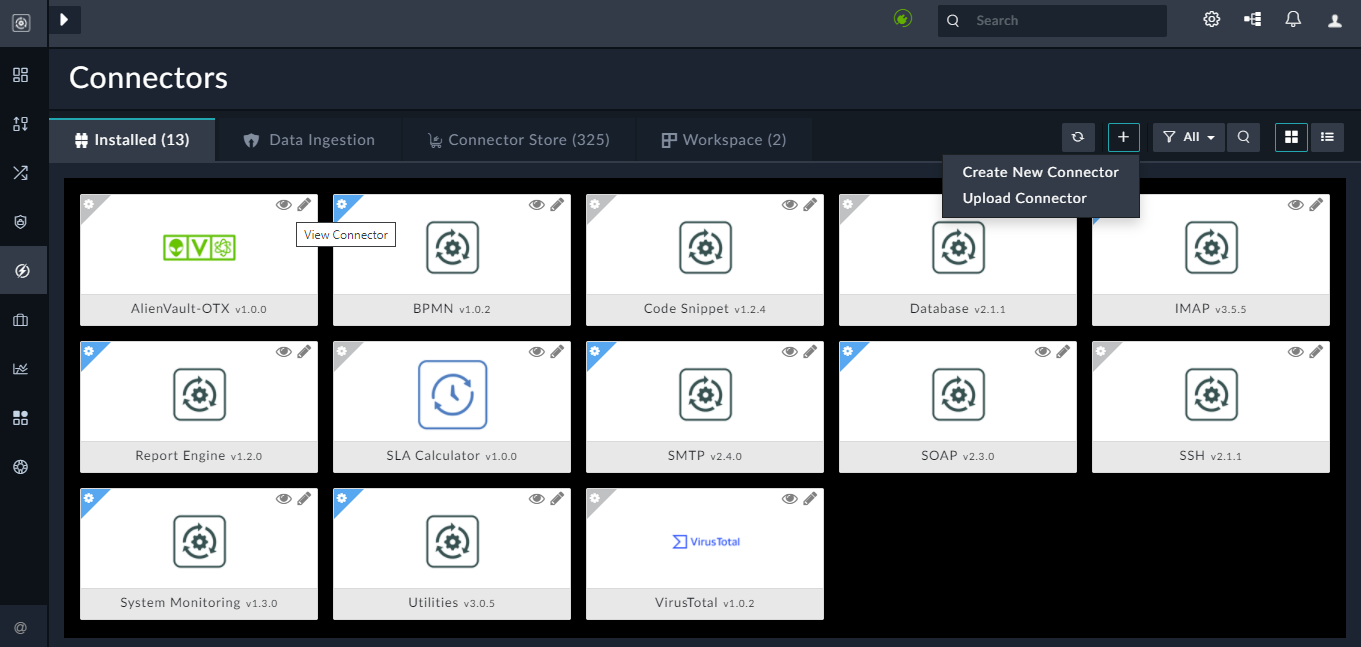
Clicking the View Connector icon opens the code editor interface for the selected connector. The folder structure is the similar to the folder structure defined in the Building your own connector chapter.
You can make updates to a connector according to your requirements by clicking the Edit Connector icon; however, to edit a connector, you must make a local copy of the connector and then make the changes in the same, and then you can save and publish the connector as defined in the Building your own connector chapter.
Buttons to change the view from grid to card and vice-versa are present on the right of theConnectorspage. Following is an image of the Connector page in the grid view:
You can see a list of the connectors with their associated brief descriptions, version installed and the status. The status of the connectors will be Installed for connectors that are installed but not configured, such as AlienVault-OTX, or Configured for connectors that are installed and configured, such as HP ArcSight, or for connectors that do not require any configuration, such as Utilities.
Click the Connector Store tab to view the connector store. - To configure a connector, click the connector row (if you are in the grid view) or the connector card (if you are in the card view) to open the Connector Configuration popup. Enter the required configuration details in the Connector Configuration popup, as shown in the following image:
You can uninstall a connector by clicking the Uninstall Connector icon. To uninstall a connector, you must be assigned a role that has a minimum ofDeleteaccess to theConnectorsmodule.
From version 6.4.1 onwards, you can configure connectors for the current FortiSOAR node, an agent, which is used to remotely run actions, or both. For more information on agents and how to run remote actions using agents, see the Segmented Network support in FortiSOAR chapter in the "Administration Guide." You can configure on the current node (Self) or on a remote Agent node (Agent) by clicking the Self, which is the default, or Agent buttons besidesTarget. You can configure multiple configurations for a connector on both the current node and the agent node.
To configure connector on the "Self" node, click Self, which is the default, if you are configuring the connector for the first time or if you want to add a new configuration, then click Add new configuration from the Select Configuration drop-down list and then add the name of the configuration and specify the configuration parameters. If you want to update an existing configuration, then select the configuration from the Select Configuration drop-down list and update the configuration parameters. If there is only one configuration, then that configuration will be selected automatically. To configure and execute connector actions on the "Agent" node, click Agent, and from the Select Agent drop-down list select the agent on which you want to run the connector actions. If there is only one agent installed, then that agent will be selected automatically. If you are configuring the connector for the first time or if you want to add a new configuration, then click Add new configuration from the Select Configuration drop-down list and then add the name of the configuration and specify the configuration parameters. If you want to update an existing configuration, then select the configuration from the Select Configuration drop-down list and update the configuration parameters. If there is only one configuration, then that configuration will be selected automatically.
You can also define the ownership of connector configurations by setting the visibility of a connector's configuration to 'Private'. For more information, see the Defining the ownership of a connector's configuration section.
Note: You can add multiple configurations for your connector if you have more than one instance of your third-party server in your environment. You must, therefore, add a uniqueNamefor each configuration in the Configuration Name field.
If you have previous versions of a connector and you are configuring a newer version of that connector, with the same configuration parameters, then FortiSOAR fetches the configuration and input parameters of the latest available version of that connector. For example, if you have 1.0.0 and 2.0.0 versions of the Database connector and you are configuring the 2.0.0 version of the Database connector, then while configuring the 2.0.0 version, FortiSOAR will fetch the configuration and input parameters from the 1.0.0 version of the Database connector. You can review the configuration and input parameters, and then decide to change them or leave them unchanged.
You can activate or deactivate a configured connector by clicking on the Activate Connector or Deactivate Connector Link.
You can also check the Mark As Default Configuration option to make the selected configuration, the default configuration of this connector, on the particular FortiSOAR instance. This connector will point to this configuration by default.
Important: In the case of the SMTP connector, you must ensure that this option is selected for the configuration that is to be used for sending system notifications.
Thepasswordtype fields in FortiSOAR include encryption and decryption. Passwords are encrypted before saving them into the database and decrypted when they are used in actions. In case of an upgrade, connectors that are already installed will work with stored passwords. If your administrator has configured an external vault to securely store your organization's sensitive data and credentials, then you can use the Dynamic Values dialog to enter the credentials for your connector as shown in the following image: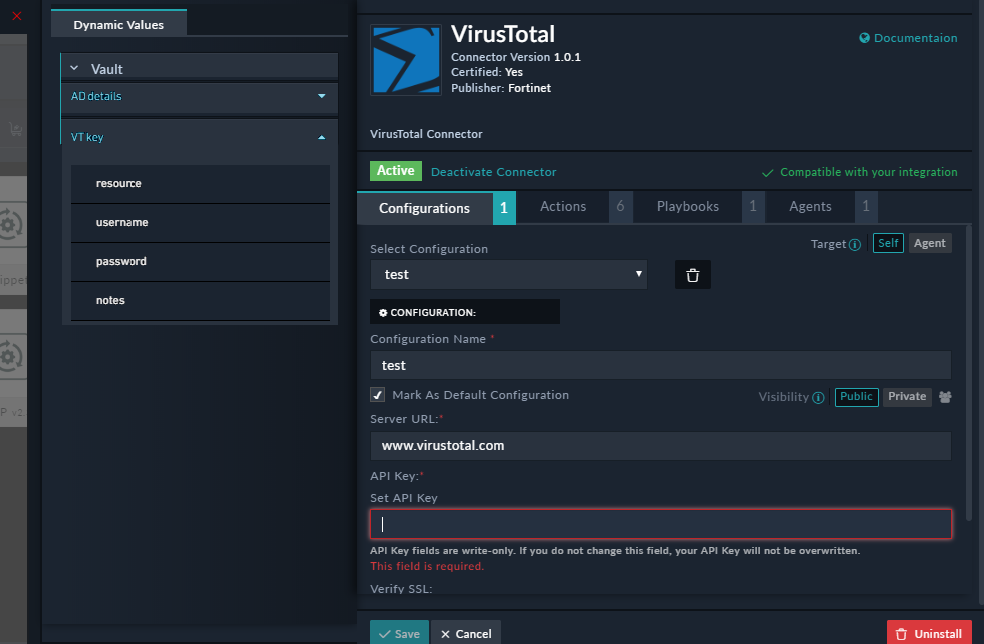
For information on Dynamic Values, see the Dynamic Values chapter in the "Playbooks Guide." For information on Password Vault, see the Security Management chapter in the "Administration Guide."
Connectors also include a Verify SSL field, that specifies whether the SSL certificate for the server is to be verified or not. By default, this option is set asTrue. For more information, see How the connector framework verifies the server certificate when it's self-signed.
To view the documentation associated with a connector, click the Documentation link on the top-right corner of the connector configuration pane. - To save your configuration, click Save.
To view the list of actions that can be performed by the connector, click the Actions tab. On the Actions tab, you can also restrict specific connector actions to specific roles, i.e., users with only those roles would be able to perform that action. For more information, see the Restricting specific connector actions to specific roles section,
To view the playbook file that is bundled with the connector, click the Playbooks tab.
To view the list of agents on which the connector is installed, click the Agents tab. For more information on agents and how to run remote actions using agents, see the Segmented Network support in FortiSOAR chapter in the "Administration Guide." - (Optional) You can optionally perform a Health Check by clicking the Refresh icon that is present in the
Health Checkbar. The Health Check checks if the configuration parameters you have specified are correct and if connectivity can be established to the specified server, endpoint or API.
If all the details are correct and the connectivity to the server can be established, then on the Connectors page, Available is displayed in the health check dialog.
If any or all the details are incorrect or if the connectivity to the server cannot be established then on the Connectors page, Disconnected is displayed in the health check dialog.
Points to be considered for connector configurations while upgrading to a newer version of the connector
If you are upgrading a connector to a newer version, you must be assigned a role that has a minimum of Upgrade access to the Connectors module. For example, if you are upgrading the Symantec Security Analytics connector version from v1.0.0 to v2.0.0, then keep a note of the following points:
- Existing (older) connector configuration fields retain their value, i.e., the value from the older configuration will be displayed in the configuration pane of the newer connector version. New connector configuration field(s), if any, will be added to the connector configuration pane.
- If the newly added configuration field is mandatory, and FortiSOAR has specified its default value (in the
info.jsonfile of the connector), then the configuration pane of the newer version of the connector will contain the default value for this configuration field. For more information on the connector framework and theinfo.jsonfile, see the Building your own connector chapter.
For information on common connector framework issues, see the Common connector framework errors section in the Debugging common playbook and connector issues article present in the Fortinet Knowledge Base. - If the newly added configuration field is mandatory, and FortiSOAR has not specified its default value (in the
info.jsonfile of the connector), then the configuration pane of the newer version of the connector will contain ablankvalue for this configuration field. If you also do not specify a value for this mandatory configuration field, then the connector configuration pane will display Partially Configured, and an error will also be displayed in the Playbook Execution Log. For more information on the Playbook Execution Log, see the Debugging and Optimizing Playbooks chapter in the "Playbooks Guide." - If the field type of a mandatory configuration field is changed from the older version to the newer version, for example from a text field to a drop-down list, then the value of that field will not be retrieved from the older version. However, if FortiSOAR has specified its default value (in the
info.jsonfile of the connector), then that value will be displayed for this configuration field the configuration pane of the newer version of the connector. If however FortiSOAR has not defined the default value and you also do not specify a value for this mandatory configuration field, then the configuration pane of the newer version of the connector will contain ablankvalue for this configuration field, and the connector configuration pane will display Partially Configured. An error will also be displayed in the Playbook Execution Log. For more information on the Playbook Execution Log, see the Debugging and Optimizing Playbooks chapter in the "Playbooks Guide." - If the newly added configuration field is optional, and FortiSOAR has specified its default value (in the
info.jsonfile of the connector), then the configuration pane of the newer version of the connector will contain the default value for this configuration field. If there is no default value is set, then its value is set asblank.
How the connector framework verifies the server certificate when its self-signed
The connector framework is explained in the Building your own connector chapter.
All connector calls are made by the python requests library reading the certificate from /opt/cyops-integrations/.env/lib/python3.6/site-packages/certifi/cacert.pem. Therefore, for any connector, when you set verify_ssl to true, and it's a self-signed cert, then the cacert must be appended to this file. If it's a chain of trust, then you must add the entire chain in the pem format. You must also ensure that the server address added in the connector configuration matches the CN in the certificate.
|
|
A |
If you are using the HTTPS proxy for external connections, then you must ensure that proxy certificate is added here also, if the Verify SSL is set to true in the connector configuration.
Some commands that you can use to get the pem certificate chain:
# openssl s_client -connect {HOSTNAME}:{PORT} -showcerts
OR
If you have the certificate already in a .crt, .cer, .der format, then you need to convert to the pem format:
# openssl x509 -inform der -in certificate.cer -out certificate.pem
Role-based Access Control for connector actions
From version 7.0.0 onwards, FortiSOAR introduces Role-based Access Control (RBAC) for connectors, i.e., 'Connector Administrators', i.e., users with Connector Read and Update permissions and Security Read permission can allow access to only certain teams or users, based on roles, to perform certain connector actions. For example, the administrator might want to allow a "Block IP" action to be performed by only certain teams or users in the organization.
The ownership of connector configurations can also be defined, by marking the connector configuration as 'Private'; thereby, controlling who can view and execute that particular connector configuration.
|
|
You must configure access control for connector configurations and actions separately for the tenant nodes. Access control for connector configurations and actions cannot be configured from the master. |
Restricting specific connector actions to specific roles
By default, all users and roles with appropriate permissions, as defined in the Connector Store section, can view and execute all the connector actions, however connector administrators can restrict specific actions to specific roles as follows:
- Log on to FortiSOAR.
- On the left navigation pane, click Automation > Connectors > Installed.
- Select the connector whose connector actions you want to restrict to certain users, based on the roles or specific set of roles that have been assigned to open the
Connector Configurationspage. - Click the Actions tab:

- In the row that contains the action that you want to restrict, click the Assign Role(s) to Action icon to display the
Assign Role(s) to Actiondialog:
- Select the roles that would be able to perform this action and then click OK.
Once a particular action is assigned to specific roles, you can see a Roles Assigned bar in that action's role, which specifies the roles that the users should be assigned to perform that connector action: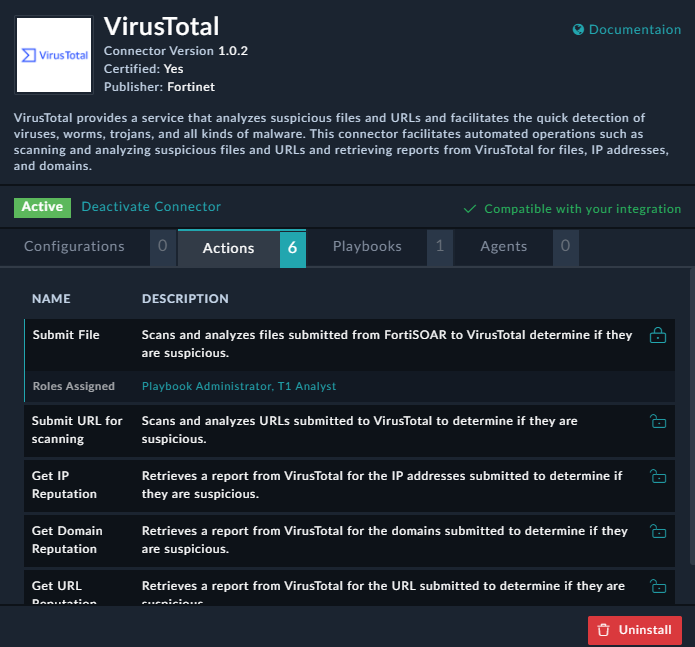
Therefore, in this case if there are users who are not assigned the 'Playbook Administrator' or 'T1 Analyst' role, and if they try to invoke this action directly on a record, they will be unable to run that action as the action will be disabled:
Notes:
-
When a connector is upgraded to a higher version, if there are any roles defined for any connector action in the previous version of the connector, those roles are carried forwarded to the upgraded version.
-
The Playbook designer displays all the connector actions irrespective of the roles of the user creating the playbook. Also, while executing a connector action from playbook, FortiSOAR does not perform any role check. You can create a playbook as a 'Private' playbook to restrict access. For more information, see the "Playbooks Guide."
-
When a connector action is being executed directly on a record, the roles of the logged in user will be matched against the roles permitted for the action.
Defining the ownership of a connector's configuration
The ownership of connector configurations can also be defined by setting the visibility of a connector's configuration to 'Private'. By default, the connector configuration is set to 'Public', i.e., it can be viewed by anyone who has appropriate permissions, as defined in the Connector Store section. By setting a connector's configuration to 'Private', you are assigning ownership of that connector configuration to particular teams and thereby only allowing the assigned team owners the right to view and execute that particular connector configuration.
|
|
You must configure access control for connector configurations and actions separately for the tenant nodes. Access control for connector configurations and actions cannot be configured from the master. |
To set the visibility of connector configurations to 'Private' so as to restrict the teams who can view and execute that particular connector configuration, do the following:
- Log on to FortiSOAR.
- On the left navigation pane, click Automation > Connectors > Installed.
- Select the connector whose configuration you want to set to 'Private', i.e., whose configuration you want to restrict to certain teams. By default, connector configurations are set to 'Public'.
- To mark a connector configuration as 'Private', click the Private button beside the Visibility parameter:

- To assign the connector configuration to a particular team, once you have clicked Private, click the Teams (
 ) icon to display the
 Assign Ownersdialog. - In the
Assign Ownersdialog, you will see that the logged in user's team are assigned ownership, by default. Click the Red Cross beside the teams whose ownership you want to remove, and select the teams that you want to configure as owners for this connector configuration from the Owners drop-down list and clicking Assign: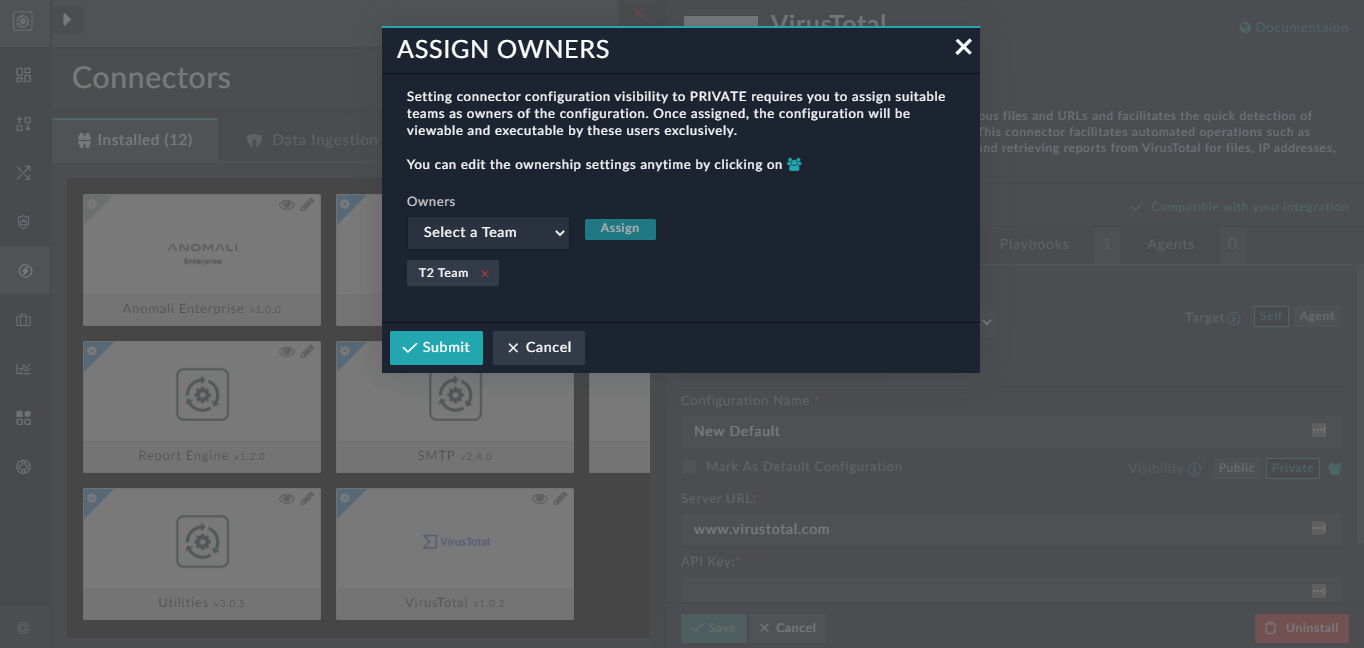
- Click Submit to assign ownership of this connector configuration.
Now, in this case if there are users who are not part of the 'T2 ' team, and if they want to run the actions of the VirusTotal connector on a record for example, they will observe that the "New Default" configuration will not be visible and only the "Default" configuration is visible:
Therefore, users can see only those connector configurations to which they have access, as is the case with the above example, the 'New Default' configuration is visible only to users that belong to the 'T2' team. However, users belonging to teams other than 'T2' can execute playbooks containing a connector step with the 'New Default' configuration that has been created by 'T2' users.