About the connector
ArcSight Enterprise Security Manager (ESM) is a threat detection, analysis, triage, and compliance management SIEM platform.
This document provides information about the ArcSight connector, which facilitates automated interactions, with an ArcSight ESM server using FortiSOAR™ playbooks. Add the ArcSight connector as a step in FortiSOAR™ playbooks and perform automated operations, such as annotating events, running a report based on a report ID, and uploading an ArcSight report file as an attachment in FortiSOAR™.
Version information
Connector Version: 1.3.0
Compatibility with FortiSOAR™ Versions: 4.9.0.0-708 and later
Compatibility with ArcSight Versions: 6.9 and later
Release Notes for version 1.3.0
Following enhancements have been made to the HP ArcSight Connector in version 1.3 .0:
- Enhanced the FortiSOAR™ forwarder to ensure guaranteed delivery of messages.
- Updated the included playbooks.
- Removed the timeout parameter for the Run Report with Default Parameters and Run Report operations.
Installing the connector
For the procedure to install a connector, click here.
Prerequisites to configuring the connector
- You must have the URL of ArcSight REST endpoint and credentials to access the URL.
- For forwarding event details from the ArcSight ESM to FortiSOAR™, you must configure the forwarding script to run with Python 3 as a local script or as a Flex CounterACT connector. (Configuring the FortiSOAR™ forwarder).
Configuring the FortiSOAR™ forwarder
The FortiSOAR™ forwarder script is built to forward events from ArcSight into FortiSOAR™ for remediation, escalation, case management, and orchestrated response. You can then track correlated events according to the information from ArcSight and enrich the information with additional data, such as affected asset context and reports. The FortiSOAR™ forwarder script is bundled in the arcsight.tgz connector bundle in the scripts directory (arcsight.tgz/scripts). You can configure the script to either run as a command on the ArcSight ESM machine or as a Flex CounterACT connector on a separate machine. We recommend that you configure the FortiSOAR™ forwarder script as a Flex CounterACT connector.
The following sections specify the process of configuring the FortiSOAR™ forwarder.
Configuring the FortiSOAR™ forwarder as a script
Log on to the FortiSOAR™ UI and create an appliance with appropriate permissions, based on the actions you want to perform in the FortiSOAR™ playbook with the forwarded event data, for example, create an alert. Store the public and private keys, which you will require in step 5 of the procedure.
Perform the following steps on the host where you want to install the script:
- Install openssl-devel.
- Install Python.
If you are using Python 2, ensure that the version is Python 2.7 or higher.
Install requests python package: pip install requests.
- From the
arcsight.tgz connector bundle, copy the scripts directory to the host machine. The scripts directory contains the following files and folders:
+events
+logs
+portalocker
++__about.py__
++__init__.py__
++constants.py
++exceptions.py
++portalocker.py
++utils.py
+config.ini
+cyops_forwarder.py
+cyops_parser.py
- Update the
host_uri parameter in the config.ini file to point to your FortiSOAR™ instance. Edit the following lines in config.ini:
host_uri = '<CyOPs IP Address>'
- In the same
scripts folder, create the public_key.txt and the private_key.txt files and add the public and private keys that you have stored previously.
- Ensure that the machine can connect to the has connectivity to the FortiSOAR™ server and can send requests to the FortiSOAR™ instance on port 443.
- To test the connectivity of the script, in FortiSOAR™ add a playbook with an Action trigger containing the same URL as in specified in the
host_uri in step 4.
Run the script as follows: <path to python> cyops_forwarder.py -type event -eId "12345"
The script forwards the data to FortiSOAR™ in a JSON format with the arg name as the key and value as the value. The playbook should get triggered with the payload {“-type”: “event”, “-eId”: “12345”}.

Configuring the FortiSOAR™ forwarder as a Flex CounterACT connector
-
On the Windows or Linux machine where you have configured the forwarder script, copy the scripts/cyops.counteract.properties file from the arcsight.tgz connector bundle. See the Configuring the FortiSOAR™ forwarder as a script section for steps on configuring the forwarder script.
The scripts/cyops.counteract.properties file has the following contents:
command[0].name=cyopsforwarder
command[0].displayname=Forward data to CyOPs
command[0].parameter.count=1
command[0].parameter[0].name=eventId
command [0].parameter[0].displayname=Event Id
command[0].action=C:\\Python36-32\\python C:\\cybersponse\\cyops_forwarder.py -eid${eventId}
-
Edit command[0].action to point to the python executable and the forwarder script location on your machine.
The above example forwards only the eventId to FortiSOAR™.
You can extend the parameter list to add all event data that you would like to forward. Ensure that you update command[0].parameter.count and the corresponding parameters data accordingly.
The script forwards the data to FortiSOAR™ in a JSON format with the arg name as the key and value as the value.
For example, if the eventId input to the script in the above sample is ‘12345’, the script sends data to FortiSOAR™ as {“-eid”: “12345”}.
-
The Flex CounterACT connector is included in the SmartConnectors package. Install the Flex CounterACT connector on the machine.
-
Copy the cyops.counteract.properties file to {ARCSIGHT_HOME} /user/agent/flexagent.
-
The Flex CounterACT connector is currently marked as INTERNAL so to install it you might need to execute an agent setup using the runagentsetup.bat script on Windows or the runagentsetup.sh script on Linux. The scripts are located in your $ARCSIGHT_HOME/current/bin directory.
If the ArcSight Manager uses a self-signed certificate, you might need to import the certificate of the ArcSight server to the trusted certificates of the connector's JRE. See the ArcSight ESM documentation for setting up the communication to the manager.
Note: The ESM server name that you specified during installing the connector must match the server name in the server's certificate.
-
Select the Flex CounterACT connector from the list of available connectors.
-
Enter cyops as the name of the Configuration file. The extension is added automatically.
-
Start the connector: {ARCSIGHT_HOME} /bin/arcsight agents.
-
To verify that the connector has been set up correctly, select the connector in the Navigator panel of the HPE Security ArcSight Console. Right-click and select the Send Command. Under CounterACT, select the command you want to run.
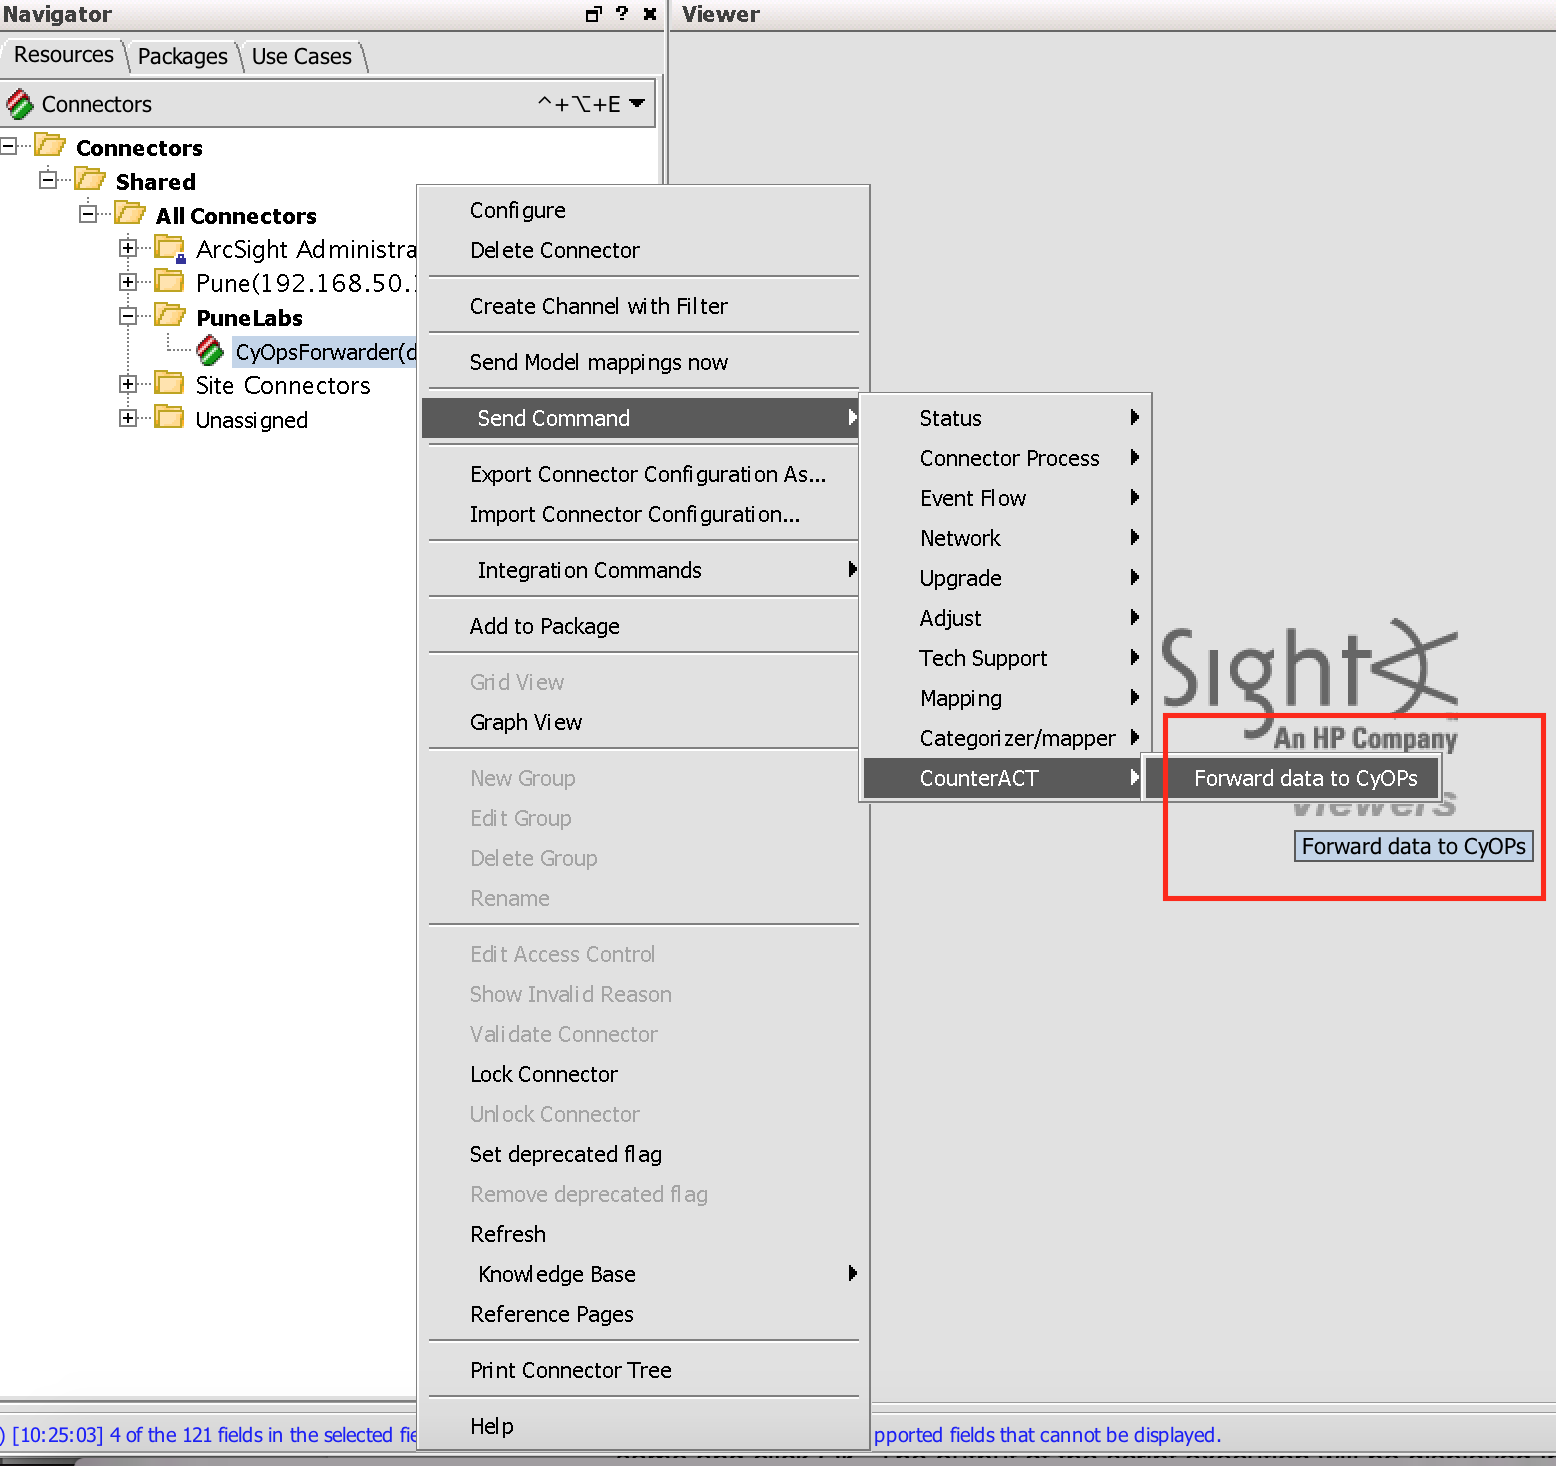
-
A window appears, which prompts you to enter the required parameters. Enter test values for the same and click OK.
The output of the script execution is displayed in the command result. You can also check the connector script logs from the cyops_forwarder.log log file located in the logs directory. The logs directory is part of the scripts directory and is parallel to the cyops_forwarder.py script.
Using the FortiSOAR™ ArcSight integration
The FortiSOAR™ ArcSight integration leverages a wrapper that takes the inbound syslog data from ArcSight using the Event Action feature. Once you have appropriately configured the wrapper, you can set an Event Action on a Rule such that at the time of the Playbook trigger, the wrapper is sent the Event data, which is then signed with an HMAC signature and sent to FortiSOAR™.
Create an ArcSight Rule for the set of events you need to forward to FortiSOAR™. In the Event Actions for the Rule, add Execute Connector Command or Execute Command based on whether you have configured the forwarder as a connector or as a local script.

Once the command hits the FortiSOAR™ API, you can trigger a Playbook. By default, the forwarder is configured to send data to the https://<CyOps IP>/api/triggers/1/ArcSight URL. Therefore, you must add an API trigger to the playbook with the same URL. Or, you can also edit the forwarder to send data to another desired API trigger. The playbook then leverages the ArcSight connector functions to perform the desired operations on the received Event data.
Working of Guaranteed delivery of messages
- If the forwarder script does not receive a success response from the FortiSOAR™ server, i.e., the task_id is not returned, the script will, by default, try to send the data once more to FortiSOAR™ after a sleep time of 30 seconds. This is done so as to handle intermittent network glitches.
- If the forwarder script still does not receive a success response, then the event payload is written to a text file named
pending_events-<current data>.txt in the events directory.
- If the forwarder script successfully sends any subsequent events then that means the connection to FortiSOAR™ has been restored. The forwarder script reads all pending events from the
pending_eventsfiles that are present in the events directory and tries to send the pending events in bulk. The payload for bulk send is {‘bulkevents’: [<list of event objects>]}. Once all the events are successfully sent, the forwarder script deletes the pending_events files that are present in the events directory.
- The playbooks on FortiSOAR™ should be capable of receiving both single event or list of events. The included playbook
2.1 Process ArcSight Event provides a sample for your reference.
- The forwarder purges events older than 5 days that could not be sent. You can configure the number of days after which the forwarder purges event using the
days_event_retained parameter in the config.ini file.
- The default retry count and sleep time mentioned in the first step is configurable, but it is recommended not to increase these parameters to a high value, since if there is a flood of events during a FortiSOAR™ downtime, those many forwarder scripts would be running for a long time as the forwarder scripts keep on retrying, which might cause a bottleneck on the forwarder server.
Configurable parameters contained in the config.ini file
Following is a list of parameters, along with its default values, that you can configure using the config.inifile:
retry_count = 2
retry_sleep = 30
host_uri = dev.cyops.cyber
trigger = /api/triggers/1/ArcSight
days_event_retained = 5
default_algorithm = sha256
Configuring the connector
For the procedure to configure a connector, click here.
Configuration parameters
In FortiSOAR™, on the Connectors page, select the ArcSight connector and click Configure to configure the following parameters:
| Parameter |
Description |
| ArcSight ESM IP/FQDN |
IP Address or FQDN of the ArcSight ESM server. |
| ArcSight ESM Port |
REST API port of the ArcSight ESM server.
Defaults to 8443. |
| Username |
Username to access the endpoint. |
| Password |
Password to access the endpoint. |
Actions supported by the connector
The following are specific automated operations can be included in playbooks:
- Annotate Event: Updates an ArcSight Event Stage, assign it to a user and add a comment.
- Get Event Information: Retrieves event information from ArcSight Event.
- Run Report with Default Parameters: Runs a report based on an ID or URI and default inputs.
- Run Report: Runs a report based on an ID and custom user inputs.
- Delete Archived Report: Deletes an archived report with the specified Resource ID.
- Create Case: Creates a case in ArcSight ESM.
- Update Case: Updates an existing case in ArcSight ESM.
- Get Case Information: Gets the information from ArcSight ESM, based on the specified case ID.
- Add Events in Case: Adds the specified events to an existing case in ArcSight ESM, based on the specified case ID.
- Delete Events in Case: Deletes the specified events to an existing case in ArcSight ESM, based on the specified case ID.
- Run Search: Searches ArcSight ESM records based on a specified query.
- Upload Report file as an attachment to CyOps: Downloads a report based on an ID from ArcSight ESM and then upload that report as an attachment to FortiSOAR™.
operation: Annotate Event
You can annotate ArcSight Events using the ArcSight Console to update the Stage and Assignee of the event and to add comments to the event.


You can also perform similar operations using the Annotate Event function in FortiSOAR™ playbooks.
Input parameters
| Parameter |
Description |
| Event ID |
The ID of the ArcSight Event that you want to annotate. |
| Stage |
The Stage to be set for the Event. You can choose from one of the following values:
Queued/Initial/Monitoring/Rule Created/Follow-Up/Final/Flagged as Similar/Closed |
| User |
An existing ArcSight user to whom you want to assign the event. For example, admin. |
| Comment |
The comment that you want to add to the event. |
Output
The JSON output returns a Success message if the annotation is successful or an Error message containing the reason for failure if the annotation is not successful.
Following image displays a sample output:

operation: Get Event Information
Input parameters
| Parameter |
Description |
| Event ID |
The ID of the ArcSight Event for which you want to retrieve the events. |
| Replace Null Values with Empty String? |
If an event field is not set, the ArcSight APIs return the following values. Use this option to replace these values with an empty string. Note that, by default, the Replace Null Values with Empty String?field is set to True.
Field Typeinteger: Returned value in place of NULL: -2147483648 (Integer.MIN_VALUE)
Field Typelong: Returned value in place of NULL: -9223372036854775808 (Long.MIN_VALUE)
Field Typedouble: Returned value in place of NULL: 5e-324 (Double.MIN_VALUE |
| IP Address Keys to Parse |
ArcSight API returns the IP address fields in decimal format. Provide a comma-separated list of field names you want to convert from decimal to IP address format.
Defaults to address. |
| MAC Address Keys to Parse |
ArcSight API returns the MAC address fields in decimal format. Provide a comma-separated list of field names you want to convert from decimal to MAC address format.
Defaults to macAddress,translatedAddress. |
Output
The JSON output contains the details of the event, based on the specified event ID.
Following image displays a sample output:

operation: Run Report with Default Parameters
You can get the ID for a report (Resource ID) from the ArcSight Console, as shown in the following image:

You can get the URI for a report from the ArcSight Console. To get the URI, you must add the report name to the parent resource, as shown in the following image:

Input parameters
| Parameter |
Description |
| Report Id |
ID of the ArcSight report that you want to run. |
| Report URI |
URI of the ArcSight report that you want to run. |
Note: You must specify only one of the parameters as inputs. If both are specified, then Report URI is given preference.
Output
The JSON output returns the Download ID of the report. You can use this Download ID to download the report subsequently when the report is ready. You can use the Upload Report file as attachment to CyOps operation to download the report and add it as an attachment to FortiSOAR™.
Following image displays a sample output:

operation: Run Report
Input parameters
| Parameter |
Description |
| Report Id |
ID of the ArcSight report that you want to run. |
| Input parameters |
Input parameters in the JSON format.
For example, {'StartTime': '$Now - 3h', 'Report Format': '0'}.
The keys are the same as seen on the ArcSight console. Note that the values for the drop-down fields are their integer positions. For example, Report Format should be specified as 0, 1,2 etc, and not as pdf, csv,htmletc. |
Note: You must specify only one input either the Report ID or the Report URI for this operation.
Output
The JSON output returns the Download ID of the report. You can use this Download ID to download the report subsequently when the report is ready. You can use the Upload Report file as attachment to CyOps operation to download the report and add it as an attachment to FortiSOAR™.
Following image displays a sample output:

operation: Delete Archived Report
Input parameters
| Parameter |
Description |
| Archived Report Id |
ID of the archived ArcSight report that you want to delete. |
Output
The JSON output returns a Success message if the events are deleted from the specified case ID, or an Error message containing the reason for failure.
Following image displays a sample output:

operation: Create Case
Input parameters
Note: The Parent Id and Case Name parameters are mandatory. All the other fields are optional and if they are not specified then their default value is considered while creating a new case in ArcSight ESM.
| Parameter |
Description |
| Parent Id |
Parent ID of the case you want to create. |
| Case Name |
Name of the case that you want to create. |
| Stage |
Stage that you want to assign to the created case.
Examples of stages are Queued, Initial, and Follow-up. |
| Frequency |
Frequency that you want to assign to the created case.
Example of Frequency is Ten_To_Fifteen. |
| Operational Impact |
Operational Impact that you want to assign to the created case.
Examples of Operational Impact are No_Impact, No_Immediate_Impact, Low_Priority_Impact, High_Priority_Impact, and Immediate_Impact. |
| Security Classification |
Security Classification that you want to assign to the created case.
Examples of Security Classification are None, Insignificant, Marginal, Critical, and Catastrophic. |
| Consequence Severity |
Consequence Severity that you want to assign to the created case.
Examples of Consequence Severity are Unclassified, Confidential, Secret, and Top_Secret. |
| Notification Groups |
Groups that should be notified when the created cases is updated. |
| Alias (Display Name) |
Name that is displayed on ArcSight console instead of the case name. |
| Ticket Type |
Type of the case, such as, Internal, Client, and Incident. |
| External ID |
Unique ID of the case. |
| Description |
Description of the case. |
| Deprecated |
Whether or not the created case is deprecated. |
| Additional attributes in json format |
Use this field to set values that are not displayed in FortiSOAR™. |
| Estimated Restore Date Time |
Set the Date and time restoring the created case, if required. |
Output
The JSON output contains the case ID and the details of the created case.
Following image displays a sample output:

operation: Update Case
Input parameters
Note: Only the Case Id parameter is mandatory. All the other fields are optional and you enter the values of those fields that you want to update.
| Parameter |
Description |
| case Id |
ID of the case you want to update. |
| Case Name |
Updated case name, if you want to update the name of an existing case. |
| Stage |
Updated stage, if you want to update the stage of an existing case. |
| Frequency |
Updated frequency, if you want to update the frequency of an existing case. |
| Operational Impact |
Updated operational impact, if you want to update the operational impact of an existing case. |
| Security Classification |
Updated security classification, if you want to update the security classification of an existing case. |
| Consequence Severity |
Updated consequence severity, if you want to update the consequence severity of an existing case. |
| Notification Groups |
Groups that should be notified when the case is updated |
| Alias (Display Name) |
Update the Alias name which is the name that is displayed on ArcSight console instead of the case name. |
| Ticket Type |
Type of the case or ticket that is updated, such as, Internal, Client, and Incident. |
| External ID |
Unique ID of the case. |
| Description |
Description of the case. |
| Deprecated |
Whether or not the updated case is deprecated. |
| Additional attributes in json format |
Use this field to set values that are not displayed in FortiSOAR™. |
| Estimated Restore Date Time |
Update the Date and time restoring the case, if required. |
Output
The JSON output contains the details of the updated case.
Following image displays a sample output:

operation: Get Case Information
Input parameters
| Parameter |
Description |
| case Id |
ID of the case for which you want to retrieve the information. |
Output
The JSON output contains the details of the case, based on the specified case ID.
Following image displays a sample output:

operation: Add Events in Case
Input parameters
| Parameter |
Description |
| case Id |
ID of the case to which you want to add events. |
| Events Ids |
IDs of the events that you want to add to the specified case.
The Event IDs are provided in a list form. |
Output
The JSON output returns a Success message if the events are added to the specified case ID, or an Error message containing the reason for failure.
Following image displays a sample output:

operation: Delete Events in Case
Input parameters
| Parameter |
Description |
| case Id |
ID of the case to which you want to add events. |
| Events Ids |
IDs of the events that you want to delete to the specified case.
The Event IDs are provided in a list form. |
Output
The JSON output returns a Success message if the events are deleted from the specified case ID, or an Error message containing the reason for failure.
Following image displays a sample output:

operation: Run Search
Input parameters
| Parameter |
Description |
| Query |
Query based on which you want to search ArcSight. |
| Start Position |
Position from where you want to start the search. |
| Page Size |
Number of result records that you want to display on one page. |
Output
The JSON output contains the search results based on the specified query.
Following image displays a sample output:

operation: Upload Report file as attachment to CyOps
Input parameters
| Parameter |
Description |
| Report Download Id |
Download ID of the ArcSight report that you want to upload as an attachment in FortiSOAR™. |
| Name of the file when added as an attachment in Cybersponse |
Name of the file when it is added as an attachment in FortiSOAR™.
If you do not specify any name then the file by default is named as 'ArcSight Report '. |
Output
The JSON output contains the details of the attachment in FortiSOAR™.
Following image displays a sample output:

Included playbooks
The Sample-ArcSight-1.3.0 playbook collection comes bundled with the HP ArcSight connector. This playbook contains steps using which you can perform all supported actions. You can see the bundled playbooks in the Automation > Playbooks section in FortiSOAR™ after importing the HP ArcSight connector.
- Run ArcSight Report
- Process ArcSight Event
- Create Case
- Resolve Case
- Run Search
These sample playbooks require some custom fields to be defined in the Alerts module. A custom module named ArcSight Alerts containing these fields is shipped with the connector at playbooks/ArcSightAlertsModule.json. You can import this module to test the sample playbooks.
Note: If you are planning to use any of the sample playbooks in your environment, ensure that you clone those playbooks and move them to a different collection, since the sample playbook collection gets deleted during connector upgrade and delete.
Troubleshooting
Forwarder script is not able to send data to the FortiSOAR™ instance with authentication failure
This generally occurs when the system date-time on the host on which the forwarder is running does not match closely enough to the FortiSOAR™ system time.
Resolution:
You can first check the system clock on the host and see how closely it matches the FortiSOAR™ clock. You can then solve this issue by installing or updating the NTP on the host if it the host does not have an NPT server. Using the same NTP server for both the host and the FortiSOAR™ system ensures that the time always matches.
This error will most likely not occur once the NTP server is the same and the clocks are in sync.
Connection refusal while requesting to run the wrapper
This generally occurs in the case of self-signed SSL certificates. If you are using self-signed certificates for testing or staging, keep in mind this problem will not occur in production and you might need to switch the certificates on or off.
Resolution:
Ensure that the SSL certificates are trusted or that SSL checking is turned off in the wrapper script. This is not advised for production instances.
Playbook fails after the ingestion is triggered
There are many reasons for a playbook failure, for example, if a required field is null in the target module record, or there are problems with the Playbook Appliance keys.
Resolution:
Investigate the reason for failure using the Running Playbooks tab in the Playbook Administration page. Review the step in which the failure is being generated and the result of the step, which should contain the trace of the error. Once you have identified the error and if you cannot troubleshoot the error, contact CyberSponse support for further assistance.


