


Fresh Installation
Pre-Installation Checklist
Before you begin, check the following:
-
Ensure that your system can connect to the network. You will be asked to provide a DNS Server and a host that can be resolved by the DNS Server and responds to ping. The host can either be an internal host or a public domain host like google.com.
- Deployment type for Supervisor, Worker, and Collector – Enterprise or Service Provider. The Service Provider deployment provides multi-tenancy.
- Whether FIPS should be enabled
- Install type:
- All-in-one with FortiSIEM Manager
Note: FortiSIEM Manager installation has slight differences from the Supervisor/Worker/Collector installation. - All-in-one with Supervisor only, or
- Cluster with Supervisor and Workers
- All-in-one with FortiSIEM Manager
- Storage type for Supervisor, Worker, and/or Collector
- Online – Local or NFS or ClickHouse or Elasticsearch
- Archive – NFS or HDFS
- Before beginning FortiSIEM deployment, you must configure external storage, excluding FortiSIEM Manager.
- Determine hardware requirements:
| Node | vCPU | RAM | Local Disks |
|
Manager |
Minimum – 16 |
Minimum
Recommended
|
OS – 25GB OPT – 100GB CMDB – 60GB SVN – 60GB |
| Supervisor (All in one) | Minimum – 12 Recommended - 32 |
Minimum
Recommended
|
OS – 25GB OPT – 100GB CMDB – 60GB SVN – 60GB Local Event database – based on need |
| Supervisor (Cluster) | Minimum – 12 Recommended - 32 |
Minimum
Recommended
|
OS – 25GB OPT – 100GB CMDB – 60GB SVN – 60GB
|
| Workers | Minimum – 8 Recommended - 16 |
Minimum – 16GB Recommended – 24GB |
OS – 25GB OPT – 100GB |
| Collector | Minimum – 4 Recommended – 8 ( based on load) |
Minimum – 4GB Recommended – 8GB |
OS – 25GB OPT – 100GB |
Note: compared to FortiSIEM 5.x, you need one more disk (OPT) which provides a cache for FortiSIEM.
For OPT - 100GB, the 100GB disk for /opt will consist of a single disk that will split into 2 partitions, /OPT and swap. The partitions will be created and managed by FortiSIEM when configFSM.sh runs.
Before proceeding to FortiSIEM deployment, you must configure the external storage.
- For NFS deployment, see FortiSIEM - NFS Storage Guide here.
- For Elasticsearch deployment, see FortiSIEM - Elasticsearch Storage Guide here.
All-in-one Installation
This is the simplest installation with a single Virtual Appliance. If storage is external, then you must configure external storage before proceeding with installation.
- Import FortiSIEM into KVM
- Configure FortiSIEM via GUI
- Upload the FortiSIEM License
- Choose an Event Database
Import FortiSIEM into KVM
- Go to the Fortinet Support website https://support.fortinet.com to download the KVM package
FSM_Full_All_KVM_6.6.0_build1633.zip. See Downloading FortiSIEM Products for more information on downloading products from the support website. - Download the packages for Super/Worker and Collector to the location where you want to install the image. For example:
FSM_Full_All_KVM_6.6.0_build1633.zip. - Unzip the
.zipfile to get theFortiSIEM-6.6.0.1633.qcow2file. - Copy the above unzipped
qcow2file into the storage image location separately for the installation of super, worker, and collector. For example:/var/lib/libvirt/images/super/FortiSIEM-6.6.0.1633.qcow2/var/lib/libvirt/images/worker/FortiSIEM-6.6.0.1633.qcow2/var/lib/libvirt/images/collector/FortiSIEM-6.6.0.1633.qcow2 - Start the KVM Manager for the KVM server by clicking Virtual Machine Manager.

- Click Create a new virtual machine from the Virtual Machine Manager.
- Select Import existing disk image (Architecture defaults to x86_64).
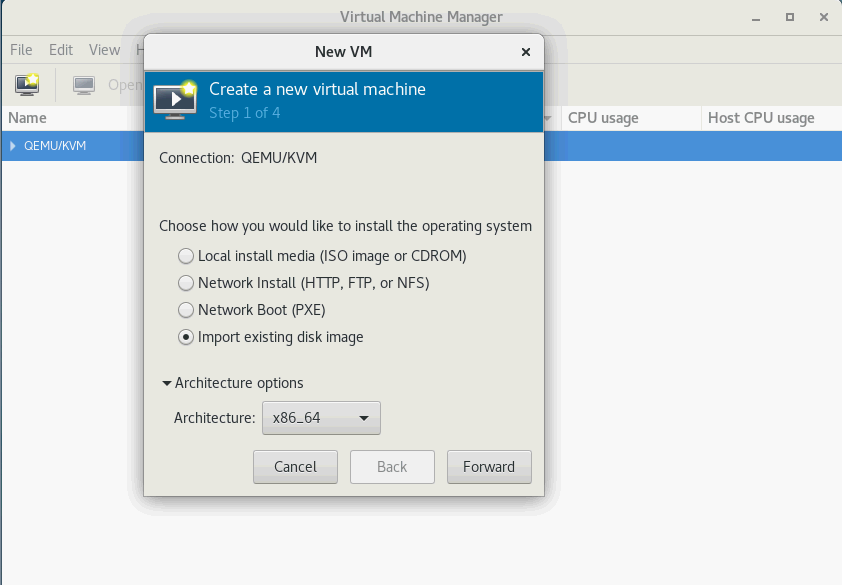
- Click Forward from the above step, and select the OS type as Linux and Verision to CentOS 7.0, then click Forward.
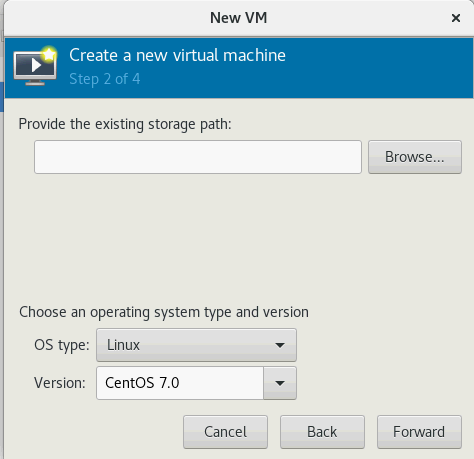
- Click Browse... from the New VM dialog box to find the location for the file (for example,
FortiSIEM-6.6.0.1633.qcow2). Or, you can directly copy the path and theqcow2file name under Provide the existing storage path. Click Forward.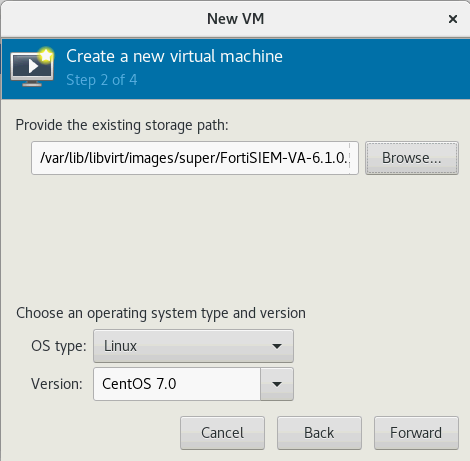
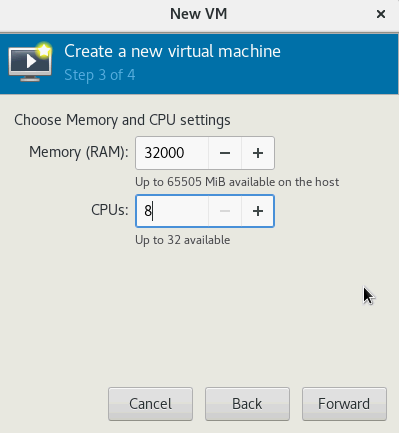
- In the New VM dialog box, change Memory from 1024 to 32000 (32 GB). Change the CPUs from 1 to 8. Click Forward.
- Before clicking Finish, make sure to check that the Network selection is a Bridge, and Customize configuration before install is selected. Then, click Finish.

- Start to make the configuration. This is the place where you change the name from the default name centos 7.0
in the Overview.

In every step in this configuration, you must click Apply to save your changes.
- Click VirtIO Disk 1 (the default disk) and check that the Source path is correct. Click Apply.
- Click Boot Options and make sure that VirtIO Disk 1 is checked. Click Apply.
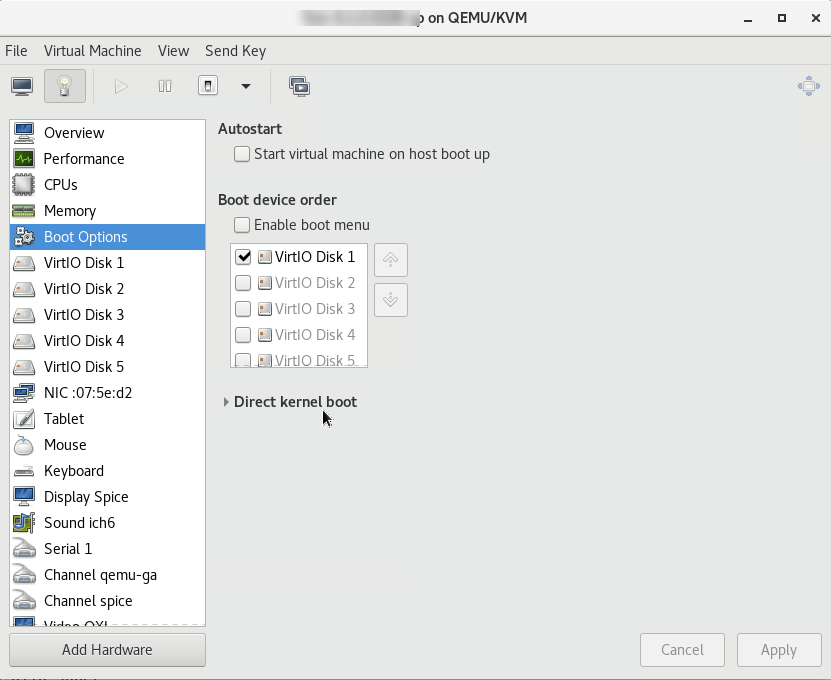
-
Add an extra three disks by clicking Add Hardware. Assign to them the disk image size to 100GB, 60GB, and 60GB respectively with the same Bus type of VirtIO. Click Finish to save the result.
Disk
Size
Disk Name
Hard Disk 2 100GB /opt
For OPT - 100GB, the 100GB disk for /opt will consist of a single disk that will split into 2 partitions, /OPT and swap. The partitions will be created and managed by FortiSIEM when
configFSM.shruns.Hard Disk 3 60GB /cmdb Hard Disk 4 60GB /svn Hard Disk 5 60GB+ /data (see the following note) Note on Hard Disk 5:
-
Add a 5th disk if using local storage in an All In One deployment. Otherwise, a separate NFS share or Elasticsearch cluster must be used for event storage.
- 60GB is the minimum event DB disk size for small deployments, provision significantly more event storage for higher EPS deployments. See the FortiSIEM Sizing Guide for additional information.
- NFS or Elasticsearch event DB storage is mandatory for multi-node cluster deployments.
-
-
Click Begin Installation at the top of the dialog box to start the installation process.

-
At the end of booting, log in with the default login credentials: User:
rootand Password:ProspectHills. -
You will be required to change the password. Remember this password for future use.
At this point, you can continue configuring FortiSIEM by using the GUI.
Configure FortiSIEM via GUI
Follow these steps to configure FortiSIEM by using a simple GUI.
- Log in as user
rootwith the password you set in Step 18 above. - At the command prompt, go to
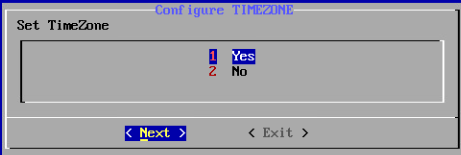
/usr/local/binand enterconfigFSM.sh, for example:# configFSM.sh - In VM console, select 1 Set Timezone and then press Next.
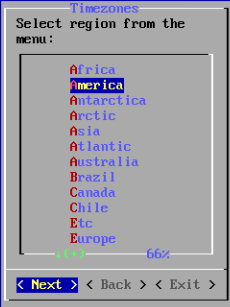
- Select your Region, and press Next.
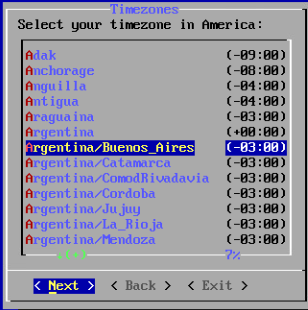
- Select your Country, and press Next.

- Select the Country and City for your timezone, and press Next.
- If installing a Supervisor, select 1 Supervisor, and press Next.
If installing a Worker, select 2 Worker, and press Next.
If installing a Collector, select 3 Collector, and press Next.
If Installing FortiSIEM Manager, select 4 FortiSIEM Manager, and press Next.
Note: The appliance type cannot be changed once it is deployed, so ensure you have selected the correct option.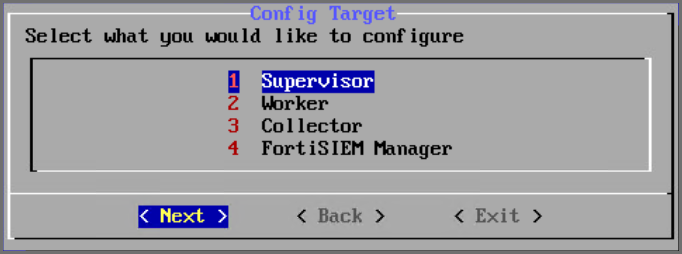

Regardless of whether you select FortiSIEM Manager,Supervisor, Worker, or Collector, you will see the same series of screens with only the header changed to reflect your target installation, unless noted otherwise.
- If you want to enable FIPS, then choose 2. Otherwise, choose 1. You have the option of enabling FIPS (option 3) or disabling FIPS (option 4) later.
Note: After Installation, a 5th option to change your network configuration (5 change_network_config) is available. This allows you to change your network settings and/or host name. 
- Determine whether your network supports IPv4-only, IPv6-only, or both IPv4 and IPv6 (Dual Stack). Choose 1 for IPv4-only, choose 2 for IPv6-only, or choose 3 for both IPv4 and IPv6.

- If you choose 1 (IPv4) or choose 3 (Both IPv4 and IPv6), and press Next, then you will move to step 11. If you choose 2 (IPv6), and press Next, then skip to step 12.
- Configure the network by entering the following fields. Press Next.
Option Description IPv4 Address The Manager/Supervisor/Worker/Collector's IPv4 address NetMask The Manager/Supervisor/Worker/Collector's subnet Gateway Network gateway address DNS1, DNS2 Addresses of the DNS servers 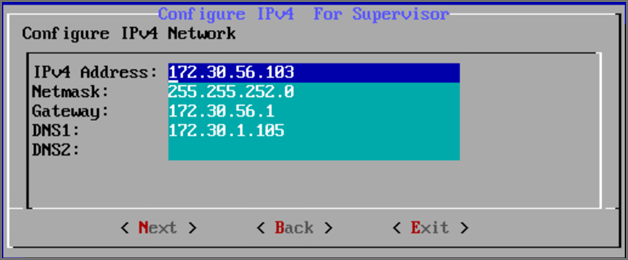
- If you chose 1 in step 9, then you will need to skip to step 13. If you chose 2 or 3 in step 9, then you will configure the IPv6 network by entering the following fields, then press Next.
Option Description IPv6 Address The Manager/Supervisor/Worker/Collector's IPv6 address prefix (Netmask) The Manager/Supervisor/Worker/Collector's IPv6 prefix Gateway ipv6 IPv6 Network gateway address DNS1 IPv6, DNS2 IPv6 Addresses of the IPv6 DNS server 1 and DNS server2 
Note: If you chose option 3 in step 9 for both IPv4 and IPv6, then even if you configure 2 DNS servers for IPv4 and IPv6, the system will only use the first DNS server from IPv4 and the first DNS server from the IPv6 configuration.
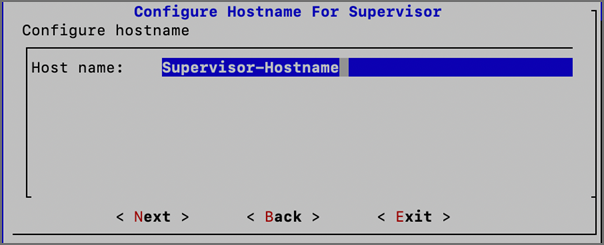
Note: In many dual stack networks, IPv4 DNS server(s) can resolve names to both IPv4 and IPv6. In such environments, if you do not have an IPv6 DNS server, then you can use public IPv6 DNS servers or use IPv4-mapped IPv6 address. - Configure Hostname for FortiSIEM Manager/Supervisor/Worker/Collector. Press Next.
Note: FQDN is no longer needed. - Test network connectivity by entering a host name that can be resolved by your DNS Server (entered in the previous step) and can respond to a ping. The host can either be an internal host or a public domain host like google.com. Press Next.
Note: By default, “google.com” is shown for the connectivity test, but if configuring IPv6, you must enter an accessible internally approved IPv6 DNS server, for example: “ipv6-dns.fortinet.com"
Note: When configuring both IPv4 and IPv6, only testing connectivity for the IPv6 DNS is required because the IPV6 takes higher precedence. So update the host field with an approved IPv6 DNS server.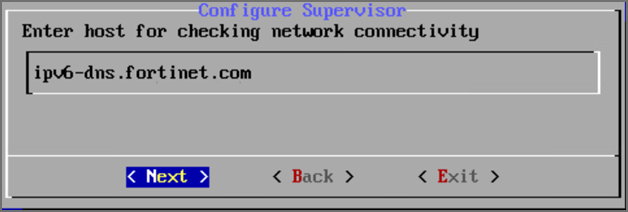
- The final configuration confirmation is displayed.
Verify that the parameters are correct. If they are not, then press Back to return to previous dialog boxes to correct any errors. If everything is OK, then press Run.
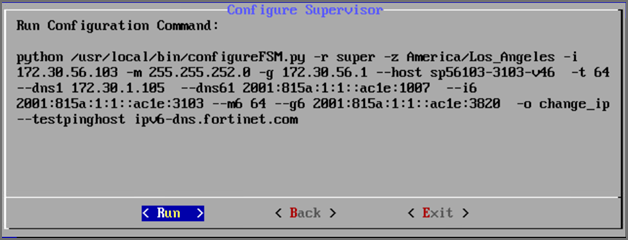
The options are described in the following table.
Option Description -r The FortiSIEM component being configured -z The time zone being configured -i IPv4-formatted address -m Address of the subnet mask -g Address of the gateway server used --host Host name -f FQDN address: fully-qualified domain name -t The IP type. The values can be either 4 (for ipv4) or 6 (for v6) or 64 (for both ipv4 and ipv6) .--dns1, --dns2
Addresses of the DNS servers
--i6
IPv6-formatted address
--m6
IPv6 prefix
--g6
IPv6 gateway
-o
Installation option (install_without_fips, install_with_fips, enable_fips, disable_fips
, change_network_config* )*Option only available after installation. -z Time zone. Possible values are US/Pacific, Asia/Shanghai, Europe/London, or Africa/Tunis --testpinghost
The URL used to test connectivity
- It will take some time for this process to finish. When it is done, proceed to Upload the FortiSIEM License. If the VM fails, you can inspect the
ansible.logfile located at/usr/local/fresh-install/logsto try and identify the problem.
Upload the FortiSIEM License
|
|
Before proceeding, make sure that you have obtained valid FortiSIEM license from Forticare. For more information, see the Licensing Guide. |
You will now be asked to input a license.
- Open a Web browser and log in to the FortiSIEM UI. Use link https://<supervisor-ip> to login.
Please note that if you are logging into FortiSIEM with an IPv6 address, you should input https://[IPv6 address] on the browser tab. - The License Upload dialog box will open.
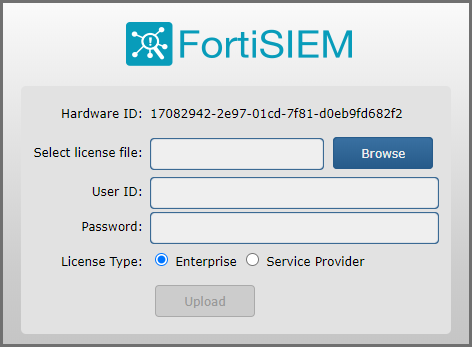
- Click Browse and upload the license file.
Make sure that the Hardware ID shown in the License Upload page matches the license.
- For User ID and Password, choose any Full Admin credentials.
For the first time installation, enter
adminas the user andadmin*1as the password. You will then be asked to create a new password for GUI access. - Choose License type as Enterprise or Service Provider.
This option is available only for a first time installation. Once the database is configured, this option will not be available.
For FortiSIEM Manager, License Type is not an available option, and will not appear. At this point, FortiSIEM Manager installation is complete. You will not be taken the Event Database Storage page, so you can skip Choose an Event Database.
Note: The FortiSIEM Manager license allows a certain number of instances that can be registered to FortiSIEM Manager. - Proceed to Choose an Event Database.
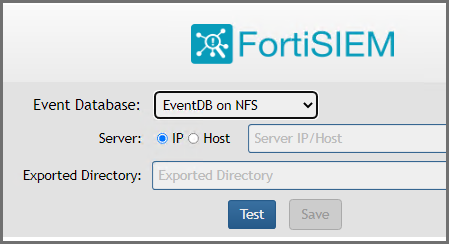
Choose an Event Database
For a fresh installation, you will be taken to the Event Database Storage page. From the Event Database drop-down list, choose EventDB on Local Disk, EventDB on NFS, ClickHouse, or Elasticsearch. For more details, see Configuring Storage.

After the License has been uploaded, and the Event Database Storage setup is configured, FortiSIEM installation is complete. If the installation is successful, the VM will reboot automatically. Otherwise, the VM will stop at the failed task.
You can inspect the ansible.log file located at /usr/local/fresh-install/logs if you encounter any issues during FortiSIEM installation.
After installation completes, ensure that the phMonitor is up and running, for example:
# phstatus
For the Supervisor, Worker and Collector, the response should be similar to the following.

For FortiSIEM Manager, the response should look similar to the following. 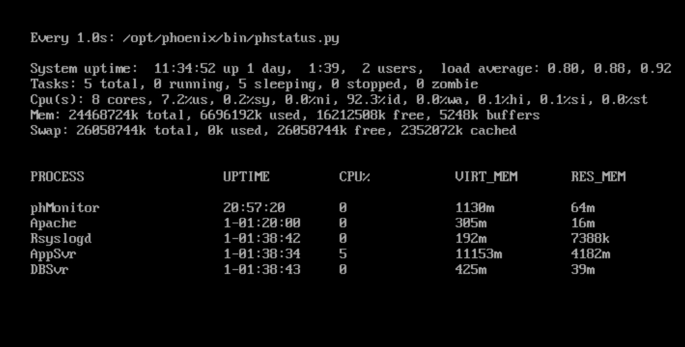
Cluster Installation
For larger installations, you can choose Worker nodes, Collector nodes, and external storage (NFS, ClickHouse, or Elasticsearch).
- Install Supervisor
- Install Workers
- Register Workers
- Install Collectors
- Register Collectors
- Install Manager
- Register Instances to Manager
Install Supervisor
Follow the steps in All-in-one Install with two differences:
- Setting up hardware - you do not need an event database.
- Setting up an Event database - Configure the cluster for either NFS, ClickHouse, or Elasticsearch.
NFS
ClickHouse

Elasticsearch

You must choose external storage listed in Choose an Event Database.
Install Workers
Once the Supervisor is installed, follow the same steps in All-in-one Install to install a Worker except you need to only choose OS and OPT disks. The recommended settings for Worker node are:
- CPU = 8
- Memory = 24 GB
- Two hard disks:
- OS – 25GB
- OPT – 100GB
For OPT - 100GB, the 100GB disk for /opt will consist of a single disk that will split into 2 partitions, /OPT and swap. The partitions will be created and managed by FortiSIEM whenconfigFSM.shruns.
Register Workers
Once the Worker is up and running, add the Worker to the Supervisor node.
- Go to ADMIN > License > Nodes.
- Select Worker from the drop-down list and enter the Worker's IP address
and host name . Click Add.
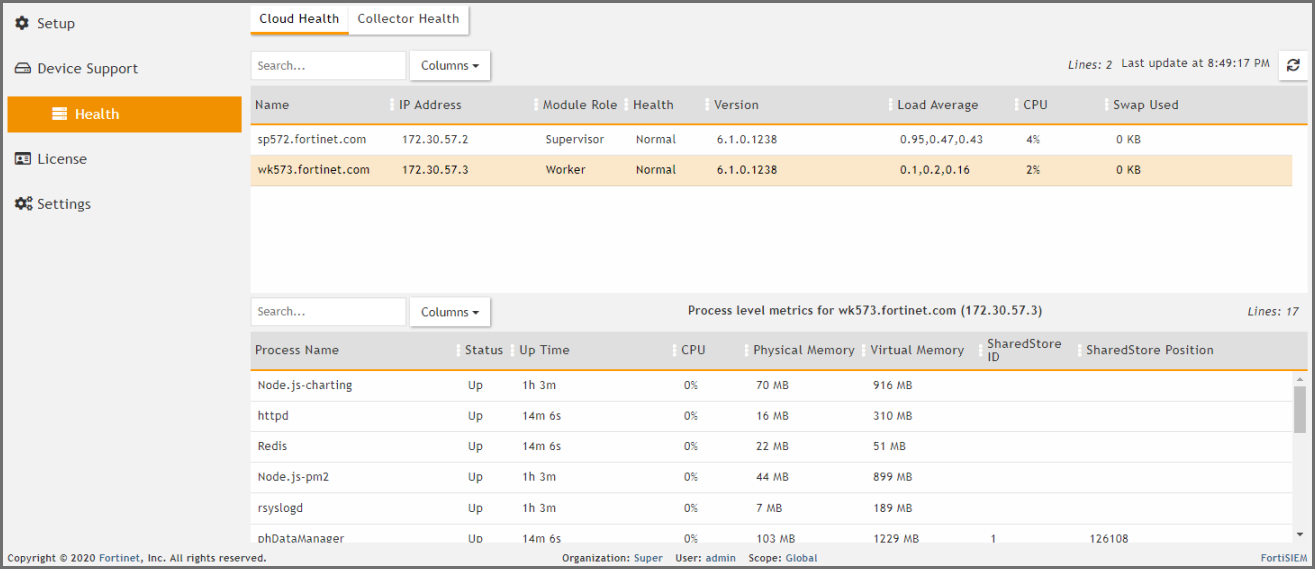
- See ADMIN > Health > Cloud Health to ensure that the Workers are up, healthy, and properly added to the system.
Install Collectors
Once Supervisor and Workers are installed, follow the same steps in All-in-one Install to install a Collector except you need to only choose OS and OPT disks.
Collector in Regular IT Environments
The recommended settings for Collector node are:
- CPU = 4
- Memory = 8GB
- Two hard disks:
- OS – 25GB
- OPT – 100GB
For OPT - 100GB, the 100GB disk for /opt will consist of a single disk that will split into 2 partitions, /OPT and swap. The partitions will be created and managed by FortiSIEM whenconfigFSM.shruns.
Collector with Reduced Disk in OT Environments
FortiSIEM installations require the disk for OPT+SWAP to have exactly 100 GB. This is valid for all three node options (Supervisor, Worker and Collectors).
Certain environments such as Operational Technology (OT) may find it difficult to dedicate 125 GB to a log collector. The steps here explain how to bypass the requirement for Collector install. Be aware that reducing the size of the disk also reduces the size of the available cache when there is a connection interruption between Collector and Workers/Supervisor, and may result in loss of logs.
- Follow the installation guide but instead of adding a 100 GB disk for OPT, add a disk of whatever size you require.
-
In this example, we will assume the OPT disk is 35 GB, so in total, the Collector VM will have 70 GB (25 for OS + 35 for OPT).


-
After you boot the VM and change the password, you will be editing the following files.
-
/usr/local/syslib/config/disksConfig.json
-
/usr/local/install/roles/fsm-disk-mgmt/tasks/disks.yml
Note: You must make changes to these files before running the configureFSM.sh installer.
-
-
The
disksConfig.jsonfile contains a map of installation types and node types. It defines the required sizes of disks so that the installer can validate them. Since we are changing the KVM Collector opt disk requirement to 35 GB in this example, we must reflect that size in this file. Using a text editor, modify the "opt" line in thedisksConfig.jsonfile, shown in blue to your requirement."FSIEMKVM": { "SUPER": { "number": "3", "opt": "100", "svn": "60", "cmdb": "60" }, "FSMMANAGER": { "number": "2", "opt": "100", "cmdb": "60" }, "WORKER": { "number": "1", "opt": "100" }, "COLLECTOR": { "number": "1", "opt": "35" } }, -
Save the
disksConfig.jsonfile. -
Load the
/usr/local/install/roles/fsm-disk-mgmt/tasks/disks.ymlfile via a text editor. You can choose to adjust only the (step a) OPT disk or (step b) adjust the swap disk and OPT disk. To change only the OPT disk, proceed with step a, then skip to step 7. To adjust the swap disk and reduce the OPT disk, skip step a and proceed with step b.-
ADJUST OPT DISK ONLY
Navigate to line 54 in the /usr/local/install/roles/fsm-disk-mgmt/tasks/disks.yml file and change the line.
Original line (The original line assumes the drive is 100 GB)
parted -a optimal --script "{{ item.disk }}" mkpart primary "{{ item.fstype }}" 26G 100G && sleep 5Change this line to reflect the size of your OPT disk (in this example 35 GB), marked in blue.
parted -a optimal --script "{{ item.disk }}" mkpart primary "{{ item.fstype }}" 26G 35G && sleep 5Skip step b and c, and proceed to step 7.
-
ADJUST SWAP DISK and REDUCE OPT DISK
Reduce the Swap Disk by changing the following original line (The original line assumes swap disk to be 25GB).
parted -a optimal --script "{{ item.disk }}" mklabel gpt mkpart primary linux-swap 1G 25G && sleep 5Change to (in this example 10G), marked in blue:
parted -a optimal --script "{{ item.disk }}" mklabel gpt mkpart primary linux-swap 1G 10G && sleep 5 -
Reduce /OPT disk: by changing the following line (The original line assumes the drive is 100 GB).
parted -a optimal --script "{{ item.disk }}" mkpart primary "{{ item.fstype }}" 26G 100G && sleep 5Change to reflect the size of your OPT disk (in this example 35 GB), marked in blue.
parted -a optimal --script "{{ item.disk }}" mkpart primary "{{ item.fstype }}" 11G 35G && sleep 5
-
-
Save the
disks.ymlfile. -
Run configFSM.sh to install the collector. When it reboots, you can provision it using the
phProvisionCollectorcommand. Your partition output should appear similar to the following.Partition Output of deployment: sdb 8:16 0 35G 0 disk ├─sdb1 8:17 0 8.4G 0 part [SWAP] └─sdb2 8:18 0 22.4G 0 part /opt # df -h Filesystem Size Used Avail Use% Mounted on devtmpfs 12G 0 12G 0% /dev tmpfs 12G 0 12G 0% /dev/shm tmpfs 12G 17M 12G 1% /run tmpfs 12G 0 12G 0% /sys/fs/cgroup /dev/mapper/rl-root 22G 8.1G 14G 38% / /dev/sdb2 23G 4.3G 19G 19% /opt /dev/sda1 1014M 661M 354M 66% /boot tmpfs 2.4G 0 2.4G 0% /run/user/500 tmpfs 2.4G 0 2.4G 0% /run/user/0
Register Collectors
Collectors can be deployed in Enterprise or Service Provider environments.
Enterprise Deployments
For Enterprise deployments, follow these steps.
- Log in to Supervisor with 'Admin' privileges.
- Go to ADMIN > Settings > System > Event Worker.
- Enter the IP of the Worker node. If a Supervisor node is only used, then enter the IP of the Supervisor node. Multiple IP addresses can be entered on separate lines. In this case, the Collectors will load balance the upload of events to the listed Event Workers.
Note: Rather than using IP addresses, a DNS name is recommended. The reasoning is, should the IP addressing change, it becomes a matter of updating the DNS rather than modifying the Event Worker IP addresses in FortiSIEM. - Click OK.
- Enter the IP of the Worker node. If a Supervisor node is only used, then enter the IP of the Supervisor node. Multiple IP addresses can be entered on separate lines. In this case, the Collectors will load balance the upload of events to the listed Event Workers.
- Go to ADMIN > Setup > Collectors and add a Collector by entering:
- SSH to the Collector and run following script to register Collectors:
phProvisionCollector --add <user> '<password>' <Super IP or Host> <Organization> <CollectorName>The password should be enclosed in single quotes to ensure that any non-alphanumeric characters are escaped.
- Set
userandpasswordusing the admin user name and password for the Supervisor. - Set
Super IP or Hostas the Supervisor's IP address. - Set
Organization. For Enterprise deployments, the default name is Super. - Set
CollectorNamefrom Step 2a.The Collector will reboot during the Registration.
- Set
- Go to ADMIN > Health > Collector Health for the status.

Service Provider Deployments
For Service Provider deployments, follow these steps.
- Log in to Supervisor with 'Admin' privileges.
- Go to ADMIN > Settings > System > Event Worker.
- Enter the IP of the Worker node.
If a Supervisor node is only used, then enter the IP of the Supervisor node. Multiple IP addresses can be entered on separate lines. In this case, the Collectors will load balance the upload of events to the listed Event Workers.
Note: Rather than using IP addresses, a DNS name is recommended. The reasoning is, should the IP addressing change, it becomes a matter of updating the DNS rather than modifying the Event Worker IP addresses in FortiSIEM. - Click OK.

- Enter the IP of the Worker node.
If a Supervisor node is only used, then enter the IP of the Supervisor node. Multiple IP addresses can be entered on separate lines. In this case, the Collectors will load balance the upload of events to the listed Event Workers.
- Go to ADMIN > Setup > Organizations and click New to add an Organization.
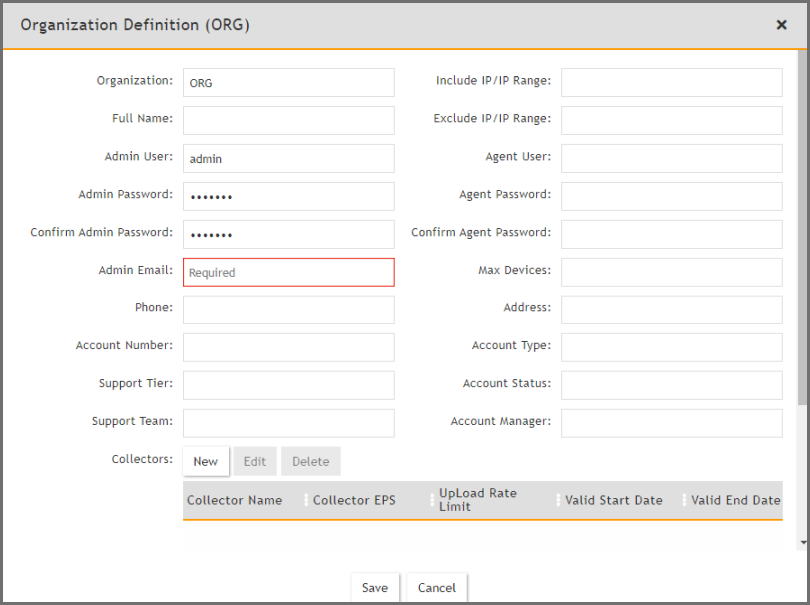
- Enter the Organization Name, Admin User, Admin Password, and Admin Email.
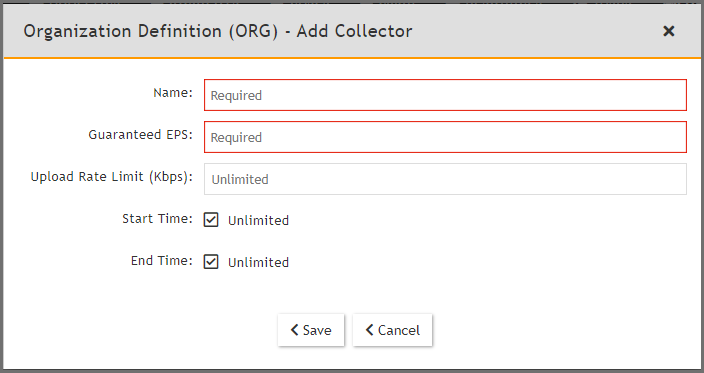
- Under Collectors, click New.
- Enter the Collector Name, Guaranteed EPS, Start Time, and End Time.
The last two values could be set as Unlimited. Guaranteed EPS is the EPS that the Collector will always be able to send. It could send more if there is excess EPS available.
- SSH to the Collector and run following script to register Collectors:
phProvisionCollector --add <user> '<password>' <Super IP or Host> <Organization> <CollectorName>The password should be enclosed in single quotes to ensure that any non-alphanumeric characters are escaped.
- Set
userandpasswordusing the admin user name and password for the Organization that the Collector is going to be registered to. - Set
Super IP or Hostas the Supervisor's IP address. - Set
Organizationas the name of an organization created on the Supervisor. - Set
CollectorNamefrom Step 6.
The Collector will reboot during the Registration.
- Set
- Go to ADMIN > Health > Collector Health and check the status.
Install Manager
Starting with release 6.5.0, you can install FortiSIEM Manager to monitor and manage multiple FortiSIEM instances. An instance includes a Supervisor and optionally, Workers and Collectors. The FortiSIEM Manager needs to be installed on a separate Virtual Machine and requires a separate license. FortiSIEM Supervisors must be on 6.5.0 or later versions.
Follow the steps in All-in-one Install to install Manager. After any Supervisor, Workers, and Collectors are installed, you add the Supervisor instance to Manager, then Register the instance to Manager. See Register Instances to Manager.
Register Instances to Manager
To register your Supervisor instance with Manager, you will need to do two things in the following order.
Note that Communication between FortiSIEM Manager and instances is via REST APIs over HTTP(S).
Adding Instance to Manager
You can add an instance to Manager by taking the following steps.
Note: Make sure to record the FortiSIEM Instance Name, Admin User and Admin Password, as this is needed when you register your instance.
-
Login to FortiSIEM Manager.
-
Navigate to ADMIN > Setup.
-
Click New.
-
In the FortiSIEM Instance field, enter the name of the Supervisor instance you wish to add.
-
In the Admin User field, enter the Account name you wish to use to access Manager.
-
In the Admin Password field, enter the Password that will be associated with the Admin User account.
-
In the Confirm Admin Password field, re-enter the Password.
-
(Optional) In the Description field, enter any information you wish to provide about the instance.
-
Click Save.

-
Repeat steps 1-9 to add any additional instances to Manager.
Now, follow the instructions in Register the Instance Itself to Manager for each instance.
Register the Instance Itself to Manager
To register your instance with Manager, take the following steps.
-
From your FortiSIEM Supervisor/Instance, navigate to ADMIN > Setup > FortiSIEM Manager, and take the following steps.
-
In the FortiSIEM Manager FQDN/IP field, enter the FortiSIEM Manager Fully Qualified Domain Name (FQDN) or IP address.
-
In the FortiSIEM Instance Name field, enter the instance name used when adding the instance to Manager.
-
In the Account field, enter the Admin User name used when adding the instance to Manager.
-
In the Password field, enter your password to be associated with the Admin User name.
-
In the Confirm Password field, re-enter your password.
-
Click Test to verify the configuration.
-
Click Register.
A dialog box displaying "Registered successfully" should appear if everything is valid.
-
Login to Manager, and navigate to any one of the following pages to verify registration.
-
ADMIN > Setup and check that the box is marked in the Registered column for your instance.
-
ADMIN > Health, look for your instance under FortiSIEM Instances.
-
ADMIN > License, look for your instance under FortiSIEM Instances.
-
-
Install Log
The install ansible log file is located here: /usr/local/fresh-install/logs/ansible.log.
Errors can be found at the end of the file.