


Disaster Recovery in Elasticsearch Deployments
The following sections describe how to configure and work with FortiSIEM Disaster Recovery (DR) in Elasticsearch based deployments. This is based on Elasticsearch uni-directional replication (see https://www.elastic.co/guide/en/elasticsearch/reference/7.12/xpack-ccr.html). Currently, bi-directional replication is not supported.
- Introduction
- Configuring Disaster Recovery - New Install
- Configuring Disaster Recovery - Existing Install
- Primary (Site 1) Fails, Site 2 Becomes Primary
- Site 1 is Up and Becomes Primary
- Viewing Replication Health
- Implementation Notes
Introduction
- Understanding the FortiSIEM DR Feature
- Prerequisites for a Successful DR Implementation
- Understanding the Requirements for DNS Names
Understanding the FortiSIEM DR Feature
FortiSIEM has a replication feature, designed for those customers who require full disaster recovery capabilities, where one site is designated to be the Primary (active), Site 1, and the other the Secondary (hot standby) site, Site 2. The two systems replicate the Primary sites (Site 1) databases.
This requires a second fully licensed FortiSIEM system, where Site 1 (Primary) and Site 2 (Secondary) are identically setup in terms of Supervisor, Workers, and event storage.

Under normal operations, if collectors are being used, these upload to Site 1, the Primary site and will buffer by design when this site is not available. If DR is set up and a disaster occurs, then these same collectors will revert to uploading to Site 2, the Secondary site, which will now be designated as the Primary/Active site.
FortiSIEM runs as a cluster (or single node for a SMB) with Super, Worker, and Collectors nodes.
To provide DR features, FortiSIEM must have a Secondary system ready on standby to take over operations, with the following databases replicated from the Primary site:
- The CMDB residing in a PostgresSQL database.
- Device configurations residing in SVN-lite on the Supervisor node.
- Profile data residing on SQLite databases on the Supervisor node.
- Event database stored in Elasticsearch.

When disaster strikes:
- The Secondary (Site 2) must become the Primary FortiSIEM.
- DNS Changes must be made so that users will login to Secondary Supervisor (Site 2), and that Collectors will send events to Secondary Workers.

When the Old Primary (Site 1) is recovered and powered up, it will sync missing data with the Secondary site (Site 2, the Active Primary FortiSIEM).
When the user decides to return to the pre-disaster setup, the user can switch the roles of Primary (Site 2) and Secondary (Site 1).
Prerequisites for a Successful DR Implementation
- Two separate FortiSIEM licenses - one for each site.
- The installation at both sites must be identical - workers, storage type, archive setup, hardware resources (CPU, Memory, Disk) of the FortiSIEM nodes.
- DNS Names are used for the Supervisor nodes at the two sites. Elasticsearch clusters should also be set up identically on the two sites. Make sure that users, collectors, and agents can access both Supervisor nodes by their DNS names.
- DNS Names are used for the Worker upload addresses.
- TCP Ports for HTTPS (TCP/443), SSH (TCP/22), PostgresSQL (TCP/5432), Elasticsearch replication (TCP/9200), and Private SSL Communication port between phMonitor (TCP/7900) are open between both sites.
Understanding the Requirements for DNS Names
It is important to understand your FortiSIEM environment and plan ahead in terms of communications from users, agents and collectors.
Worker Event
Each entry in the Worker Event address list is given to Collectors at registration (and periodically in communication to the Supervisor) to instruct where to upload customer event data.
An example is shown below, where the customer has not followed best practice advice and used IP Addresses and not FQDNs.

In addition to the Worker Event entries, Collectors also maintain communication with the Supervisor node, to receive jobs/tasks and report Collector health data. When Collectors register for the first time with the Supervisor node, these communication addresses are stored for this purpose.
Why is using IP addresses for Collector registration and Worker Event settings bad when it comes to DR planning?
Consider the environment below where only IP addresses have been used. During normal operations Collector traffic flows to the Workers at the Primary site (Site 1) and the Collector maintains communications with the Supervisor. This all works fine until the Primary site (Site 1) has a disaster.

At this point, the Primary node (Site 1) is unavailable. The remote Collector nodes are essentially hard-coded (by IP) to talk to the Primary site only. Even if Site 2 (the Secondary node) is up and operational and promoted to be the Primary node, Collectors are unable to upload logs or get any tasks from the Supervisor node due to the old Primary sites IPs being used.

A much better approach is to utilize DNS.
This allows name resolution to control which Supervisor, Primary, or Secondary is currently active and which worker addresses to attempt to upload customer data to. DNS “A” records are created for the Supervisor nodes at both sites, and a “CNAME” is used to determine which is active, which has a small time to live (TTL) value.
The Worker Event settings reference DNS addresses:

External DNS Example
| Node | DNS Record Type | Name | IP/Alias |
|---|---|---|---|
| Supervisor (Primary) | A | site1.fsm-mssp.com | 198.51.100.10 |
| Supervisor (Secondary) | A | site2.fsm-mssp.com | 203.0.113.10 |
| Active Supervisor | CNAME | site.fsm-mssp.com | site1.fsm-mssp.com |
| Worker1 (Primary) | A | worker1.fsm-mssp.com | 198.51.100.20 |
| Worker2 (Primary) | A | worker2.fsm-mssp.com | 198.51.100.21 |
For the internal DNS records, again both internal Supervisor addresses are listed with a CNAME to determine the current Primary GUI to logon to for SOC operators. (If public certificates are being used, then a Wildcard cert should be used to achieve this).
Internal DNS Example
| Node | DNS Record Type | Name | IP/Alias |
|---|---|---|---|
| Supervisor (Primary) | A | site1.fsm-mssp.com | 10.0.0.10 |
| Supervisor (Secondary) | A | site2.fsm-mssp.com | 20.0.0.10 |
| Active Supervisor | CNAME | site.fsm-mssp.com | site1.fsm-mssp.com |
By utilizing internal DNS, then SOC operators can always access the active Supervisor GUI via site.fsm-mssp.com, but as will be discussed later, the Secondary Standby Supervisor can always be accessed if required.

Note: Any DNS changes, are made manually in the event of a failover.
As can be seen below, using DNS the Collectors are instructed to talk to the Active site.

And in the event of a failure at the Primary Site, they can be easily instructed to communicate with the Supervisor and Workers at the Secondary site which will be manually switched to be the Primary Role site.

Note : In addition to DNS changes being made manually, the process for promoting the Secondary Supervisor to be the Primary Role Supervisor node is also made manually in the FortiSIEM GUI.
Performing Collector Registration
When registering Collectors, you should ignore the Supervisor-IP requirement, and instead use the CNAME for the Active Supervisor node.
[root@collector ~]# phProvisionCollector
Usage: phProvisionCollector --add <Organization-user-name> <Organization-user-password> <Supervisor-IP> <Organization-name> <Collector-name>
An example using site.fsm-mssp.com is shown below. Since Collectors always communicate with the Supervisor node, communications can be easily restored to the Primary via a simple DNS change.
[root@collector ~]# phProvisionCollector --add admin admin*1 site.fsm-mssp.com super collector.fsm-mssp.com
Continuing to provision the Collector
Adding Collector (collector.fsm-mssp.com) to Super (site.fsm-mssp.com) with Organization (super)
This collector is registered successfully, and will be rebooted soon.
Agent Communications
The communications for FortiSIEM Windows and Linux agents follow a similar path to the above. Agents register with the Supervisor node, and maintain this communication to receive updated templates and report health. One or more Collectors are assigned to each agent as the node or nodes to deliver event data.

For best practice, agent registration should use the Supervisor CNAME. This way, if the Primary Site is a totally destroyed, you can still easily ensure agent communication to the DR site Supervisor via a simple DNS change and still make template changes etc.
The Windows installation file installSettings.xml is shown:

The same concept also applies to deploying Linux agents.
Configuring Disaster Recovery - New Install
Ensure you have followed the Prerequisites for a Successful DR Implementation and Basic Requirements (below) prior to this configuration.
This configuration assumes a completely new FortiSIEM install. To facilitate configuration, assume that there are two Sites: Site 1 and Site 2. Initially, Site 1 is Primary and Site 2 is Secondary.
Follow all the proceeding steps to configure a unidirectional Elasticsearch Cross-Cluster replication (CCR) that works with FortiSIEM Disaster Recovery (DR).
Basic Requirements
Site 1 and Site 2 must have an identical setup for its Supervisor, Workers, and Elasticsearch cluster (Master, Coordinator only and Data Nodes) if the Secondary Site needs to take the workload of the Primary Site for extended periods of time. Specifically, this means for Site 1 and Site 2:
-
They must have the same number of Workers.
-
The Super and Workers hardware configuration must be identical.
-
They must have the same number of Master node, Coordinating nodes, Hot, Warm, and Cold Data nodes.
Step 1. Set Up Elasticsearch for Site 1 and Site 2
Set up two separate Elasticsearch Clusters, one as Site 1 and one as Site 2. Do not add the Elasticsearch cluster to FortiSIEM yet. This will be done after cross-cluster replication (CCR) is setup.
Step 2. Enable Remote Cluster Client
Take the following steps to set up the Elasticsearch Clusters for Site 1 and Site 2.
-
Modify the
elasticsearch.ymlfile for each node in Site 1 with:node.remote_cluster_client: true
-
Restart each node in the cluster for Site 1.
-
Modify the
elasticsearch.ymlfile for each node in Site 2 with:node.remote_cluster_client: true
-
Restart each node in the cluster for Site 2.
Step 3. Add X-Pack's Auto Create Index
X-Pack needs its indices to be created. To create these indices to action.auto_create_index list, take the following steps:
-
Run the following command against the Site 1 Coordinator node.
PUT /_cluster/settings?pretty { "persistent": { "action.auto_create_index": "-fortisiem-event-*,fortisiem-*,.monitoring-*" } } -
Run the same command against the Site 2 Coordinator node.
PUT /_cluster/settings?pretty
{
  "persistent": {
    "action.auto_create_index": "-fortisiem-event-*,fortisiem-*,.monitoring-*"
  }
}
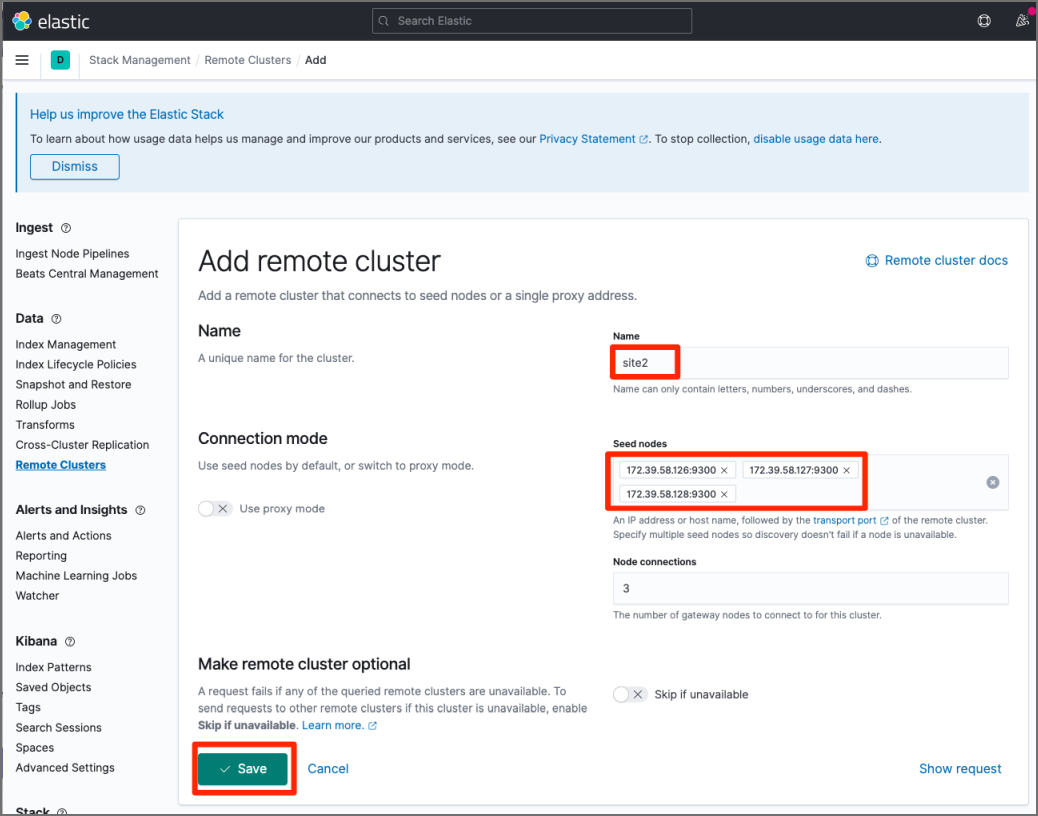
Step 4. Define Remote Clusters for Site 2
Since Site 2 will initiate the replication, the Site 1 nodes must be defined in Site 2 using Kibana.
Note: Do not add the master dedicated node to seeds. This is because dedicated master nodes are never selected as gateway nodes. It is recommended that at least three nodes with low traffic, node.remote_cluster_client enabled, and transport port opened be added in the list of seed nodes, such as the coordinator node.
Take the following steps:
-
Login to Kibana.
-
Navigate to Kibana Home > Analytics section > Discover > Remote Clusters.

-
Add Site 1's nodes as the remote servers to Site 2. After adding the Site 1's nodes, click Save.

Step 5. Define Auto-Follow Patterns in Site 2
Since indices are dynamically created in Site 1, you must configure auto-follow pattern in Site 2 to enable the dynamically generated indices in Site 1 to be replicated to Site 2.
Take the following steps:
-
Login to Kibana.
-
Navigate to Kibana Home > Analytics section > Discover > Cross-Cluster Replication.
-
Define Auto-Follow patterns for
fortisiem-event-*andfortisiem-incident-*time-series indices. Do NOT make similar definitions for other indices. The example screenshot here shows thefortisiem-event.auto_follow_patternbeing defined.
The screenshot here shows that auto-follow patterns have been created for
fortisiem-event-*andfortisiem-incident-*time-series indices.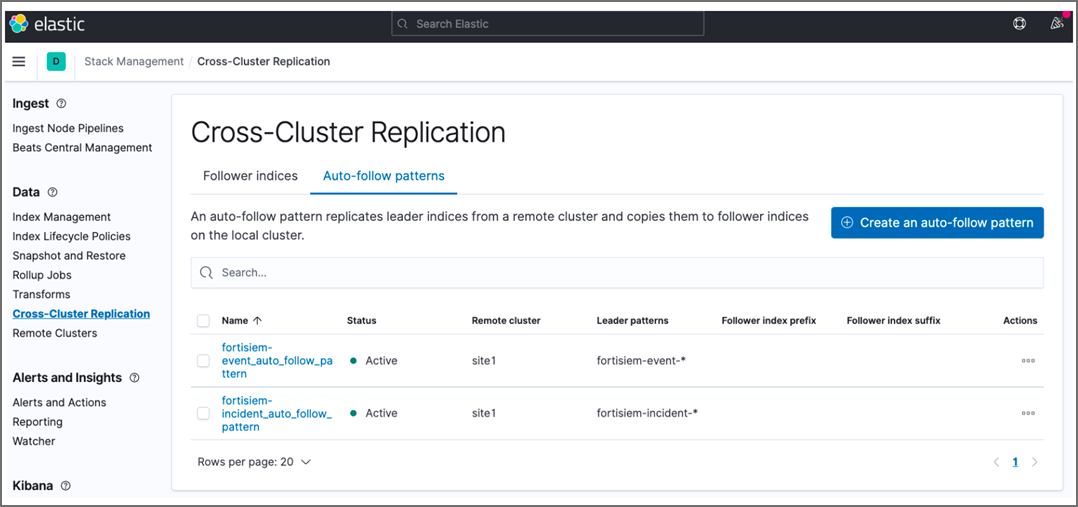
When completed, elasticsearch on Site 2 is now ready for replication.
Step 6. Set Up Site 1 FortiSIEM with Elasticsearch Storage
Take the following steps to set up Site 1 FortiSIEM with Elasticsearch as its online storage.
-
Login to the FortiSIEM GUI.
-
Navigate to ADMIN > Setup > Storage > Online.
-
Select the Elasticsearch radio button from the three available options (Local Disk, NFS, Elasticsearch) and configure.
-
Click Save.
Step 7. Set Up Site 2 FortiSIEM with Elasticsearch Storage
Take the following steps to set up Site 2 FortiSIEM with Elasticsearch as its online storage.
-
Login to the FortiSIEM GUI.
-
Navigate to ADMIN > Setup > Storage > Online.
-
Select the Elasticsearch radio button from the three available options (Local Disk, NFS, Elasticsearch) and configure.
-
Click Save.
Step 8. Set Up Disaster Recovery
See Configuring Disaster Recovery in the latest Disaster Recovery Produces in EventDB Based Deployments Guide here.
Step 9. Verify Site 1 to Site 2 Event Replication
CCR only replicates new indices for the next day after auto-follow patterns are defined. Since indices are created daily, you will need to wait until the next day to verify that Site 1 to Site 2 replication is working.
Take the following steps to check on Elasticsearch event replication.
-
Login to Kibana.
-
Navigate to Kibana Home > Analytics section > Discover > Cross-Cluster Replication.
-
Verify that the follower indices are created automatically.

Step 10. Verify ILM is Working in Site 2
To verify that index lifecycle management (ILM) is working on site 2, you will need to take the following steps:
-
Login to Kibana.
-
Navigate to Kibana Home > Analytics section > Discover > Index Management.
-
Under Indices, select one follower event index and under Index lifecycle management, check Lifecycle policy. It should be fsiem_ilm_policy.

Configuring Disaster Recovery - Existing Install
This section assumes that Elasticsearch is running on FortiSIEM on Site 1 (Primary), and that Disaster Recovery needs to be set up for Site 2, to be used as Secondary.
Basic Requirements
Site 1 and Site 2 must have an identical setup for its Supervisor, Workers, and Elasticsearch cluster (Master, Coordinator only and Data Nodes) if the Secondary Site needs to take the workload of the Primary Site for extended periods of time. Specifically, this means for Site 1 and Site 2:
-
They must have the same number of Workers.
-
The Super and Workers hardware configuration must be identical.
-
They must have the same number of Master node, Coordinating nodes, Hot, Warm, and Cold Data nodes.
Step 1. Set Up Elasticsearch for Site 2
Set up a separate Elasticsearch cluster for Site 2. Do not install FortiSIEM yet. This will be done after cross-cluster replication (CCR) setup.
Step 2. Enable Remote Cluster Client
Take the following steps to set up the Elasticsearch Cluster for Site 1 and Site 2.
Note: Do not install FortiSIEM yet.
-
Modify the
elasticsearch.ymlfile for each node in Site 1 with:node.remote_cluster_client: true
-
Restart each node in the cluster for Site 1.
-
Modify the
elasticsearch.ymlfile for each node in Site 2 with:node.remote_cluster_client: true
-
Restart each node in the cluster for Site 2.
Step 3. Add X-Pack's Auto Create Index
X-Pack needs its indices to be created. To add X-Pack's Auto Create Index to action.auto_create_index list, take the following steps:
-
Run the following command against the Site 1 Coordinator node.
PUT /_cluster/settings?pretty { "persistent": { "action.auto_create_index": "-fortisiem-event-*,fortisiem-*,.monitoring-*" } } -
Run the same command against the Site 2 Coordinator node.
PUT /_cluster/settings?pretty
{
  "persistent": {
    "action.auto_create_index": "-fortisiem-event-*,fortisiem-*,.monitoring-*"
  }
}
Step 4. Define Remote Clusters for Site 2
Since Site 2 will initiate the replication, the Site 1 nodes must be defined in Site 2.
Note: Do not add the master dedicated node to seeds. This is because dedicated master nodes are never selected as gateway nodes. It is recommended that at least three nodes with low traffic, node.remote_cluster_client enabled, and transport port opened be added in the list of seed nodes, such as the coordinator node.
Take the following steps:
-
Login to Kibana.
-
Navigate to Kibana Home > Analytics section > Discover > Remote Clusters.
-
Add Site 1's nodes as the remote servers to Site 2. After adding Site 1's nodes, click Save.
Step 5. Define Auto-Follow Patterns in Site 2
Since indices are dynamically created in Site 1, you must configure auto-follow pattern in Site 2 to enable the dynamically generated indices in Site 1 to be replicated to Site 2.
Take the following steps:
-
Login to Kibana.
-
Navigate to Kibana Home > Analytics section > Discover > Cross-Cluster Replication.
-
Define Auto-Follow patterns for
fortisiem-event-*andfortisiem-incident-*time-series indices. Do NOT make similar definitions for other indices.
Elasticsearch on Site 2 is now ready for replication.
Step 6. Set Up Site 2 FortiSIEM with Elasticsearch Storage
Take the following steps to set up Site 2 FortiSIEM with Elasticsearch as its online storage.
-
Login to the FortiSIEM GUI.
-
Navigate to ADMIN > Setup > Storage > Online.
-
Select the Elasticsearch radio button from the three available options (Local Disk, NFS, Elasticsearch) and configure Elasticsearch for Site 2.
-
Click Save.
Step 7. Set Up Disaster Recovery
See Configuring Disaster Recovery in the latest Disaster Recovery Produces in EventDB Based Deployments Guide here.
Step 8. Verify Site 2 is Replicating Data From Site 1
Event replication only works for new indices for the next day, since indices are created daily. Older event indices have to be replicated manually. Incident replication will only work for new indices for the next month, since indices are created monthly. Older incident indices have to replicated manually. See Step 9 - (Optional) Copy Older Indices from Site 1 to Site 2 on how to do this.
To verify that event replication is working, take the following steps:
-
Navigate to Kibana Home > Analytics section > Discover > Index Management for Site 1 and Site 2.
-
Make sure Site 2's index has Follower behind the index name.
-
Ensure that the document is continuing to write to Site 1 and then wait for a period of time to check that Site 2's Docs count has been increased to verify that event replication is working.

Step 9. (Optional) Copy Older Indices from Site 1 to Site 2
Use Elasticsearch API to copy all older indices to Site 2 by taking the following steps.
-
Use Kibana to copy older fortisiem-incident-* indices to Site 2.
-
Login to Kibana.
-
Navigate to Kibana Home > Stack Management > Cross-Cluster Replication > Follower indices.
-
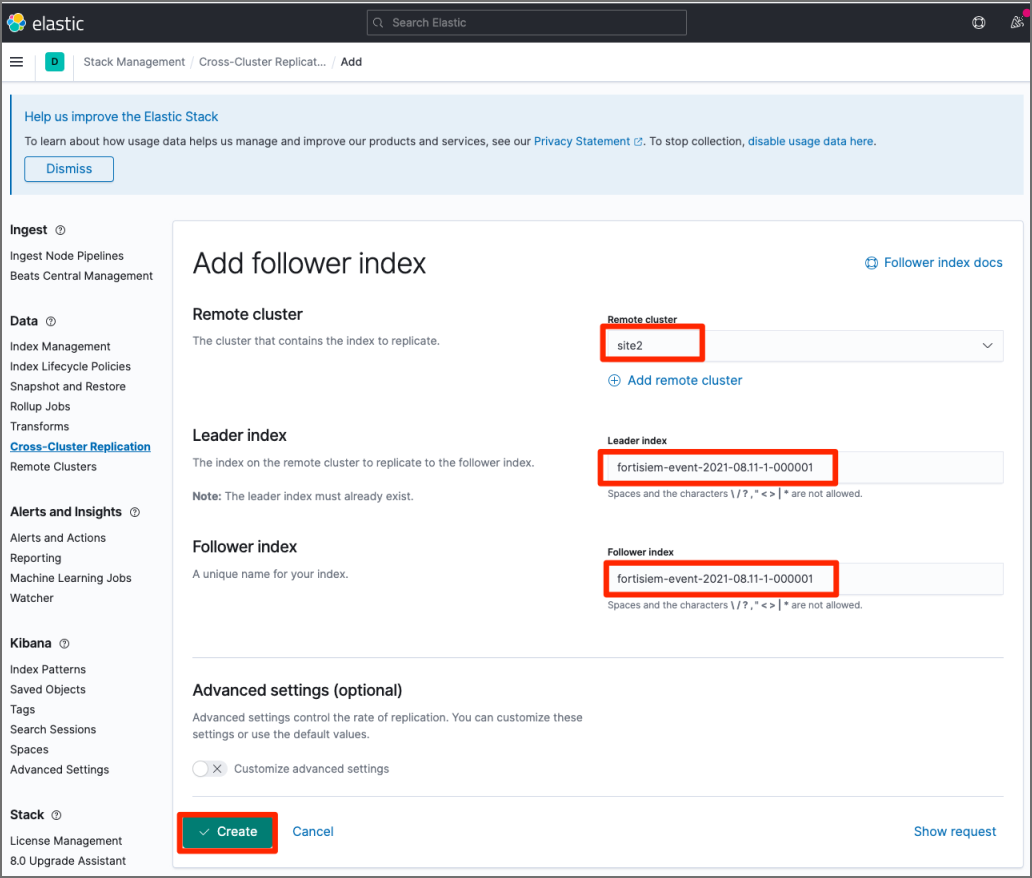
In Add follower index, take the following steps:
-
Provide the Leader index.
-
Provide the Follower index.
-
Click Create.

-
-
Use Kibana to copy older
fortisiem-incident-*indices to Site 2. -
Navigate to Kibana Home > Stack Management > Cross-Cluster Replication > Follower indices.
-
In Add follower index, take the following steps:
-
Provide the Remote cluster.
-
Provide the Leader index.
-
Provide the Follower index.
-
Click Create.

-
Step 10. Verify ILM is Working in Site 2
To verify that index lifecycle management (ILM) is working on site 2, you will need to take the following steps:
-
Login to Kibana.
-
Navigate to Kibana Home > Analytics section > Discover > Index Management.
-
Under Indices, select one follower event index and under Index lifecycle management, check Lifecycle policy. It should be fsiem_ilm_policy.
Primary (Site 1) Fails, Site 2 Becomes Primary
If Site 1 fails, its Workers no longer function, and events are buffered at the Collectors, which are ready to push these events to Site 2. You must now prepare Elasticsearch on Site 2 to be ready for insertion.
Step 1. Prepare Elasticsearch Indices on Site 2 for Insertion
Before you can make Site 2 Primary, you must configure Elasticsearch indices on Site 2 so it is ready for insertion. Take the following steps:
-
Login to Kibana of Site 2.
-
Navigate to Kibana Home > Analytics section > Discover > Cross-Cluster Replication.
-
Select all follower indices, then select Pause replication.

-
Navigate to Kibana Home > Analytics section > Discover > Index Management.
-
Select all follower indices, then select Close index.

-
Navigate to Kibana Home > Analytics section > Discover > Cross-Cluster Replication.
-
Select all follower indices, then select Unfollow leader indices.

-
Make the aliases writeable by modifying today's indices. This only needs to be done for today's indices.
Example:curl -X POST "<Site 2's coordinator ip>:9200/_aliases?pretty" -H 'Content-Type: application/json' -d' { "actions": [ { "add": { "index": "fortisiem-event-2021.08.11-1000001", "alias": "fortisiem-event-2021.08.11-1" } } } '
Step 2. Switch Site 2 Role to Primary in FortiSIEM
See Switching Primary and Secondary Roles in the latest Disaster Recovery Produces in EventDB Based Deployments Guide here.
Step 3. Save Elasticsearch Settings on Site 2 in FortiSIEM
After the Site 2 Role has been switched to Primary, take the following steps:
Note: If you have a custom event template on Site 1, you will need to upload the same custom event template to Site 2 first before proceeding with these instructions.
-
Login to the Site 2 FortiSIEM GUI.
-
Navigate to ADMIN > Setup > Storage Online.
-
Click Test to test the settings.
-
Click Save to save the online settings.

Step 4. Confirm Events are Inserted to Site 2
At this point, Collectors should be communicating to the Site 2 Supervisor, and would get a set of Site 2 Event (Upload) Workers. Since Site 2 Workers are connected to the Site 2 Elasticsearch Cluster, events are now stored in the Site 2 Elasticsearch. You can verify this by running queries from the Site 2 Supervisor's ANALYTICS page.
Site 1 is Up and Becomes Primary
Overview
If Site 1 comes back up, you can set it to become Primary by following these general steps:
-
Set Site 1 to Secondary and confirm data from Site 2 is replicated to Site 1.
-
Prepare Site 2 for Secondary and copy missing data from Site 2 to Site 1.
-
-
Miscellaneous:
Step 1. Set Site 1 to Secondary and Confirm Data from Site 2 is Replicated to Site 1
The Site 1 CMDB must sync up with the Site 2 CMDB, since new devices, rules, reports, etc. may exist in Site 2. Hence Site 1 needs to be Secondary first.
-
Set Site 1 to Secondary in FortiSIEM by taking the following steps:
-
Login to the Site 2 FortiSIEM GUI.
-
Navigate to ADMIN > License > Nodes.
-
Verify that there is a Secondary Node entry for Site 1, and it shows Inactive under Replication status.
-
With Site 1 selected, click Edit, and double check that the information is correct.
-
Click Save.
At this point, Site 1 is now Secondary.
-
-
Remove the auto-follow patterns from Site 2 by taking the following steps:
-
Login to Kibana.
-
Navigate to Kibana Home > Analytics section > Discover > Cross-Cluster Replication.
-
Select all patterns, then select Delete patterns.

-
-
Remove the remote server from Site 2 by taking the following steps:
-
Navigate to Kibana Home > Analytics section > Discover > Remote Clusters.
-
Select "Site 1".
-
Select Delete remote cluster.

-
-
Add remote servers to Site 1 by taking the following steps:
-
Login to Kibana of Site 1.
-
Navigate to Kibana Home > Analytics section > Discover > Remote Clusters.
-
Add Site 2’s nodes as the remote servers to Site 1.
-
-
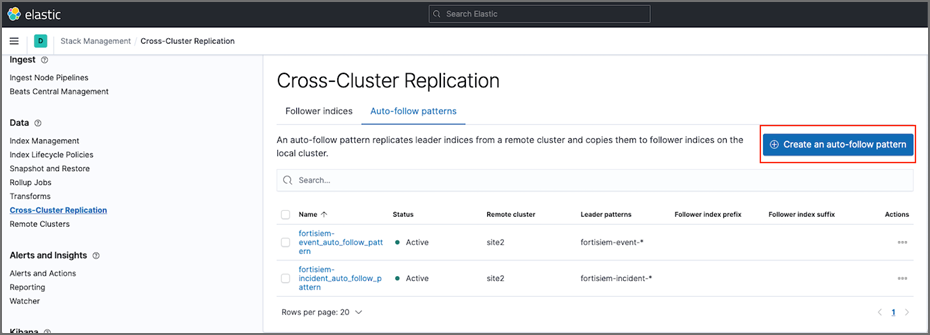
Create an auto-follow pattern in Site 1 by taking the following steps:
Navigate to Kibana Home > Analytics section > Discover > Cross-Cluster Replication.
click Create an auto-follow pattern and configure.
-
Delete old indices for today's event and current month's indices in Site 1. Please be careful. Double check the indices, and make sure Site 2 has the full data first, then you can delete today's indices in Site 1. Otherwise, you will need to merge the data first. Take the following steps:
-
Navigate to Kibana Home > Analytics section > Discover > Index Management.
-
Select the old event index, for example
fortisiem-event-2021.08.11-1-000001, and delete it by clicking on Delete index. -
Select the incident index, for example
fortisiem-incident-2021.08, and delete it by clicking on Delete index.
-
-
Create follower index for the current incident index in Site 1 by taking the following steps:
-
Navigate to Kibana Home > Analytics section > Discover > Cross-Cluster Replication.
-
Create one follower index for the incident index in Site 1.

-
-
Create a follower index for today’s event indices in Site 1 by taking the following steps:
-
Navigate to Kibana Home > Analytics section > Discover > Cross-Cluster Replication.
-
Create a follower index for today’s event index in Site 1.
-
-
Make sure all information is correct by taking the following steps:
-
Login to the Site 1 GUI, and check the new devices, rules, reports and ensure they are updated.
-
Compare the data on Site 1 and Site 2. All indices, and document numbers should be identical.
-
Step 2. Stop Collectors from Sending Events to Site 2
After following step 1, you will need to stop the Collectors from sending events to Site 2. To do this, take the following steps:
-
Login to the Site 2 GUI.
-
Navigate to ADMIN > Settings > System > Event Worker.
-
Remove all the Event Workers.
-
Click Save.
Collectors will now start buffering events.
Step 3. Prepare Site 2 for Secondary
To prepare Site 2 as Secondary, take the following steps:
-
Copy the missing indices from Site 2 to Site 1 by doing the following.
-
Determine the missing indices in Site 1.
-
Copy the missing indices from Site 2 to Site 1 by taking the following steps:
-
Login to Kibana.
-
Navigate to Kibana Home > Analytics section > Discover > Cross-Cluster Replication.
-
Replicate indices from site 2 to site 1.
-
-
Convert the copied indices to regular indices in Site1 by taking the following steps:
Note: You will be pausing the indices, closing them, then unfollowing them here.-
Login to Kibana of Site 1.
-
Navigate to Kibana Home > Analytics section > Discover > Cross-Cluster Replication.
-
Select all follower indices, then select Pause replication.
-
Navigate to Kibana Home > Analytics section > Discover > Index Management.
-
Select all follower indices, then select Close index.
-
Navigate to Kibana Home > Analytics section > Discover > Cross-Cluster Replication.
-
Select all follower indices, then select Unfollow leader indices.
-
-
-
Merge indices if both Site 1 and Site 2 have partial data of one day. To merge indices from Site 1 and Site 2, take the following steps:
-
Run the following command, and then compare the doc count in each index of the two clusters. If the index name is the same but the doc count is different, we need to merge the data in Site 2 into Site 1.
curl -X GET "<Site 1's coordinator ip>:9200/_cat/indices/fortisiem-*?v=true&s=index"

curl -X GET "<Site 2's coordinator ip>:9200/_cat/indices/fortisiem-*?v=true&s=index"
-
In Site 1, run the following command to replicate the index from Site 2 to Site 1, then wait for the replication to complete by making sure the doc_count is the same.
curl -X PUT "<Site 1's coordinator ip>:9200/<index>-site2/_ccr/follow?wait_for_active_shards=1&pretty" -H 'Content-Type: application/json' -d' { "remote_cluster" : "site2", "leader_index" : "<index>" } ' -
In Site 1, run the following command to make a change to the reset auto_create_index setting.
curl -X PUT "<site 1's coordinator ip>:9200/_cluster/settings?pretty" -H 'Content-Type: application/json' -d' { "persistent": { "action.auto_create_index": "true" } } ' -
In Site 1, run the following command to merge two indices.
curl -X POST "<site 1's coordinator ip>:9200/_reindex?pretty" -H 'Content-Type: application/json' -d' { "source": { "index": ["<index>-site2", "<index>"] }, "dest": { "index": "<index>-merged" } } ' -
In Site 1, run the following command to list all alias of index and add missing alias to the index.
curl -X GET "<site 2's coordinator ip>:9200/<index>/_alias?pretty"
Here is an example of three different aliases.

curl -X POST "<Site 1's coordinator ip>:9200/_aliases?pretty" -H 'Content-Type: application/json' -d' { "actions" : [ { "add" : { "index" : <index>-merged", "alias" : "fortisiem-event=2021.07.31.2000-000001" } } ] } ' curl -X POST "<Site 1's coordinator ip>:9200/_aliases?pretty" -H 'Content-Type: application/json' -d' { "actions" : [ { "add" : { "index" : <index>-merged", "alias" : "fortisiem-event=2021.08.01.2000-000001" } } ] } ' curl -X POST "<Site 1's coordinator ip>:9200/_aliases?pretty" -H 'Content-Type: application/json' -d' { "actions" : [ { "add" : { "index" : <index>-merged", "alias" : "fortisiem-event=2021.08.02.2000-000001" } } ] } ' -
In Site 1, verify that the new created alias is able to query data from <leader_index>-merged index.
curl -X GET "<Site 1's coordinator ip>:9200/<index>/_search?petty"
-
In Site 1, run the following command to roll back the auto_create_index setting.
curl -X PUT "<Site 1's coordinator ip>:9200/_cluster/settings?pretty -H 'Content-Type: application/json' -d' { "persistent": { "action.auto_create_index": "-fortisiem-event-*,fortisiem-*,.monitoring-*" } } ' -
In Site 1, run the following command to delete the original leader_index.
curl -X DELETE "<Site 1's coordinator ip>:9200/<index>?pretty"
-
-
Remove the auto-follow patterns from Site 1 by taking the following steps:
-
Login to Kibana of Site 1.
-
Navigate to Kibana Home > Analytics section > Discover > Cross-Cluster Replication.
-
Select all patterns.
-
Click Delete patterns.

-
-
Remove the Remote Cluster from Site 1 by taking the following steps:
-
Login to Kibana.
-
Navigate to Kibana Home > Analytics section > Discover > Remote Clusters.
-
Select "site2".
-
Click the trash icon to delete the remote cluster.

-
-
Add Remote Server to Site 2 by taking the following steps:
-
Login to Kibana of Site 1.
-
Navigate to Kibana Home > Analytics section > Discover > Remote Clusters.

-
Add Site 1's nodes as the remote servers to Site 2.
-
-
Create an auto-follow pattern in Site 2 by taking the following steps:
-
Login to Kibana of Site 2.
-
Navigate to Kibana Home > Analytics section > Discover > Cross-Cluster Replication.
-
Define Auto-Follow patterns for
fortisiem-event-*andfortisiem-incident-*time-series indices. Do NOT make similar definitions for other indices.
Elasticsearch on Site 2 is now ready for replication.
-
-
Create a follower index for today's event indices in Site 2 by taking the following steps:
-
Login to Kibana.
-
Navigate to Kibana Home > Analytics section > Discover > Cross-Cluster Replication.
-
Create a follower index for today’s event index in Site 2.

-
-
Delete old indices for today's event and incident indices in Site 2. Please be careful, double check the indices, and make sure Site 2 has the full data first before you delete today's indices in Site 1. Otherwise, you will need to merge the data first. Take the following steps:
-
Login to Kibana.
-
Navigate to Kibana Home > Analytics section > Discover > Index Management.
-
Select the old indices.
-
Click Delete index.

-
-
Create follower index for the incident index in Site 1 by taking the following steps:
-
Login to Kibana.
-
Navigate to Kibana Home > Analytics section > Discover > Cross-Cluster Replication.
-
Create one follower index for the incident index in Site 2.

-
-
Verify that all data in Site 1 and Site 2 are Identical by taking the following steps:
-
Compare index name, and docs.count by running the following commands:
curl -X GET "<Site 1's coordinator ip>:9200/_cat/indices/fortisiem-*?v=true&s=index"

curl -X GET "<Site 2's coordinator ip>:9200/_cat/indices/fortisiem-*?v=true&s=index"
-
-
Verify no follower index in site 1 by taking the following steps:
-
Login to Kibana of Site 1.
-
Navigate to Kibana Home > Analytics section > Discover > Cross-Cluster Replication.
-
Click Follower indices to make sure Cross-Cluster Replication appears as shown, meaning that there is no follower index in Site 1.

-
-
Set today's event alias in Site 1 to be writeable by running the following command:
curl -X POST "<Site 1's coordinator ip>:9200/_aliases?pretty" -H 'Content-Type: application/json' -d'
{
  "actions": [
    {
	  "add": {
	    "index": "fortisiem-event-2021.08.11-1-000001-site2",
		"alias": "fortisiem-event-2021.08.11-1"
	  }
	}
  ]
}
'
Step 4. Switch Site 1 Role to Primary in FortiSIEM
See Switching Primary and Secondary Roles in the latest Disaster Recovery Produces in EventDB Based Deployments Guide here.
Step 5. Delete the Old Lookup Index in Site 1
Delete the old lookup index in Site 1 by running the following command.
curl -XDELETE http://site1:9200/fortisiem-lookups-v2
Step 6. Save Elasticsearch Settings on Site 1 in FortiSIEM
Save the Site 1 Elasticsearch settings by taking the following steps.
Note: If you have a custom event template in Site 2, you must upload the same custom event template in Site 1 first before proceeding with these instructions.
-
Login to FortiSIEM Site 1 GUI.
-
Navigate to ADMIN > Setup > Storage > Online.
-
Click Test to verify your settings.
-
Click Save.
Step 7. Verify All Event Workers are Added to Site 1
Verify that all event workers are added to Site 1 by taking the following steps.
-
Login to FortiSIEM Site 1 GUI.
-
Navigate to ADMIN > Settings > System > Event Worker.
-
Verify all event workers are added to the Event Worker list.
All Collectors will now send events to Site 1.
Step 8. Verify Events are Being Written into Site 1
Verify that events are being written into Site 1 by taking the following steps.
-
Login to FortiSIEM Site 1 GUI.
-
Navigate to ANALYTICS.
-
Run some queries and make sure events are coming in.

-
Navigate to INCIDENTS, and check that new incidents are triggered.

Step 9. Verify Events are being Replicated to Site 2
Take the following steps to check on Elasticsearch event replication.
-
Login to Kibana.
-
Navigate to Kibana Home > Analytics section > Discover > Cross-Cluster Replication.
-
Verify that the follower indices are created automatically.
Viewing Replication Health
Replication progress is available by navigating to ADMIN > Health > Replication Health. For details see here.
Implementation Notes
Changing Index Lifecycle Management Parameters on Primary
When replication is occurring, if you change the Index Lifecycle Management (ILM) age or hot/warm/cold thresholds on Primary, you will need to restart phDataPurger on Secondary. The restart is necessary to enable phDataPurger on Secondary to read the new changes.
Steps to Merge Indices Between Two Sites
To merge indices between two sites, Site 1 and Site 2, take the following steps:
-
Run the following command, and then compare the doc count in each index of the two clusters. If the index name is the same but the doc count is different, we need to merge the data in Site 2 into Site 1.
curl -X GET "<Site 1's coordinator ip>:9200/_cat/indices/fortisiem-*?v=true&s=index"

curl -X GET "<Site 2's coordinator ip>:9200/_cat/indices/fortisiem-*?v=true&s=index"
-
In Site 1, run the following command to replicate the index from Site 2 to Site 1, then wait for the replication to complete by making sure the doc_count is the same.
curl -X PUT "<Site 1's coordinator ip>:9200/<index>-site2/_ccr/follow?wait_for_active_shards=1&pretty" -H 'Content-Type: application/json' -d' { "remote_cluster" : "site2", "leader_index" : "<index>" } ' -
In Site 1, run the following command to make a change to the reset auto_create_index setting.
curl -X PUT "<Site 1's coordinator ip>:9200/_cluster/settings?pretty" -H 'Content-Type: application/json' -d' { "persistent": { "action.auto_create_index": "true" } } ' -
In Site 1, run the following command to merge two indices.
curl -X POST "<Site 1's coordinator ip>:9200/_reindex?pretty" -H 'Content-Type: application/json' -d' { "source": { "index": ["<index>-site2", "<index>"] }, "dest": { "index": "<index>-merged" } } ' -
In Site 1, run the following command to list all alias of index and add missing alias to the index.
curl -X GET "<Site 2's coordinator ip>:9200/<index>/_alias?pretty"
Here is an example of three different aliases.
curl -X POST "<Site 1's coordinator ip>:9200/_aliases?pretty" -H 'Content-Type: application/json' -d' { "actions" : [ { "add" : { "index" : <index>-merged", "alias" : "fortisiem-event=2021.07.31.2000-000001" } } ] } ' curl -X POST "<Site 1's coordinator ip>:9200/_aliases?pretty" -H 'Content-Type: application/json' -d' { "actions" : [ { "add" : { "index" : <index>-merged", "alias" : "fortisiem-event=2021.08.01.2000-000001" } } ] } ' curl -X POST "<Site 1's coordinator ip>:9200/_aliases?pretty" -H 'Content-Type: application/json' -d' { "actions" : [ { "add" : { "index" : <index>-merged", "alias" : "fortisiem-event=2021.08.02.2000-000001" } } ] } ' -
In Site 1, verify that the new created alias is able to query data from <leader_index>-merged index.
curl -X GET "<Site 1's coordinator ip>:9200/<index>/_search?petty"
-
In Site 1, run the following command to roll back the auto_create_index setting.
curl -X PUT "<Site 1's coordinator ip>:9200/_cluster/settings?pretty -H 'Content-Type: application/json' -d' { "persistent": { "action.auto_create_index": "-fortisiem-event-*,fortisiem-*,.monitoring-*" } } ' -
In Site 1, run the following command to delete the original leader_index.
curl -X DELETE "<Site 1's coordinator ip>:9200/<index>?pretty"
Circuit_Breaking_Exception in Elasticsearch
Enabling Cross-Cluster Replication (CCR) may affect the heap memory usage of Elasticsearch. If you encounter a request circuit_breaking_exception in Elasticsearch, please try the following solutions to fix the issue:
-
1. Increase "indices.breaker.request.limit" from its default 60% to 85%. It can be hard coded in
elasticsearch.ymlor configured dynamically with the command below:curl -X PUT "<Site 1's coordinator ip>:9200/_cluster/settings?pretty" -H 'Content-Type: application/json' -d' { "persistent" : { "indices.breaker.request.limit": "85%" } } ' curl -X PUT "<Site 2's coordinator ip>:9200/_cluster/settings?pretty" -H 'Content-Type: application/json' -d' { "persistent" : { "indices.breaker.request.limit": "85%" } } ' -
Increase Elasticsearch heap size in
jvm.optionsin data nodes, then restart all data nodes.
Circuit Breaker Settings Reference: https://www.elastic.co/guide/en/elasticsearch/reference/7.12/circuit-breaker.html