


Migrating from FortiSIEM 5.3.x or 5.4.0
Migration limitations: If migrating from 5.3.3 or 5.4.0 to 6.1.1, please be aware that the following features will not be available after migration.
-
Pre-compute feature
-
Elastic Cloud support
If any of these features are critical to your organization, then please wait for a later version where these features are available after migration.
This section describes how to migrate from FortiSIEM
Pre-Migration Checklist
To perform the migration, the following prerequisites must be met:
- Delete the Worker from the Super GUI.
- Stop/Shutdown the Worker.
- Note the
/svnpartition by running thedf -hcommand. the partition is used to mount/svn/53x-settings. You will need this information for a later step. - Create a
/svn/53x-settingsdirectory and symlink it to/images. In AWS, you need only a small amount of space to backup5.3.x or 5.4.0 system settings, so use the/svnpartition (that is, a partition other thanroot) instead of a new disk. See the following example:

Migrate All-in-one Installation
- Download the Backup Script
- Run the Backup Script and Shutdown
- Detach
5.3.x or 5.4.0 Root Disk - Attach the 6.1.1 Root Disk to the
5.3.x or 5.4.0 Instance - Boot Up the
5.3.x or 5.4.0 Instance and Migrate to 6.1.1 - (Optional) Change Instance Type to the Latest Generation
Download the Backup Script
Download FortiSIEM AWS backup script to start migration. Follow these steps:
- # Download the file
FSM_Backup_5.3_Files_6.1.1_0118.zipor file from the support site and copy it to the 5.3.x AWSFSM_Backup_5.4_Files_6.1.1_0118.zipor 5.4.0 AWS instance that you are planning to migrate to 6.1.1 (for example,/svn/53x-settings). - Unzip the
.zipfile, for example:# unzip FSM_Backup_5.3_Files_6.1.1_0118.zip
Run the Backup Script and Shutdown System
Follow these steps to run the backup script and shut down the system:
- Go to the directory where you downloaded the backup script, for example:
# cd /svn/53x-settings/FSM_Backup_5.3_Files_6.1.1_0118
- Run the backup script with the
sh backupcommand to backup5.3.x or 5.4.0 settings that will be migrated later into the new 6.1.1 OS. For example:# sh backup
- Run the
shutdowncommand to shut down the FortiSIEM instance, for example:# shutdown -h now
Detach 5.3.x or 5.4.0 Root Disk
Follow these steps to detach the
- Log in to the AWS Console, select EC2 service, and select your FortiSIEM
5.3.x or 5.4.0 instance.
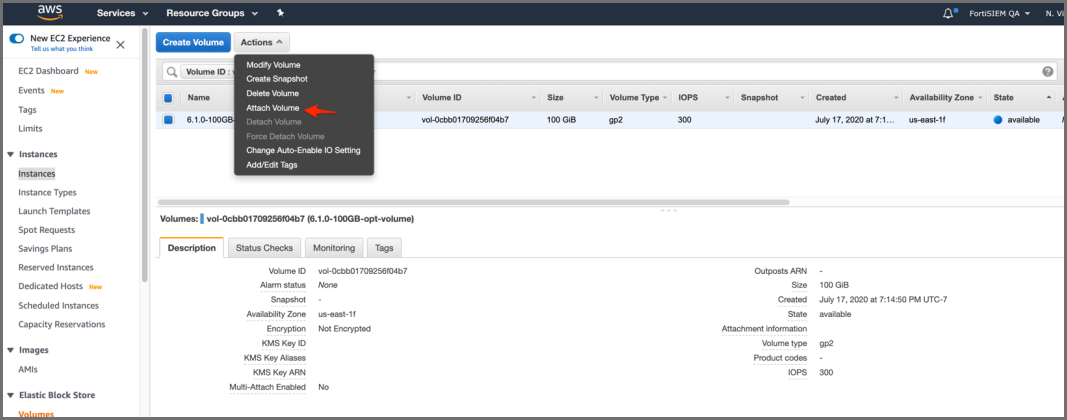
- Click the
/dev/sda1volume and navigate to the volume by clicking the volume EBS ID. - Click Action > Detach Volume.

- Confirm the operation in the popup by clicking Yes, Detach.

Attach the 6.1.1 Root Disk to the 5.3.x or 5.4.0 Instance
Follow these steps to attach the 6.1.1 root disk to the
- Navigate to the EC2 AMIs page and find FortiSIEM 6.1.1 AMI (or in AWS Marketplace after GA).
- Launch
FortiSIEM-6.1.1.0118.
- In Step 2: Choose an Instance Type, select the m5.2xlarge instance type (it does not matter if you pick another instance type). The purpose of this is only to get a root volume. Click Next: Configure Instance Details.

- In Step 3: Configure Instance Details choose the same VPC and subnet where you deployed your
5.3.x or 5.4.0 instance. The remaining details can be default values.
- In Step 4: Add Storage, click Next: Add Tags.

- In Step 5: Add Tags click the Add Tag button.

- Provide a Key name and Value for the tag. Click Next: Configure Security Group.

- In Step 6: Configure Security Group, select any security group because FortiSIEM will not be logging into this instance.
Click Review and Launch.

- In Step 7: Review Instance Launch. Click Launch.

- Select an existing key pair or create a new key pair.
Click Launch Instances.

- Navigate to Instances. Select, then stop the instance.

- Select, then navigate to the root volume.

- Click Actions > Detach Volume.
- Click Yes, Detach in the popup window. Wait for the instance state to be Available.

- Click Actions > Attach Volume.

- Enter the name of your
5.3.x or 5.4.0 instance in the Instance search box and select it.
- Enter the Device as
/dev/sda1and click Attach.
- Create a new 100GB volume for
/optin the same availability zone where your5.3.x or 5.4.0 instance is running. Click Create Volume.
- Navigate to Volumes, then click Actions > Attach Volume.
- Navigate to Instances page and select the
5.3.x or 5.4.0 instance that you want to migrate to 6.1.1.
Boot Up the 5.3.x or 5.4.0 Instance and Migrate to 6.1.1
Follow these steps to complete the migration process:
- Start the instance using Actions > Instance State > Start.

- Use the
/svnpartition noted earlier and mount it to/mnt. This contains the backup of the5.3.x or 5.4.0 system settings that will be used during migration. Copy the5.3.x or 5.4.0 settings that were previously backed up and umount/mnt. For example:# mount /dev/xvdg1 /mnt
# mkdir /restore-53x-settings
# cd /restore-53x-settings
# rsync -av /mnt/53x-settings/. .
# ln -sf /restore-53x-settings /images
# umount /mnt
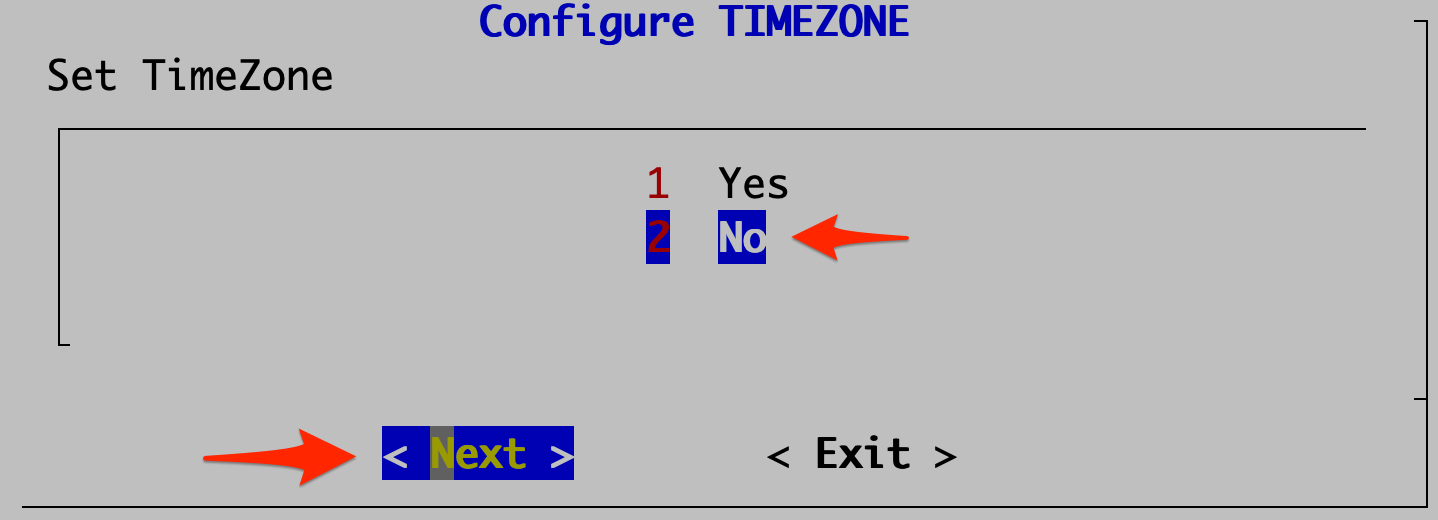
- Run the command
configFSM.shscript to open the configuration GUI:- Select 2 No in the Configure TIMEZONE dialog. Click Next.
- In Config Target, select your node type: Supervisor, Worker, or Collector. This step is usually performed on Supervisor (1 Supervisor). Click Next.

- In Configure Supervisor, select the 6 migrate_6_1_1 operation. Click Next.

- Test network connectivity by entering a host name that can be resolved by your DNS Server (entered in the previous step) and can respond to a ping. The host can either be an internal host or a public domain host like google.com. Click Next.

- Click Run on the confirmation page once you make sure all the values are correct. The options are described in the table here.

- Wait for the operations to complete and the system to reboot.

- Wait for about 2 minutes before logging in to the system. Wait another 5-10 minutes for all of the processes to start up.
Execute the
phstatuscommand to see the status of FortiSIEM processes.
- Remove the restored settings directories because you no longer need them, for example:
# rm -rf /restore-53x-settings
# rm -rf /svn/53x-settings
# rm -f /images
- Select 2 No in the Configure TIMEZONE dialog. Click Next.
(Optional) Change Instance Type to the Latest Generation
If you would like to change the instance type to one in the current generation for higher performance, this is a good time to do it.
To do this, stop the instance and change instance type as follows, then start the instance again.

Select the Instance Type from the drop-down list and click Apply.

Migrate Cluster Installation
This section provides instructions on how to migrate Supervisor, Workers, and Collectors separately in a cluster environment,
- Delete Workers
- Migrate Supervisor
- Install New Worker(s)
- Register Workers
- Set Up Collector-to-Worker Communication
- Working with Pre-6.1.0 Collectors
- Install 6.1.1 Collectors
- Register 6.1.1 Collectors
Delete Workers
- Login to the Supervisor.
- Go to Admin > License > Nodes and delete the Workers one-by-one.
- Go to the Admin > Cloud Health page and make sure that the Workers are not present.
Note that the Collectors will buffer events while the Workers are down.
- Shutdown the Workers.
SSH to the Workers one-by-one and shutdown the Workers.
Migrate Supervisor
Follow the steps in Migrate All-in-one Installation to migrate the supervisor node. Note: FortiSIEM 6.1.1 does not support Worker or Collector migration.
Install New Worker(s)
Follow the steps in Cluster Installation > Install Workers to install new Workers. You can either keep the same IP address or change the address.
Register Workers
Follow the steps in Cluster Installation > Register Workers to register the newly created 6.1.1 Workers to the 6.1.1 Supervisor. The 6.1.1 FortiSIEM Cluster is now ready.
Set Up Collector-to-Worker Communication
- Go to Admin > Systems > Settings.
- Add the Workers to the Event Worker or Query Worker as appropriate.
- Click Save.
Working with Pre-6.1.0 Collectors
Pre-6.1.0 Collectors and agents will work with 6.1.1 Supervisor and Workers. You can install 6.1.1 collectors at your convenience.
Install 6.1.1 Collectors
FortiSIEM does not support Collector migration to 6.1.1. You can install new 6.1.1 Collectors and register them to 6.1.1 Supervisor in a specific way so that existing jobs assigned to Collectors and Windows agent associations are not lost. Follow these steps:
- Copy the http hashed password file (
/etc/httpd/accounts/passwds) from the old Collector. - Disconnect the pre-6.1.1 Collector.
- Install the 6.1.1 Collector with the old IP address by the following the steps in Cluster Installation > Install Collectors.
- Copy the saved http hashed password file (
/etc/httpd/accounts/passwds) from the old Collector to the 6.1.1 Collector. This step is needed for Agents to work seamlessly with 6.1.1 Collectors. The reason for this step is that when the Agent registers, a password for Agent-to-Collector communication is created and the hashed version is stored in the Collector. During 6.1.1 migration, this password is lost.
Register 6.1.1 Collectors
Follow the steps in Cluster Installation > Register Collectors, with the following difference: in the phProvisionCollector command, use the --update option instead of --add. Other than this, use the exactly the same parameters that were used to register the pre-6.1.1 Collector. Specifically, use this form of the
phProvisionCollector command to register a 6.1.1 Collector and keep the old associations:
# /opt/phoenix/bin/phProvisionCollector --update <user> '<password>' <Super IP or Host> <Organization> <CollectorName>
The password should be enclosed in single quotes to ensure that any non-alphanumeric characters are escaped.
Re-install new Windows Agents with the old InstallSettings.xml file. Both the migrated and the new agents will work. The new Linux Agent and migrated Linux Agent will also work.