


Testing the dynamic private access policy
(Optional) To display tags on the FortiClient endpoint:
- In FortiSASE, go to Configuration > Endpoints > Profile.
- Enable Show tags on FortiClient.
- Click Apply. When this option is enabled, detected tags appear on the FortiClient avatar page.

To test that FortiSASE allows a FortiClient endpoint tagged as SASE-Compliant access to a private server:
- In FortiClient, go to the REMOTE ACCESS tab.
- From the VPN Name dropdown list, select Secure Internet Access.
- Enter the user credentials based on the VPN user authentication defined on FortiSASE. Click Connect.
- In Windows Defender, set Real-time protection to On as Stay protected with Windows Security describes. This turns on antivirus (AV) and ensures that FortiSASE dynamically tags the endpoint as compliant.
- From the FortiClient avatar page, ensure that the endpoint is non-compliant and has the SASE-Compliant Zero Trust tag applied.
- In Windows Command Prompt, enter
ping 10.100.99.101to test an ICMP ping to the specified private server with IP address 10.100.99.101 behind the FortiGate hub. - Observe the following output indicating the ping succeeded since FortiSASE allows access:
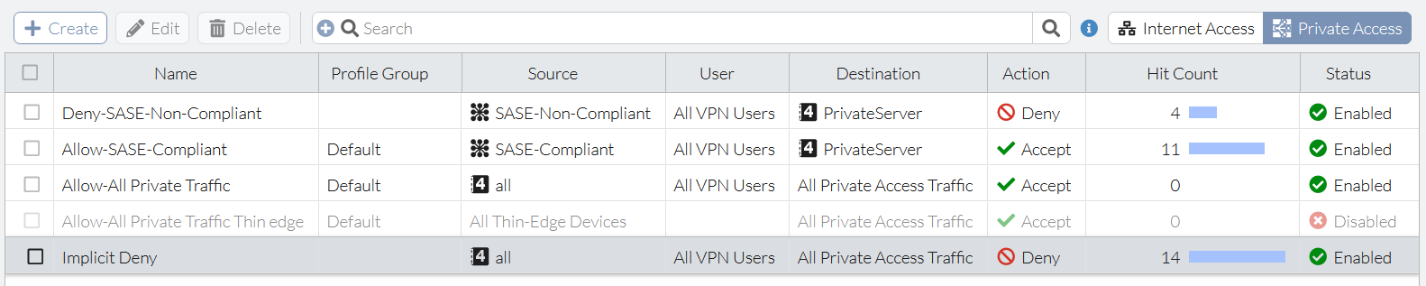
C:\> ping 10.100.99.101 Pinging 10.100.99.101 with 32 bytes of data: Reply from 10.100.99.101: bytes=32 time=137ms TTL=62 Reply from 10.100.99.101: bytes=32 time=137ms TTL=62 Reply from 10.100.99.101: bytes=32 time=137ms TTL=62 Reply from 10.100.99.101: bytes=32 time=136ms TTL=62 Ping statistics for 10.100.99.101: Packets: Sent = 4, Received = 4, Lost = 0 (0% loss), Approximate round trip times in milli-seconds: Minimum = 136ms, Maximum = 137ms, Average = 136ms - In FortiSASE, in Configuration > Policies, observe that the Allow-SASE-Compliant dynamic private access policy hit count increased and that the Deny-SASE-Non-Compliant dynamic private access policy hit count has not changed.
To test that FortiSASE denies a FortiClient endpoint tagged as SASE-Non-Compliant access to a private server:
- In FortiClient, go to the REMOTE ACCESS tab.
- From the VPN Name dropdown list, select Secure Internet Access.
- Enter the user credentials based on the VPN user authentication defined on FortiSASE. Click Connect.
- In Windows Defender, set Real-time protection to Off as Stay protected with Windows Security describes. This turns off AV and ensures that FortiSASE dynamically tags the endpoint as non-compliant.
- From the FortiClient avatar page, ensure that the endpoint is non-compliant and has the SASE-Non-Compliant Zero Trust tag applied.
- In Windows Command Prompt, enter
ping 10.100.99.101to test an ICMP ping to the specified private server with IP address 10.100.99.101 behind the FortiGate hub. - Observe the following output indicating the ICMP ping has timed out since FortiSASE denies access to the specific server:
C:\> ping 10.100.99.101 Pinging 10.100.99.101 with 32 bytes of data: Request timed out. Request timed out. Request timed out. Request timed out. Ping statistics for 10.100.99.101: Packets: Sent = 4, Received = 0, Lost = 4 (100% loss), - In FortiSASE, in Configuration > Policies, observe that the Allow-SASE-Compliant dynamic private access policy hit count has not changed and that the Deny-SASE-Non-Compliant dynamic private access policy hit count increased.