


FortiGate and OnSight configuration for SD-WAN synthetic monitoring
This article provides the steps on how to set up an OnSight for SD-WAN synthetic monitoring.
Prerequisites
-
Security Fabric must be configured in FortiMonitor.
-
SD-WAN must be configured on the FortiGate device.
-
The OnSight needs a reserved IP for each of the FortiGate's WAN interfaces. Reserved IPs will automatically be assigned to the host when enabling SD-WAN synthetic monitoring. You do not need to assign them manually.
These need to exist within the same subnet as the primary OnSight IP and not already in use by another device. -
The Admin profile used in the Security Fabric setup must have the read permission on firewall addresses.

This guide will use the following objects and addresses. In the example below, we are using 10.10.10.11 and 10.10.10.12. Substitute your chosen IPs in the details below.
|
SD-WAN Device |
OnSight Agent IP |
Firewall Address |
SD-WAN Rule |
SD-WAN Member ID |
SD-WAN Zone |
|---|---|---|---|---|---|
|
WAN1(port1) |
10.10.10.11 |
FMR_IP1 |
Manual (#1) |
1 |
virtual-wan-link |
|
WAN2(port2) |
10.10.10.12 |
FMR_IP2 |
Manual (#2) |
2 |
virtual-wan-link |
Note: While this example is presented using two underlays, it can be extended to use three or more.
High-level configuration steps
This section provides the high-level configuration steps which must be done in the correct order.
Initial steps
-
Install an OnSight vCollector.
-
Onboard the FortiGate and configure Security Fabric. Note that SD-WAN must be configured on the FortiGate.
FortiGate configuration
-
Create new firewall address objects for each OnSight agent monitored IP
-
Referenced in the table above as FMR_IP1, and FMR_IP2.
-
-
Create SD-WAN rules to manually steer traffic from each On-sight agent to its respective WAN port
FortiMonitor configuration
The following sections explain the high-level configuration steps in detail.
FortiGate configuration
This section details the steps on how to configure FortiGate.
Configure firewall objects
Create a firewall address object for each OnSight agent IP.
-
Log in to FortiGate.
-
Launch the CLI console. If you need more information on how to use the CLI console, see Using the CLI.
-
Configure firewall objects for each WAN connection and the OnSight's default IP.
In this example, The IP addresses 10.10.10.11, and 10.10.10.12 are used. Replace them with the correct OnSight IPs. Similarly, you can also replace FMR_IP1 and FMR_IP2 with your own values. -
From the CLI, enter the following command:
config firewall address
edit "FMR_IP1"
set subnet 10.10.10.11 255.255.255.255
next
edit "FMR_IP2"
set subnet 10.10.10.12 255.255.255.255
next
end
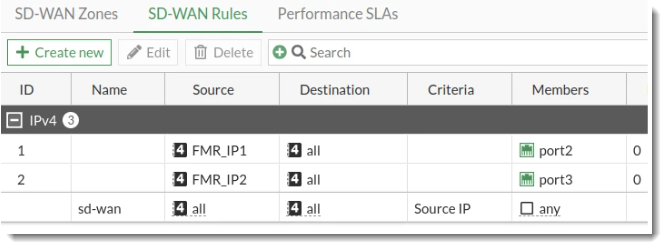
Create SD-WAN rules
SD-WAN rules must first be set up to use SD-WAN synthetic monitoring. A specific IP address is needed for each WAN connection.
In this step we will create a manual SD-WAN rule to steer each OnSight IPs monitoring traffic through its respective WAN underlay.
-
OnSight monitoring traffic will be marked using the agent-exclusive command. This command marks traffic as FortiMonitor health checks.
-
Each OnSight firewall object will be manually steered to its respective WAN underlay.
-
Launch the CLI console.
-
Enter the following command to create the SD-WAN rules:
config system sdwan
config service
edit 1
set dst "all"
set src "FMR_IP1"
set priority-members 1
set agent-exclusive enable
next
edit 2
set dst "all"
set src "FMR_IP2"
set priority-members 2
set agent-exclusive enable
next
end
end
Note: The command set agent-exclusive enable is a FortiOS dependency of 7.2.4 or later.
In this example, rules 1 and 2 are used but you may configure any available rule ID.
The Source (src) and Destination (dst) parameters are used to identify traffic. If the traffic is from a specific source address ,its associated SD-WAN rule will be used. See SD-WAN rules overview for more information.
Note that the SD-WAN rules created for SD-WAN synthetic monitoring must be set to the highest priority. You can do this by dragging the rules to the top of the list.
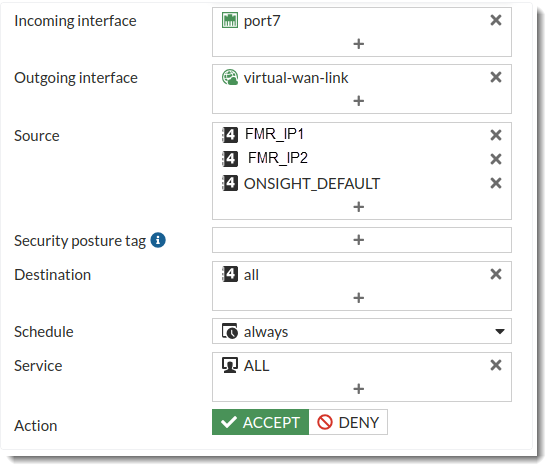
Add the firewall addresses to the firewall policy
Add FMR_IP1 and FMR_IP2 to the Firewall policy from the OnSight to virtual-wan-link, so that the traffic from OnSight can travel to the internet.
-
Incoming interface - The interface connected to the OnSight.
-
Source - Add FMR_IP1 and FMR_IP2. If the Source is All, there is no need to add the addresses.
FortiMonitor configuration
Enable SD-WAN synthetic monitoring
Once the configuration on the FortiGate has been completed:
-
Go to Monitoring > Infra setting > Fabric then run a rediscovery on the fabric integration.
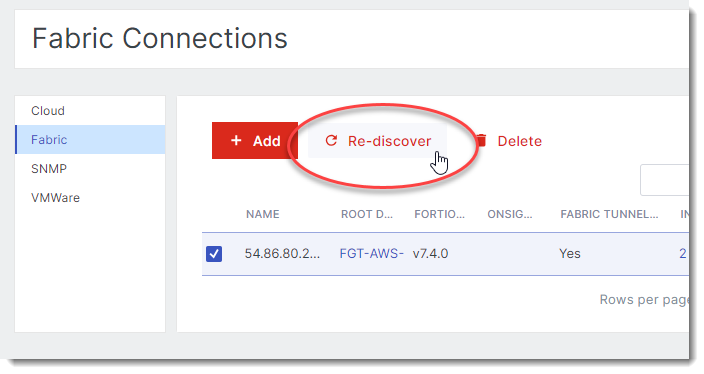
Rediscovery module performs the following:-
Retrieves the firewall address information including the FortiMonitor IP, OnSight agent IPs, and SD-WAN rules.
-
Validates the values.
-
If there are no issues, the SD-WAN synthetic monitoring menu option will be enabled.
-
After enabling SD-WAN synthetic monitoring. the OnSight will then assign the additional IP addresses.
-
-
Open the FortiGate details page in the Control Panel.
-
Click SD-WAN Synthetic Monitor.

-
On the modal that appears, click Enable SDWAN Synthetic Monitor.
Add SD-WAN monitoring to an application
-
Go to Monitoring > Application.
-
Select the application where you want to add SD-WAN monitoring.
-
Select Locations.
-
Select Add Locations > SD-WAN Devices.
-
In the Source SD-WANs drop-down field, select the FortiGate you configured.

-
Click Save.
Data should begin to flow in about 5-10 minutes.