


Part 3: Alert Timelines
All incident notifications in FortiMonitor are managed in an Alert Timeline. An Alert Timeline is a highly configurable workflow for managing alerts when an incident is detected. It pivots off of a number of variables that you can utilize to best suit your team’s alerting needs by involving multiple people, teams, and integrations.
Alert Timelines
With Alert Timelines, you can configure the following:
-
Who gets alerted
-
Which notification medium to use (direct or via third-party integration)
-
The amount of time between the identification of an incident and the first and succeeding notifications
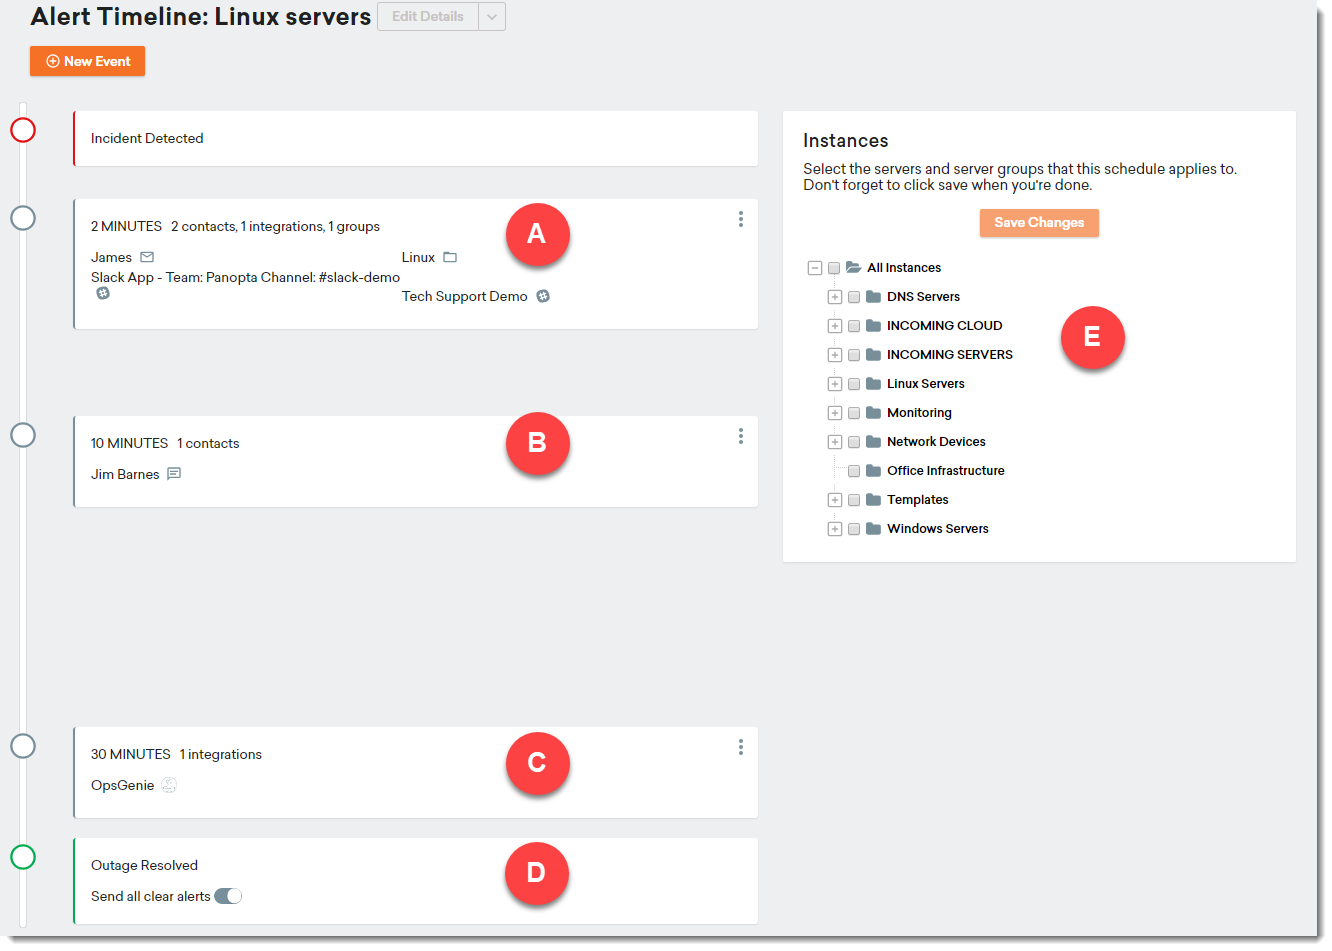
Once an incident is detected or a certain threshold that you have configured is breached, alerts will be sent out depending on your configuration. You can see how this works in the following example:
|
A |
First event |
|
Users and groups are notified depending on the configured contact method, On-Call schedule, or third-party integration. At this point, any person in your team can acknowledge it and take responsibility, escalate it to the next level, or delay or cancel all future alerts. |
|
|
B |
Second event |
|
In this example, 10 minutes have passed without any resolution and an SMS is sent to the specified user. |
|
|
C |
Third event |
|
After 30 minutes, the alert has escalated further and has been reported to a third-party integration (OpsGenie). Note: You can build as many events as needed. |
|
|
D |
Outage resolved |
|
When the incident is resolved, you have the option to send an "all clear" message. Any previously notified users, groups, or integrations will be notified on the communication channels they were previously notified on. |
|
|
E |
Instance tree |
|
This Alert Timeline is applied to your selected instances and groups |
You can set a specific alert timeline on the metric, instance, or group level. All of this can also be controlled by Templates.
For more information, including instructions on how to create an Alert Timeline, see Alert Timelines.
Who gets alerted
When you create or edit a new event in the Alert Timeline, you can select the users, groups, and/or integrations that you want to be notified during an incident. Note that the users and groups, including their contact methods, must first be configured in the Users, Groups, and On-Call page.
To configure who gets alerted during an incident, see Configure who gets alerted during an outage.
To add users or groups to FortiMonitor, see Add users to your account.
On-Call schedule
Similar to adding users, groups, and integrations, you can also add On-Call schedules to the Alert Timeline. On-Call schedules allow you to set dynamic alerting behavior based on the specific on-call rotations within your organization. Schedules can be set to any level of granularity.
To create an On-Call schedule, see Set up an On-Call schedule.

Channels and integrations
You can configure Alert Timelines to send notifications to users or groups through several direct and third-party channels.
Notifications can be sent using the following direct channels:
-
Email
-
SMS
-
Voice
The following third-party integrations are supported:
-
ServiceNow
-
Slack
-
Microsoft Teams
-
HipChat
-
PagerDuty
-
OpsGenie
-
WebHooks
See Integrations for details on how to configure each integration.
Using Alert Timelines
Alert Timelines can be applied to an instance, an instance group, or a metric. Metric-level Alert Timelines can override both the Group-level and instance-level timelines to add granularity to how FortiMonitor sends notifications for incidents.
Apply an Alert Timeline to an instance group
When you apply an Alert Timeline to an instance group, the Alert Timeline can be assigned to all instances in that group, and notification will be sent to the Alert Timeline's configured contacts if there is an incident in one or more instance in that group. This method is especially useful if you have a large number of instances that are logically grouped. For example, you can create an Alert Timeline for a group of database servers to notify database admins during an incident. The Alert Timeline is centrally managed in the database instance group. You can configure each instance to inherit the instance group's Alert Timeline. To configure an instance to inherit an instance group's alert timeline, select Edit from the instance group's then select Primary Alerts. Under Primary Alert Timeline, select Inherit from the group.

Apply an Alert Timeline to an instance
You can also apply an Alert Timeline to individual instances. This can be useful if you want to apply an Alert Timeline to an instance in addition to the Alert Timeline assigned to the instance's group. For example, you have an Alert Timeline assigned to a group of database servers but you want to notify supplemental team members to database servers that are critical to your operations. You can apply instance-level timelines to those database servers.
Override an Alert Timeline
In addition to the Alert Timeline assigned to an instance or an instance group, you can configure Alert Timelines on the metric-level. The metric-level timelines can be used to override the notification function configured in the instance's or instance group's Alert Timeline. It can also be used to supplement the normal notification function. This is useful if you want to notify team members who are responsible for only a specific metric. For example, you can configure the Ping check metric to only notify the Network Admins group and override the settings that you have configured in the Alert Timeline for the instance or instance group.

Default Alert Timelines
A Basic Alert Timeline is created when you first sign up to FortiMonitor. If an instance is added without specifying which Alert Timeline to use, the Basic Alert Timeline is used. If that has been removed, the first Alert Timeline in your account is used.
Maintenance period
In FortiMonitor, you can set up a maintenance period anytime you do routine maintenance, upgrades, or other tasks that may cause your instance or applications to trigger incidents. Adding a maintenance period to an instance or instance group can override the Alert Timeline so that FortiMonitor can monitor these instances depending on the maintenance period's configuration. See the following table for more options on how to handle monitoring and notifications for instances under a maintenance period.
|
Option
|
Description
|
|---|---|
|
Pause monitoring |
All monitoring for the instances covered by the Maintenance Period will be paused - meaning no incidents will be created and no alerts will be sent |
|
Continue monitoring but don't create incidents |
All monitoring for the instances covered by the Maintenance Period will continue - however, incidents will not be created, regardless of the monitoring data collected |
|
Continue monitoring & creating incidents but don't send alerts |
All monitoring for the instances covered by the Maintenance Period will continue and incidents will be created accordingly - however, no alerts will be sent for any detected incidents |
|
Continue monitoring, creating incidents and sending alerts |
Things will operate as normal - however, an Alert Timeline override must be selected to be used for alerting |
In addition to overriding the Alert Timeline's alerting and escalation configuration as shown in the table above, you can also control the general handling of the maintenance period, the timing, and the scope of your infrastructure which it covers. There are many ways to select which instances will be part of a maintenance period. You can select by instance group, individual instance, or by tag. See Maintenance Schedules for more information.
Acknowledging an incident
Acknowledging an incident marks the incident with your username and can optionally add a message to the incident log. You also have the option to send a message to all configured users and channels in the Alert Timeline or delay further alerts for a set amount of time. There are several ways to acknowledge an incident:
-
See Incident Hub and View incident details.
-
From the Infrastructure Map, select the instance that has an incident then click Take Action > Acknowledge.
-
From the Instance Details page, click the incident from the incident header. This will take you to the instance's incident page. You can acknowledge the incident from there. See View incident details.
-
From the navigation header, select the Notification icon. Select the incident then click Acknowledge.
-
From the email you receive during an incident, select the Acknowledge link. This will take you to the control panel.
In addition to acknowledging an incident, the following actions are also available depending on which page you are on:
-
Broadcast - Send a message to all configured users and channels in the Alert Timeline
-
Exclude from Availability - Exclude the instance from the availability calculation
-
Delay alerts by - When you acknowledge an incident, you have the option to postpone alerts for a set amount of time
-
Enable all clear - this functionality alerts all previously alerted users/integrations that the incident has resolved
-
Cancel alerts - cancels succeeding alerts. No further alerts will be sent
-
Escalate to the next event - Immediately send a notification based on the next event, overriding the configured amount of time in the Alert Timeline. This means that even if you have configured the Alert Timeline to send a notification after 10 minutes, you can override this and send the notification earlier.
Once an incident is resolved, the Alert Timeline will stop further escalations and send an "all clear" message to all the users, groups, and integrations defined in the Alert Timeline.
For more information on responding to an incident, see Respond to an outage and delay further notifications.