


Initial deployment
This example deploys a FortiManager instance from the EC2 console.
To deploy a FortiManager instance from the EC2 console:
- Launch the FortiManager-VM instance:
- Find the FortiManager listing on the AWS marketplace. Choose the FortiManager version based on the number of devices you want to manage.
- After configuring the software, click Continue to Launch. For a BYOL instance, select Launch through EC2, then click Launch.
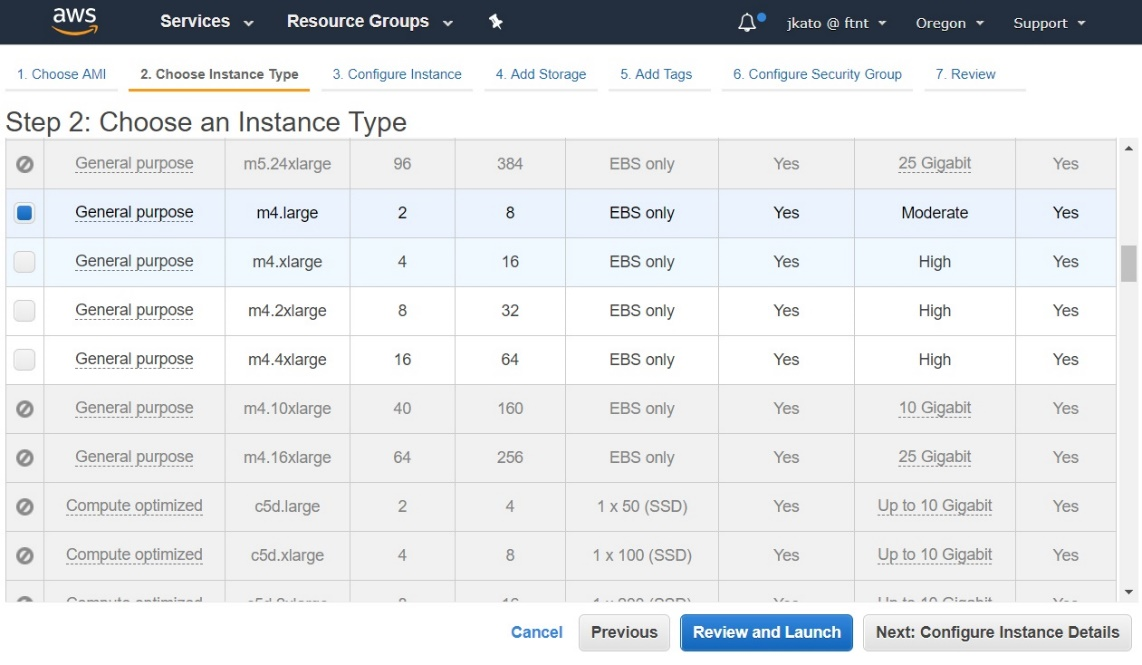
- Select one of the supported instance types. Click Next: Configure Instance Details.
- Configure the various attributes:
- Network: Ensure to select a VPC connected to the Internet gateway. By default, VPCs are connected to the Internet gateway.
- Subnet
- Enable Auto-assign public IP
- Other as needed depending on your IT infrastructure requirements
Click Next: Add Storage.

- You can configure disks by choosing one of the following options:
- Leave the disks at default values. You can add additional disks later.
- Increase the second volume's disk size. The second volume is used for logging.
- Add additional disks.
You can configure the volume type as EBS, the device as /dev/sdb, and the size based on your requirements. You are entitled to consume disks according to the licensed limit of the purchased BYOL license.
For more detail about disk sizes and the maximum limit of licensed numbers of devices, see the product listing page.
The FortiManager system reserves a certain portion of disk space for system use and unexpected quota overflow. The remaining space is available for allocation to devices. Reports are stored in the reserved space. The following describes the reserved disk quota relative to the total available disk size (other than the root device):
- Small disk (less than or equal to 500 GB): system reserves 20% or 50 GB of disk space, whichever is smaller.
- Medium disk (less than or equal to 1 TB): system reserves 15% or 100 GB of disk space, whichever is smaller.
- Large disk (less than or equal to 5 TB): system reserves 10% or 200 GB of disk space, whichever is smaller.
- Very large disk (greater than 5 TB): system reserves 5% or 300 GB of disk space, whichever is smaller.
To add additional storage at this point, follow the instructions in Adding additional storage (optional).
Click Next: Add Tags.

- Create or add tags as required. Name tags are convenient to use to distinguish EC2 instance names. You can also leave this section blank and continue by clicking Next: Configure Security Group.

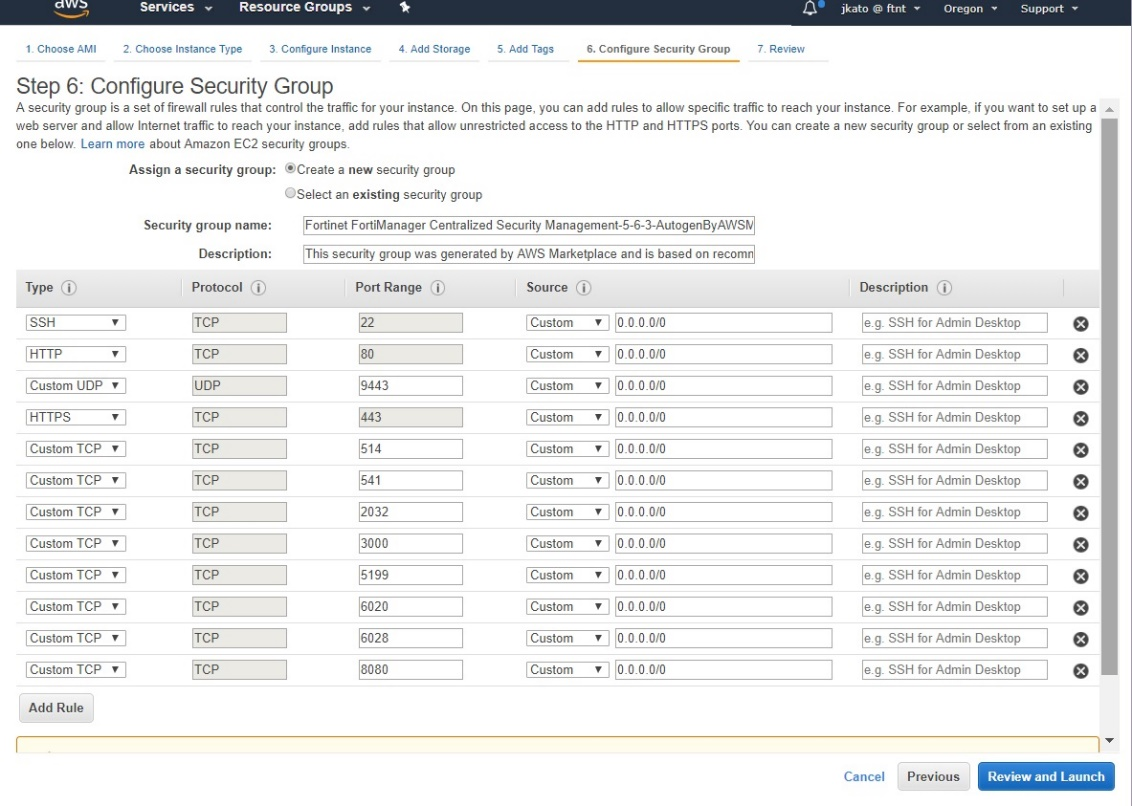
- Review all open ports configured by default. Usually, these can stay as-is. Most strict configuration is to allow SSH or HTTPS to access the FortiManager management console. Accessing the GUI requires the HTTPS port to be open. Refer here to see each port's purpose.
- Review the configuration and launch the instance:
- Click Review and Launch. A popup may ask if you want to make General Purpose (SSD) the default boot volume. Select the desired option, then click Next.

- Review the configuration and click Launch Instance.
- Select a key pair, check the acknowledgment checkbox, then click Launch Instance.
- Click Review and Launch. A popup may ask if you want to make General Purpose (SSD) the default boot volume. Select the desired option, then click Next.
- An on-demand FortiManager-VM instance requires connectivity to FortiCare to obtain a valid license. Otherwise, the FortiManager-VM shuts down for self-protection. Ensure the following:
- Outgoing connectivity to https://directregistration.fortinet.com:443 is allowed in security groups and ACLs.
- A public IP address (either default or EIP) is assigned.