


A common RADIUS SSO (RSSO) topology involves a medium-sized company network of users connecting to the Internet through the FortiGate and authenticating with a RADIUS server. The following describes how to configure FortiOS for this scenario. The example makes the following assumptions:
- VDOMs are not enabled.
- The super_admin account is used for all FortiGate configuration.
- A RADIUS server is installed on a server or FortiAuthenticator and uses default attributes.
- BGP is used for any dynamic routing.
- You have configured authentication event logging under Log & Report.
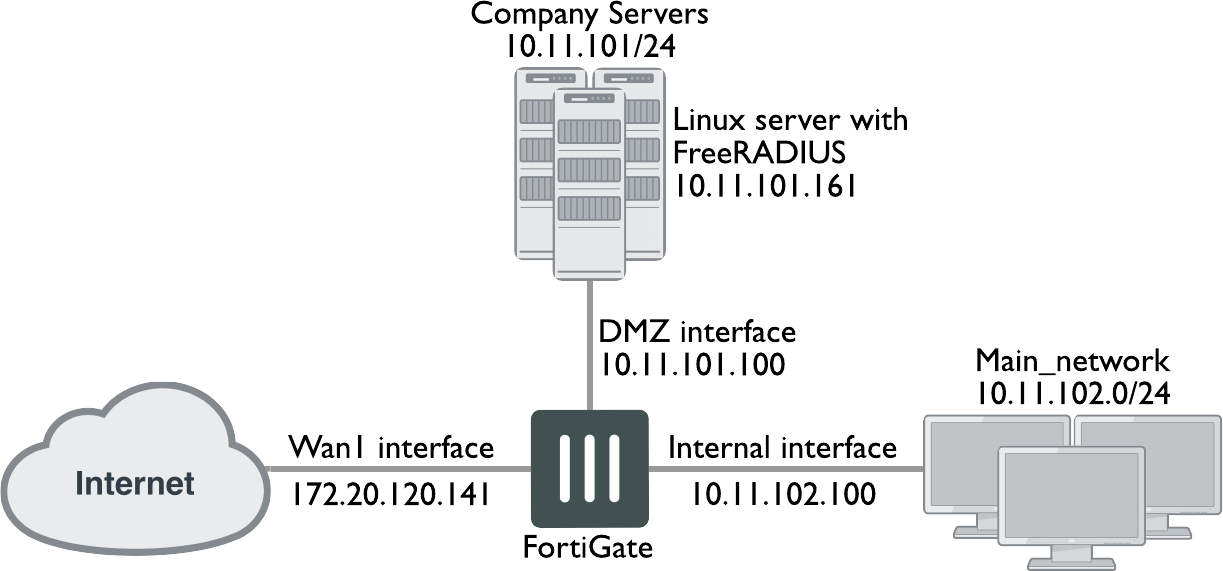
Example.com has an office with 20 users on the internal network who need access to the Internet. The office network is protected by a FortiGate-60C with access to the Internet through the wan1 interface, the user network on the internal interface, and all servers are on the DMZ interface. This includes an Ubuntu sever running FreeRADIUS. This example configures two users:
|
User |
Account |
|---|---|
|
Pat Lee |
plee@example.com |
|
Kelly Green |
kgreen@example.com |
Configuring this example consists of the following steps:
- Configure RADIUS.
- Configure FortiGate interfaces.
- Configure a RSSO agent.
- Create a RSSO user group.
- Configure security policies.
- Test the configuration.
To configure RADIUS:
Configuring RADIUS includes configuring a RADIUS server such as FreeRADIUS on user's computers and configuring users in the system. In this example, Pat and Kelly belong to the exampledotcom_employees group. After completing the configuration, you must start the RADIUS daemon. The users have a RADIUS client installed on their PCs that allow them to authenticate through the RADIUS server.
For any problems installing FreeRADIUS, see the FreeRADIUS documentation.
To configure FortiGate interfaces:
You must define a DHCP server for the internal network, as this network type typically uses DHCP. The wan1 and dmz interfaces are assigned static IP addresses and do not need a DHCP server. The following table shows the FortiGate interfaces used in this example:
| Interface | Subnet | Act as DHCP server | Devices |
|---|---|---|---|
| wan1 | 172.20.120.141 | No | Internet service provider |
| dmz | 10.11.101.100 | No | Servers including RADIUS server |
| internal | 10.11.102.100 | Yes: x.x.x.110-250 | Internal user network |
- Go to Network > Interfaces.
- Edit wan1:
Alias
Internet
Addressing Mode
Manual
IP/Network Mask
172.20.120.141/255.255.255.0
Administrative Access
HTTPS, SSH
Enable DHCP Server
Not selected
Comments
Internet
Administrative Status
Up
- Click OK.
- Edit dmz:
Alias
Servers
Addressing Mode
Manual
IP/Network Mask
10.11.101.100/255.255.255.0
Administrative Access
HTTPS, SSH, PING, SNMP
Enable DHCP Server
Not selected
Listen for RADIUS Accounting Messages
Select
Comments
Servers
Administrative Status
Up
- Click OK.
- Edit internal:
Alias
Internal network
Addressing Mode
Manual
IP/Network Mask
10.11.102.100/255.255.255.0
Administrative Access
HTTPS, SSH, PING
Enable DHCP Server
Select
Address Range
10.11.102.110 - 10.11.102.250
Netmask
255.255.255.0
Default Gateway
Same as Interface IP
Comments
Internal network
Administrative Status
Up
To create a RADIUS SSO agent:
- Go to Security Fabric > External Connectors.
- Click Create New.
- Under Endpoint/Identity, select RADIUS Single Sign-On Agent.
- Enable Use RADIUS Shared Secret. Enter the RADIUS server's shared secret.
- Enable Send RADIUS Responses. Click OK.
To create a RADIUS SSO user group:
- Go to User & Authentication > User Groups.
- Click Create New.
- For Type, select RADIUS Single Sign-On (RSSO).
- In RADIUS Attribute Value, enter the name of the RADIUS user group that this local user group represents.
- Click OK.
Configuring security policies
The following security policies are required for RADIUS SSO:
|
Sequence Number |
From |
To |
Type |
Schedule |
Description |
|---|---|---|---|---|---|
|
1 |
internal |
wan1 |
RADIUS SSO |
Business hours |
Authenticate outgoing user traffic |
|
2 |
internal |
wan1 |
Regular |
Always |
Allow essential network services and VoIP |
|
3 |
dmz |
wan1 |
Regular |
Always |
Allow servers to access the Internet |
|
4 |
internal |
dmz |
Regular |
Always |
Allow users to access servers |
|
5 |
any |
any |
Deny |
Always |
Implicit policy denying all traffic that has not been matched |
You must place the RADIUS SSO policy at the top of the policy list so that it is matched first. The only exception to this is if you have a policy to deny access to a list of banned users. In this case, you must put that policy at the top so that the RADIUS SSO does not mistakenly match a banned user or IP address.
You must configure lists before creating security policies.
Schedule
You must configure a business_hours schedule. You can configure a standard Monday to Friday 8 AM to 5 PM schedule, or whatever days and hours covers standard work hours at the company.
Address groups
You must configure the following address groups:
|
Name |
Interface |
Address range included |
|---|---|---|
|
internal_network |
internal |
10.11.102.110 to 10.11.102.250 |
|
company_servers |
dmz |
10.11.101.110 to 10.11.101.250 |
Service groups
You must configure the service groups. The services listed are suggestions and you may include more or less as required:
|
Name |
Interface |
Description of services to be included |
|---|---|---|
|
essential_network_services |
internal |
Any network protocols required for normal network operation such as DNS, NTP, BGP |
|
essential_server_services |
dmz |
All the protocols required by the company servers such as BGP, HTTP, HTTPS, FTP, IMAP, POP3, SMTP, IKE, SQL, MYSQL, NTP, TRACEROUTE, SOCKs, and SNMP |
|
user_services |
internal |
Any protocols required by users such as HTTP, HTTPS, FTP |
The following security policy configurations are basic and only include logging and default AV and IPS. These policies allow or deny access to non-RADIUS SSO traffic. These are essential as network services including DNS, NTP, and FortiGuard require access to the Internet.
To configure security policies:
- Go to Policy & Objects > Firewall Policy.
- Click Create New.
- Configure the policy as follows, then click OK:
Incoming Interface
Internal
Source Address
internal_network
Outgoing Interface
wan1
Destination Address
all
Schedule
always
Service
essential_network_services
Action
ACCEPT
NAT
ON
Security Profiles
ON: AntiVirus, IPS
Log Allowed Traffic
ON
Comments
Essential network services
- Click Create New, and configure the new policy as follows, then click OK:
Incoming Interface
dmz
Source Address
company_servers
Outgoing Interface
wan1
Destination Address
all
Schedule
always
Service
essential_server_services
Action
ACCEPT
NAT
ON
Security Profiles
ON: AntiVirus, IPS
Log Allowed Traffic
enable
Comments
Company servers accessing the Internet
- Click Create New, and configure the new policy as follows, then click OK:
Incoming Interface
Internal
Source Address
internal_network
Outgoing Interface
dmz
Destination Address
company_servers
Schedule
always
Service
all
Action
ACCEPT
NAT
ON
Security Profiles
ON: AntiVirus, IPS
Log Allowed Traffic
enable
Comments
Access company servers
- Click Create New, and configure the RADIUS SSO policy as follows, then click OK. This policy allows access for members of specific RADIUS groups.
Incoming Interface
Internal
Source Address
internal_network
Source User(s)
Select the user groups that you created for RSSO.
Outgoing Interface
wan1
Destination Address
all
Schedule
business_hours
Service
ALL
Action
ACCEPT
NAT
ON
Security Profiles
ON: AntiVirus, Web Filter, IPS, and Email Filter. In each case, select the default profile.
- Place the RSSO policy higher in the security policy list than more general policies for the same interfaces. Click OK.
To test the configuration:
Once configured, a user only needs to log in to their PC using their RADIUS account. After that, when they attempt to access the Internet, the FortiGate uses their session information to get their RADIUS information. Once the user is verified, they can access the website.
- The user logs on to their PC and tries to access the Internet.
- The FortiGate contacts the RADIUS server for the user's information. Once confirmed, the user can access the Internet. Each step generates logs that enable you to verify that each step succeeded.
- If a step does not succeed, confirm that your configuration is correct.
