


Local certificate wizard 7.0.2
The certificate wizard is used to add local certificates by either provisioning them through ACME, generating them using the self-signed Fortinet_CA_SSL CA certificate, or importing a server certificate signed by a public or private CA.
Using the certificate wizard to generate a new certificate allows you to use the built-in local CA certificate Fortinet_CA_SSL to sign the new server certificate. You can specify the CN and SAN fields to indicate the trusted FQDN or IP address. The new server certificate can be used in various places, such as for SSL VPN web and tunnel access, or HTTPS administrator portal access. For Web access, end users must import the Fortinet_CA_SSL certificate to trust the certificate chain so that the browser does not show warning messages when connecting.
When generating a new certificate on the VPN > SSL-VPN Settings page, the Common name and Subject alternate name fields are pre-filled with the address from the SSL-VPN listening interface.
The following examples demonstrate generating a certificate for administrative portal GUI access and generating a server certificate for SSL VPN.

Generating a server certificate for SSL VPN
In this example, the customer needs to configure web mode SSL VPN with a valid certificate that is signed by the FortiGate CA. As the FortiGate SSL VPN interface has multiple IP addresses, and an FQDN that resolves to the primary IP address, the certificate must be valid when accessing it with different domains or IP addresses.
The port2 interface is mapped to the SSL VPN interface, and has multiple IP addresses:
-
Primary: 10.1.100.2/24
-
Secondary: 10.1.100.192/32 and 10.1.100.202/24
User u1 on PC1 can access the SSL VPN portal by going to:
-
https://fgt401e.sslvpn.com:1443 - fgt401e.sslvpn.com resolves to the primary IP address.
-
https://10.1.100.202:1443
To configure the basic SSL VPN settings:
-
Create a local user:
-
Go to User & Authentication > User Definition and click Create New.
-
Select Local User then click Next.
-
Set username to u1 and enter a Password, then click Next.
-
Click Next, then click Submit.
-
-
Create an SSL VPN portal:
-
Go to VPN > SSL-VPN Portals and click Create New.
-
Set Name to testportal1.
-
Disable Tunnel Mode and enable Web Mode.
-
Click OK.
-
-
Configure the SSL VPN settings:
-
Go to VPN > SSL-VPN Settings.
-
Enable SSL-VPN.
-
Set Listen on Interface(s) to port2.
-
Set Listen on Port to 1443.
-
In the Authentication/Portal Mapping table:
-
Click Create New.
-
Set Users/Groups to u1.
-
Set Portal to testportal1.
-
Click OK.
-
Edit All Other Users/Groups and set the Portal to an SSL-VPN portal.
-
-
Click Apply.
-
-
Create a firewall policy:
-
Go to Policy & Objects > Firewall Policy and click Create New.
-
Set the following:
Name
sslvpn1
Incoming Interface
SSL-VPN tunnel interface
Outgoing Interface
port1
Source
Address: all
User: u1
Destination
Internal server IP address
Service
ALL
-
Click OK.
-
To generate a new certificate for the SSL VPN portal:
-
Go to VPN > SSL-VPN Settings.
-
If Server Certificate is set to the default Fortinet_Factory certificate, a warning is shown. Click Create Certificate in the warning. You can also click Create in the certificate drop-down menu.

-
Click Generate Certificate.
-
The Common name is automatically set to the primary IP address of the listening interface. The Subject alternative name is set to secondary IP addresses of the listening.

-
Set Certificate name to fgt401e.common.
-
Change Common name to the FQDN fgt401e.sslvpn.com.
-
Click Create.
-
To view the details of the new certificate, click View Details. The Subject CN and SAN correspond to the configured values.

The certificate is issued and signed by the FortiGate CA with the built-in Fortinet_CA_SSL certificate.
-
Click Close.
-
Click Download CA Certificate.
End users must import this to their certificate store to trust the certificate chain when connecting to the SSL VPN.
-
Click OK.
-
Set Server Certificate to the new fgt401e.common certificate.
-
Click Apply.
To test the certificate:
-
On the client PC1, install the CA certificate that was downloaded from the FortiGate.
-
In a browser, access the SSL VPN portal using the FQDN https://fgt401e.sslvpn.com.
No certificate warning appears when accessing the page, and user u1 can log in and connect to the internal server.
-
Open the certificate information, usually by clicking on an icon to the left of the URL. Note that the certificate is issued to the FQDN address and by the FortiGate CA.

-
In a browser, access the SSL VPN portal using the secondary IP address https://10.1.100.202:1443. The same results are seen, as the IP address in defined in the Subject alternate name field.
Generating a server certificate for HTTPS administrative access
In this example, the customer needs to secure their external HTTPS administrative access by creating and applying a server certificate that is signed by the FortiGate CA. Administrators that have the CA certificate installed will not get a certificate warning when they access the HTTPS administrative portal.
The administrator accesses the FortiGate on port3, which uses DDNS that is configured on the FortiGate to map the FQDN gui.fgt401e.sslvpn.com to the interface address. The administrator can also access the GUI on port2 on 10.1.100.2.
To generate a new certificate for the HTTPS administrative portal:
-
Go to System > Certificates and click Create/Import > Certificate.

-
Click Generate Certificate.
-
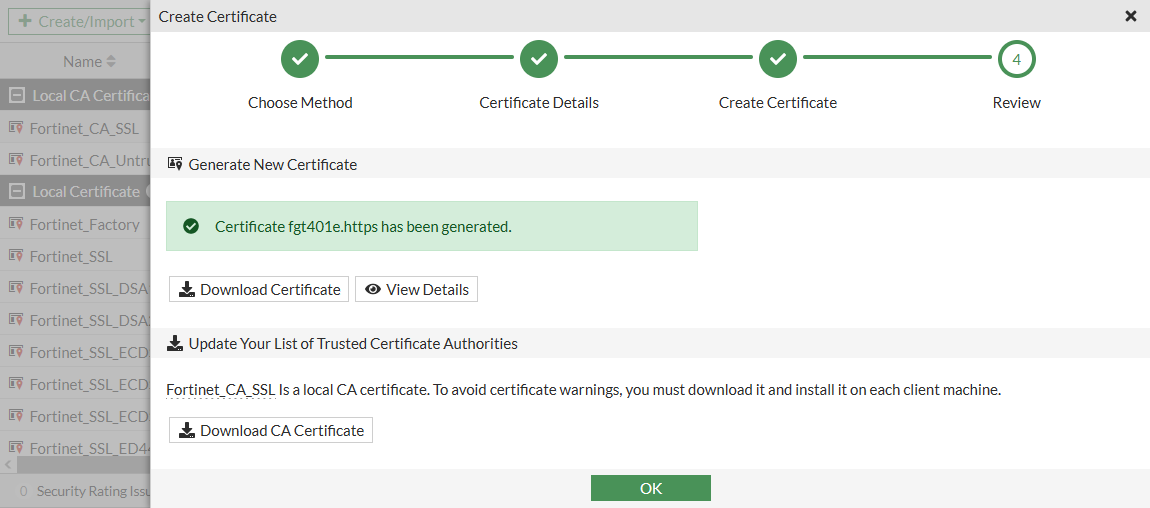
Set Certificate name to fgt401e.https.
-
Set Common name to gui1.fgt401e.sslvpn.com.
-
Set Subject alternative name to 10.1.100.2.

-
Click Create.
-
To view the details of the new certificate, click View Details. The CN and SAN correspond to the configured values.
-
Click Close.
-
Click Download CA Certificate to download the CA certificate to the management computer.
-
Click OK.
-
To apply the new certificate:
-
Go to System > Settings.
-
Set HTTPS server certificate to fgt401e.https.
-
Click Apply.
The certificate wizard could also have been accessed from the System > Settings page by clicking Create Certificate in the certificate warning (if shown) or by clicking Create the drop-down menu.
-
To test the certificate:
-
On the client PC1, install the CA certificate that was downloaded from the FortiGate.
-
In a browser, access the HTTPS administrative portal using the FQDN https://gui1.fgt401e.sslvpn.com.
No certificate warning appears when accessing the page.
-
Open the certificate information, usually by clicking on an icon to the left of the URL. Note that the certificate is issued to the FQDN address and by the FortiGate CA.

-
In a browser, access the HTTPS administrative portal on https://10.1.100.2. The same results are seen, as the IP address in defined in the Subject alternate name field.