


Configuring the VPN overlay between the HQ FortiGate and AWS native VPN gateway
This example uses static routing. It is assumed that the AWS VPN Gateway is already configured, and that proper routing is applied on the corresponding subnet.
Verify the AWS configuration
See Creating routing tables and associate subnets in the AWS Administration Guide for configuration details.
To check the AWS configuration:
- Go to Virtual Private Network (VPN) > Customer Gateways to confirm that the customer gateway defines the FortiGate IP address as its Gateway IP address, in this case 34.66.121.231.

- Go to Virtual Private Network (VPN) > Virtual Private Gateways to confirm that a virtual private gateway (VPG) has been created. In this case it is attached to the Cloud_onRamp VPC that contains the FortiGate and servers.

- Go to Virtual Private Network (VPN) > Site-to-Site VPN Connections to confirm that site-to-site VPN connections have been created and attached to the customer gateway and virtual private gateway.
If Routing Options is Static, the IP prefix of the remote subnet on the HQ FortiGate (10.100.88.0) is entered here.
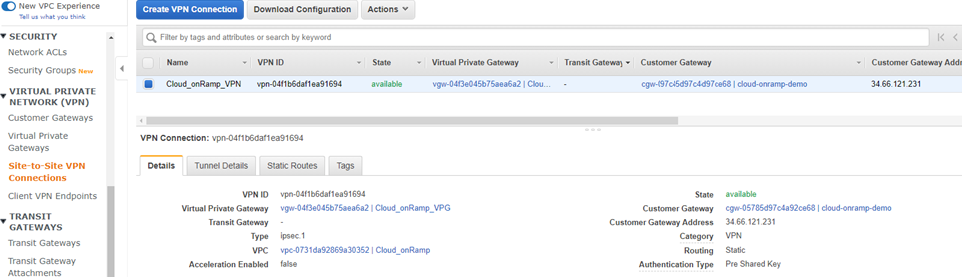
AWS site-to-site VPN always creates two VPN tunnels for redundancy. In this example, only Tunnel 1 is used.

- Click Download Configuration to download the FortiGate's tunnel configurations. The configuration can be referred to when configuring the FortiGate VPN.
- The new VPG is attached to your VPC, but to successfully route traffic to the VPG, proper routing must be defined. Go to Virtual Private Cloud > Subnets, select the Cloud-OnRamp-VPN, and select the Route Table tab to verify that there are at least two routes to send traffic over the VPG.

- 169.254.0.0/24 defines the tunnel IP address. Health check traffic originating from the FortiGate will come from this IP range.
- 10.100.0.0/16 defines the remote subnet from the HQ FortiGate.
- Both routes point to the just created VPG vgw-04xxxx.
- On the cloud FortiGate-VM EC2 instances, ensure that port1 and port2 both have Source/Dest. Check set to false. This allows the FortiGate to accept and route traffic to and from a different network.
If you launched the instance from the AWS marketplace, this setting defaults to true.

Configure routing to the VPG on the cloud FortiGate-VM
To configure routing to the VPG on the cloud FortiGate-VM:
- Go to Network > Static Routes and click Create New.
- Set Destination to Subnet and enter the IP address and netmask: 10.100.88.0/255.255.255.0.
- Set Gateway Address to Specify and enter 10.0.2.1.
- Set Interface to port2.
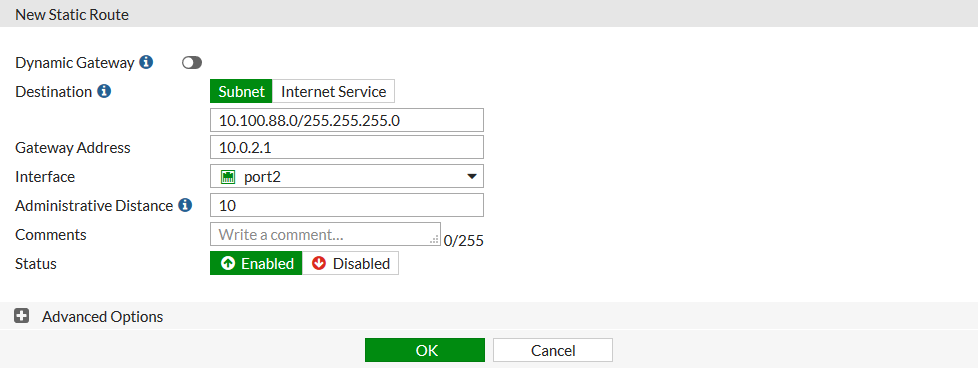
The new route must have the same Administrative Distance as the route that was created for traffic through the Core_Dialup tunnel to ensure that both routes are added to the routing table (see To configure a route to the remote subnet through the tunnel).
The Gateway Address is arbitrarily set to 10.0.2.1. The VPG does not have an IP address, but the address defined here allows the FortiGate to route traffic out of port2, while AWS routes the traffic based on its routing table.
-
Click OK.
- Go to Network > Static Routes to view the configured static routes:

- Go to Monitor > Routing Monitor to view the routing table.

Configure IPsec VPN on the HQ FortiGate
To configure a custom IPsec VPN:
- Go to VPN > IPsec Wizard.
- Set Name to AWS_VPG.
- Set Template type to Custom.
- Click Next.
- Configure Network settings:
Remote Gateway
Static IP Address
IP Address
34.210.19.225
This address is taken from the downloaded AWS configuration file.
Interface
port1
NAT Traversal
Enable
- Configure Authentication settings:
Method
Pre-shared Key
Pre-shared Key
Enter the pre-shared key.
Version 1 Mode
Main
- Configure the Phase 1 Proposal settings using information from the downloaded AWS configuration file.
- Disable XAUTH.
- Configure the Phase 2 Selector settings:
Name
AWS_VPG
Local Address
Named Address - all
This setting allows traffic originating from both the local subnet 10.100.88.0 and the health checks from the VPN interface. For increased security, each subnet can be specified individually.
Remote Address
Named Address - remote_subnet_10_0_2_0
- Click OK.
To configure local and remote tunnel IP addresses:
- Go to Network > Interfaces and edit the AWS_VPG interface under port1.
- Set IP to 169.254.55.154.
- Set Remote IP/Netmask to 169.254.55.153 255.255.255.0.
- Enable Administrative access for HTTPS and PING.
- Click OK.
|
|
Routing is defined when creating the SD-WAN interface. The firewall policy is created after the SD-WAN interface is defined. |