


SDN connector support for AWS STS
This enhancement enables the AWS SDN connector to use the AWS security token service (STS) API to connect to multiple AWS accounts concurrently. This allows an AWS SDN connector to retrieve dynamic objects from multiple accounts, instead of creating an SDN connector for each account. This is especially useful for large organizations who may have hundreds of AWS accounts and require seamless integration.
FortiOS 7.0.4 and later versions support this feature.
This example uses two AWS accounts:
- Target account: 926xxxxxx167
- Source account: 269xxxxxx203
The example demonstrates that a FortiGate-VM in the source account can retrieve dynamic objects from the target account.
To configure SDN connector support for AWS STS:
- Log in to the AWS console using the target account.
- Create an Identity & Access Management (IAM) role on the target account:
- Go to IAM > Roles > Create role > Another AWS account.
- In the Account ID field, enter the source account. In this example, the source account is 269xxxxxx203.
- Click Next.
- Continue with the configuration until the Review step. In the Role name field, enter the desired role name. In this example, the role name is CrossAccountSTS.
- Create an inline policy on the target account:
- Go to IAM > Roles.
- Select the role that you created.
- Click Add inline policy > JSON.
- Paste the following in the text box:
{
    "Version": "2012-10-17",
    "Statement": [
        {
            "Effect": "Allow",
            "Action": [
                "ec2:DescribeInstances",
                "ec2:DescribeRegions",
                "ec2:DescribeNetworkInterfaces",
                "ec2:DescribeVpcEndpoints"
            ],
            "Resource": "*"
        }
    ]
}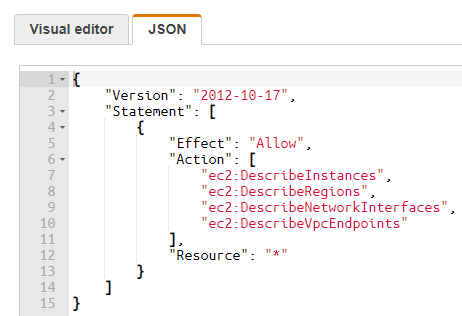
- Continue to create the policy. Name the policy as desired. In this example, the policy name is CrossAccountPolicy.

You can also create a standalone policy in IAM > Policies, and attach the policy to the IAM role, instead of adding an inline policy as this procedure describes.
- Log in to the AWS console using the source account.
- Create an IAM role on the source account:
- Go to IAM > Roles > Create role > AWS service > EC2..
- Under Permissions, configure the desired permissions. In this example, this role is configured with AmazonEC2FullAccess.
- Click Next.
- Continue with the configuration until the Review step. In the Role name field, enter the desired role name.
- Create an inline policy on the source account:
- Go to IAM > Roles.
- Select the role that you created.
- Click Add inline policy > JSON.
- Paste the following in the text box:
{ "Version": "2012-10-17", "Statement": [ { "Effect": "Allow", "Action": [ "sts:AssumeRole" ], "Resource": [ "arn:aws:iam::926xxxxxx167:role/CrossAccountSTS" ] } ] } - Continue to create the policy. Name the policy as desired. The resource should be the Amazon resource name (ARN) of the IAM role that you created in the target account. You can find the ARN by logging in to the AWS portal under the target account and going to the IAM web portal.
You can also create a standalone policy in IAM > Policies, and attach the policy to the IAM role, instead of adding an inline policy as this procedure describes.
- Launch a FortiGate-VM under the source account.
- Assign the IAM role that you created in step 5 to the FortiGate-VM.
- Configure FortiOS:
- Configure the AWS SDN connector to be able to access the target account:
config system sdn-connector
    edit "aws1"
        config external-account-list
            edit "arn:aws:iam::926xxxxxx167:role/CrossAccountSTS"
                set region-list "us-west-1" "us-west-2"
            next
        end
    next
end
The
use-metadata-iam,access-key, andsecret-keyproperties are only for STS credential setup whenexternal-account-listis enabled.To retrieve an IP address in the source AWS account, you must also add the source account to the
external-account-listproperty. - Configure a dynamic address. This address checks whether the FortiGate-VM can retrieve the instance address in the target account:
config firewall address edit "sdnaddr1" set type dynamic set sdn "aws1" set filter "InstanceId=*" next end - Confirm that the FortiGate-VM can retrieve the dynamic IP address from the target account:
show firewall address sdnaddr1
config firewall address
    edit "sdnaddr1"
        set uuid 40894c0a-4999-51ec-ddf5-a0e59c4cae20
        set type dynamic
        set sdn "aws1"
        set filter "InstanceId=*"
        config list
            edit "172.31.11.68"
            next
            edit "172.31.14.205"
            next
        end
    next
end
- Configure the AWS SDN connector to be able to access the target account: