


Connecting a FortiGate 7121F to DC power using the FortiGate 7121F DC combiner
Use the following steps to install the FortiGate 7121F DC combiner and, after installing the FortiGate 7121F chassis, to connect the each DC combiner module to a FortiGate 7121F DC PSUs to provide redundant DC power to the FortiGate 7121F chassis.
-
Attach an ESD wrist strap to your wrist and to an ESD socket or to a bare metal surface on the chassis or frame.
-
Use four rack mount screws (not provided) to secure the 1U DC combiner chassis on the front posts of an equipment rack. Install the DC combiner chassis at the bottom of the rack, the FortiGate 7121F chassis must be installed directly above the DC combiner in the same rack.

-
Use four rack mount screws (not provided) to install the rear cable management bracket on the rear posts of the equipment rack at the same level as the DC combiner assembly.
-
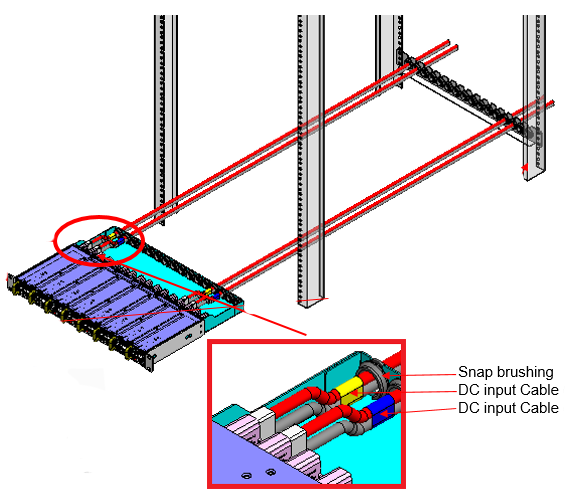
Select a DC input cable and attach a yellow label to each end. Connect the DC input Cable to power feed A of the first DC combiner module.
-
Select a DC input cable and attach a blue label to each end. Connect the DC input Cable to power feed B of the first DC combiner module.
-
Extend the yellow and blue labeled cables out the back of the DC combiner chassis and use a snap brushing to secure the cables at the back of the chassis. Extend the cables to the rear cable management bracket and secure them to the cable management bracket using another snap brushing.
-
Repeat for all eight DC combiner modules and all sixteen DC input cables.
-
Install the FortiGate 7121F chassis in the rack directly above the DC combiner.
-
Connect DC output cables from each DC combiner module to the corresponding DC PSU in the FortiGate 7121F chassis.

-
Connect all the DC input cables with yellow labels to a DC power source. Connect all the DC input cables with blue labels to a different DC power source.