


Setting up the FortiEDR Core
Preparing for the FortiEDR Core installation
The workstation, virtual machine or server on which the FortiEDR Core will be installed, must meet the following requirements:
- Complies with the requirements described in the System Requirements section in Appendix C – ON PREMISE DEPLOYMENTS.
- Has connectivity to a Local Area Network (for wired users) or a Wireless Network (for wireless users). If there is no connectivity, consult your IT support person.
- Has connectivity to the FortiEDR Aggregator. You can check this by browsing to the Aggregator’s IP address. For problems connecting, see Troubleshooting.
- Has connectivity to the FortiEDR Reputation Server at
reputation.cloud.ensilo.com. - If the FortiEDR Core is deployed on your organization’s premises (on-premises) and you use a web proxy to filter requests, then before running the installer, set the system proxy to work with an HTTPS connection, as follows:
- Edit the file
/etc/environmentto have a proxy address configuration, https_proxy or PAC address.For example:
https_proxy=https://192.168.0.2:443(for PAC):
https_proxy=pac+http://192.168.200.100/sample.pac, where thesample.pacfile contains an HTTPS address of the proxy. - If the definitions of the system proxy are placed somewhere other than
/etc/environment, then:- Copy the definitions to the file
/etc/environment. Note that this affects all processes on the Linux system. - Define a specific environment variable for the FortiEDR Linux Core with the name nslo_https_proxy at the file
/etc/environmentFor example:
nslo_https_proxy=https://192.168.0.2:443(for PAC):
nslo_https_proxy=pac+http://192.168.200.100/sample.pac
- Copy the definitions to the file

For more details about installing a Core in a multi-organization environment, see the Core Registration section in Component registration in a multi-organization environment.
- Edit the file
Installing the FortiEDR Core
The following describes how to install the FortiEDR Core.
- Create a new virtual serve by selecting File > New Virtual Machine.
-

Select the Typical option and click Next. -

Select the I will install the operating system later option and click Next. -
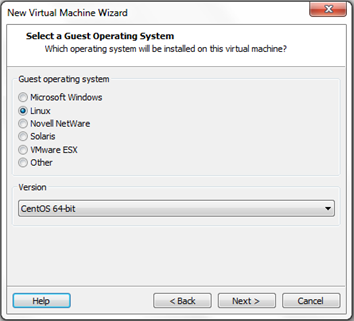
Select the Linux radio button. In the Version field, select CentOS 64-bit and click Next. Alternatively, you can select a different generic Linux 64-bit in the Version field. -
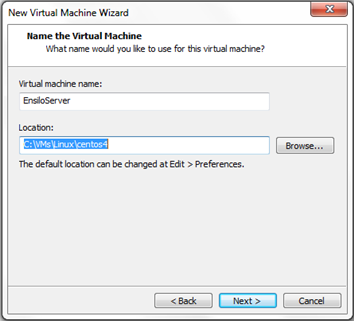
Specify a name for the virtual machine such as FortiEDRCore and the location in which to store the provided ISO file and click Next. -
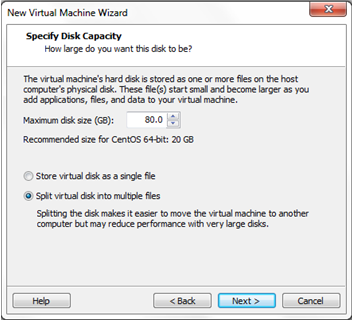
Change the Maximum disk size to80GB, leave the default option as Split virtual disk into multiple files and click Next. -
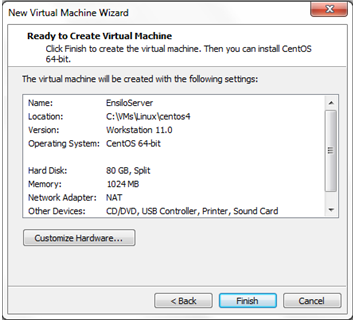
Click Finish. - Right-click the new machine and select the Settings option.
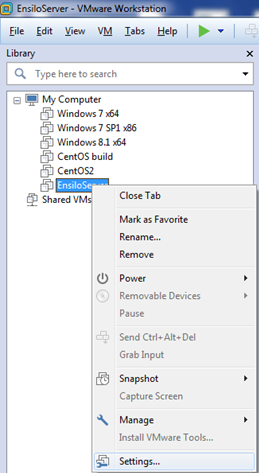
-
Select the Memory option and change the RAM to at least 8 GB. - Select the Processors option and change the value to a total of at least two CPU Cores.
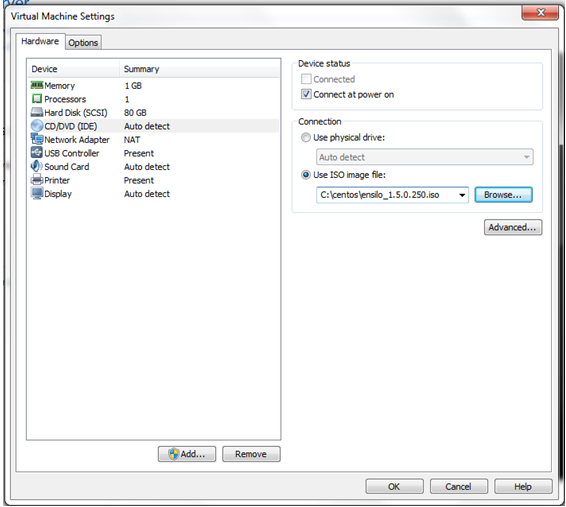
- Select the CD/DVD option and then select the Use ISO image file option on the right.
- Click the Browse button and select the ISO file provided by Fortinet for the FortiEDR Core. Click OK.
- Start the virtual machine. For example, by using the button shown below:
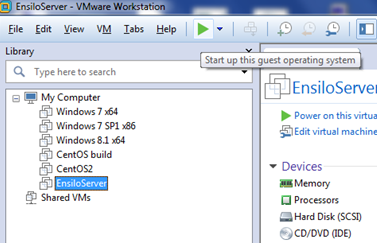
The virtual machine automatically starts the installation process, which may take a few minutes. - Wait until a success message is displayed requesting that you reboot.
- Reboot the virtual machine.
- Log into the virtual machine in order to continue the installation process.
Login: root
Change the root password, by entering any password you want and then retype it. The password must be strong enough according to Linux standards. - Enter
fortiedr config. - At the prompt, select the role of the virtual machine. For this installation, select CORE and click Next.
After the installation of the Core, you can configure the functionality of the Core as Core only, JumpBox, or Both in the INVENTORY > System Components tab of the Central Manager. - At the prompt, enter your hostname (any hostname) and click Next.
- At the prompt, enter the Organization name if this Core is added to a multi-tenant environment and should work only with one organization. For a non-multi-tenant setup, leave the organization name empty. Click Next.
- At the prompt, enter the registration password, which you can retrieve under Administration > Tools > Component authentication for single-organization setups or under Administration > Organizations for multi-tenant setup (where this Core is to belong only to a specific organization).
- At the prompt, enter the Aggregator external IP address followed by the port (optional). If a port is not provided, the default port 8081 is used.
- At the prompt, enter this Core machine’s external IP address without the port.
- A list of network interfaces on this virtual machine displays. At the Pick your primary interface prompt, select the interface to be used as the primary network interface through which all FortiEDR Cores and FortiEDR Collectors will reach this server, and then click Next.
- At the Do you want to use DHCP prompt, do one of the following:
- Select yes to use DHCP and click Next. Proceed to step 29 below.
- Select no to configure the IP of this virtual machine manually, and then click Next. Perform steps 26 through 35 below.
- At the prompt, enter the IP address of the machine that you are installing.
Use the following format:xxx.xxx.xxx.xxx/yy, whereyyis the routing prefix of the subnet. - At the prompt, enter the default gateway and click Next.
- At the Please set your DNS server prompt, enter a valid IP address and click Next.
Use the following format:xxx.xxx.xxx.xxx/yy, whereyyis the routing prefix of the subnet. - At the prompt, select no for debug mode.
- At the Please set the date prompt, verify the date and click Next. The installer automatically presents the current date. You can change this date, if necessary.
- At the Please set your Time prompt, set the time and click Next.
- At the prompt, select the timezone and country in which the server is being installed.
- At the Do you want to enable Web proxy prompt, select one of the following:
- yes—If you select yes, you must manually edit the
/etc/environmentfile to configure the proxy address, which can be https_proxy (such ashttps_proxy=https://192.168.0.2:443) or PAC address (such ashttps_proxy=pac+http://192.168.200.100/sample.pac, wheresample.pacis the file that contains an HTTPS address of the proxy. - no (default)
- yes—If you select yes, you must manually edit the
- If you selected yes in the previous step, at the Do you want to exclude proxy configuration for Aggregator communication? prompt, if the Aggregator is also installed on-premise, select yes to ignore the proxy for Core and Aggregator communication. Otherwise, select no.
- Wait a few moments while the installation processes, until you see the Installation completed successfully message.
- To verify that core installation succeeded, use the
fortiedr statusandfortiedr versioncommands. - In the INVENTORY > System Components tab of the Central Manager, verify that the FortiEDR Core details are listed and configure the functionality of the Core as Core only, JumpBox, or Both.