


Migrating an organization
FortiEDR’s Consolidation feature enables you to copy all the data and definitions within an organization from one environment to another environment. This feature copies an organization from one environment (source setup/environment) to another (destination setup/environment). The copy operation adds to the content in the destination environment, and does not replace the target’s existing content.
|
|
This feature is only available to Administrators. |
Organization migration involves three steps, which are described in detail in the procedure below.
To migrate an organization:
- Click the ADMINISTRATION tab and then click ORGANIZATIONS in the left pane. The Organizations window displays.

- Click the Migrate organization
 button in the row of the source organization that you want to copy to another environment. The following window displays:
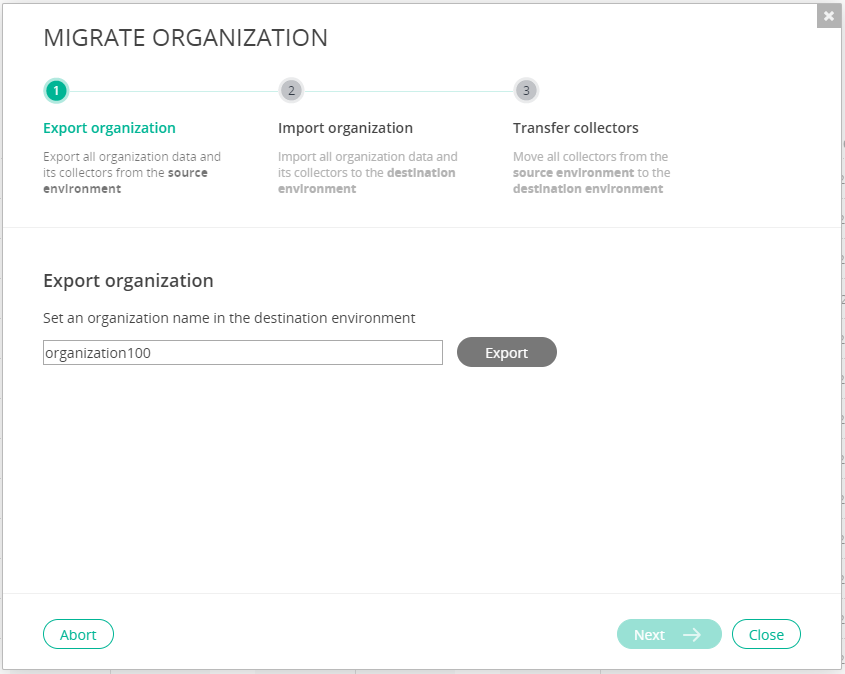
From this window, you perform three steps to migrate the organization to another environment:
- Export the Organization: This step exports all the data of the selected organization to a zip file.
- This step imports all the organization’s data using the zip file exported in step 1. Note that this step is performed on the destination environment.
- This step moves all the Collectors of the selected organization from the source environment to the destination environment.
- In the Export organization field, specify the name of the organization to appear for this data in the destination environment. Make sure that you assign an organization name that does not already exist in the destination environment.
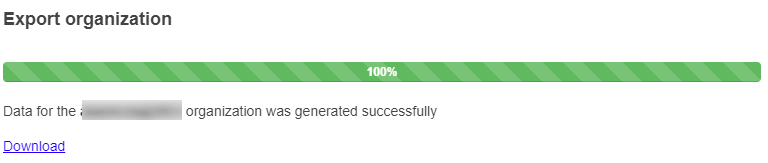
- Click the Export button. All the data and definitions for the organization are exported to a zip file. The zip file is named as follows:
<source organization name>_<environment name>_FortiEDR_<timestamp>_Export.zip. For example,ad_localhost.localdomain_enSilo_Feb.05.2019_Export.zip.After the export completes, a Download link displays in the window:

You can cancel the migration process at any time by clicking the Abort button.
- Click the Download link to download the exported zip file.
Click the Close button if you want to close this window and continue the migration process at a later time. This action saves the relevant organizational data. You can later continue this migration process by using the Continue Migration
 button.
If you click the Close button before downloading the exported zip file, a warning displays. In this case, you must perform the migration process again from the beginning.
- Click Next. The following window displays:
- Log in to the destination environment.
- Click the ADMINISTRATION tab and then click ORGANIZATIONS in the left pane.
- In the ORGANIZATIONS page, click the Import Organization button. The following window displays:
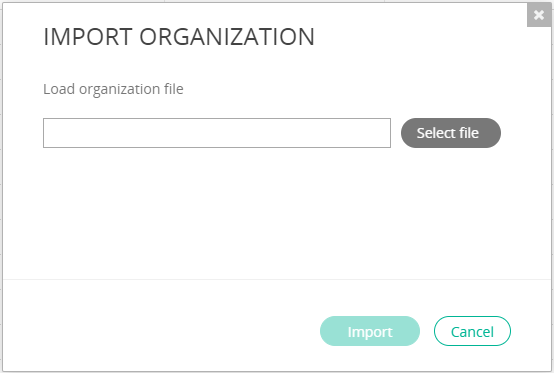
- Select the exported zip file to load and then click Import. This step copies all the data and environment definitions of the exported organization.
You cannot import an exported organization that has a name that already exists in the destination environment.
To import an organization, the FortiEDR platform version must be the same in both the source and destination environments.
The content version must be the same in both the source and destination environments. You can see the Content Version at the bottom of the Licensing window.
You must have sufficient workstation and server licenses in the destination environment.
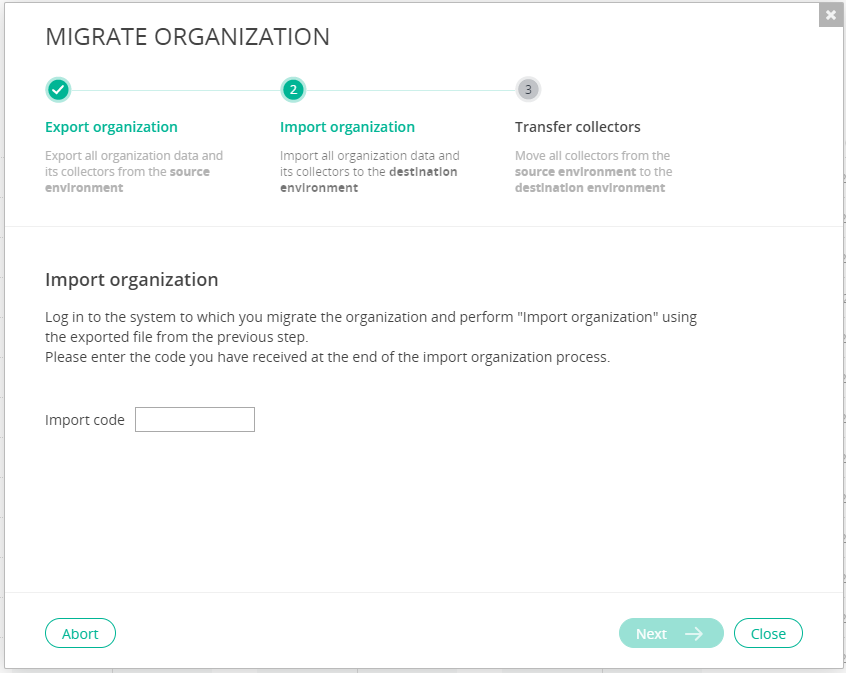
At the end of the import process, the Import Organization window displays a code. Write down this code, as it will be entered later as part of the migration process.
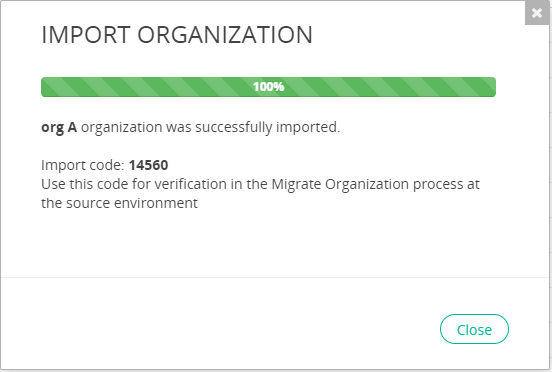
The Import code also displays in the Organization Details window, which you can display at any time by clicking the Edit button in an organization row in the Organizations window.

Note that the name of the organization cannot be changed in this window, and is read-only.
- In step 2 of the Migrate Organization window, enter or copy the import code into the Import code field.
If you previously closed the Migrate Organization window, then click the Continue Migration
button in the source organization row in the ORGANIZATIONS page.
- Click Next. The following window displays:
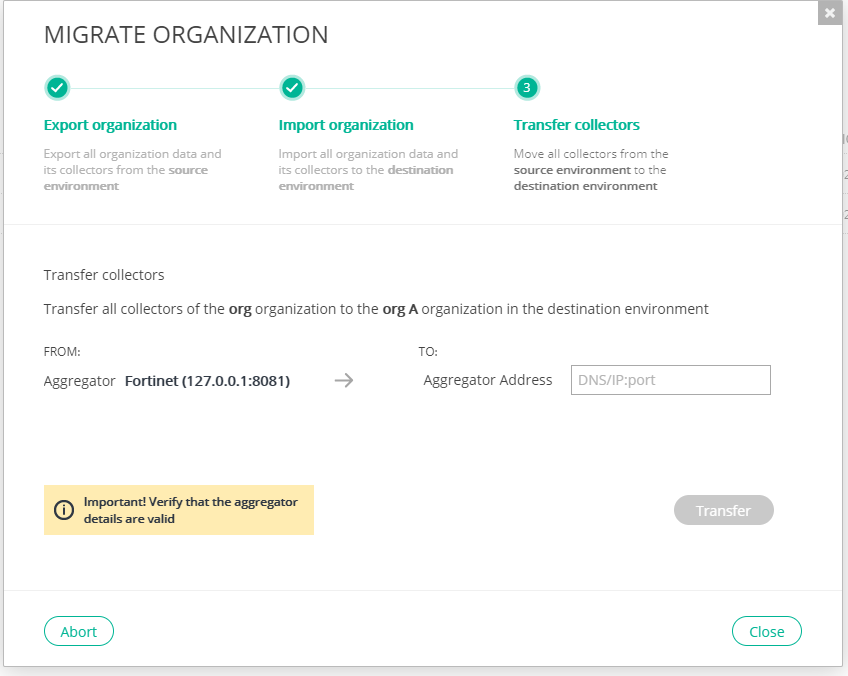
In this window, you move the Collectors from the source environment to the destination environment. The Collectors cannot be registered to both environments at the same time.
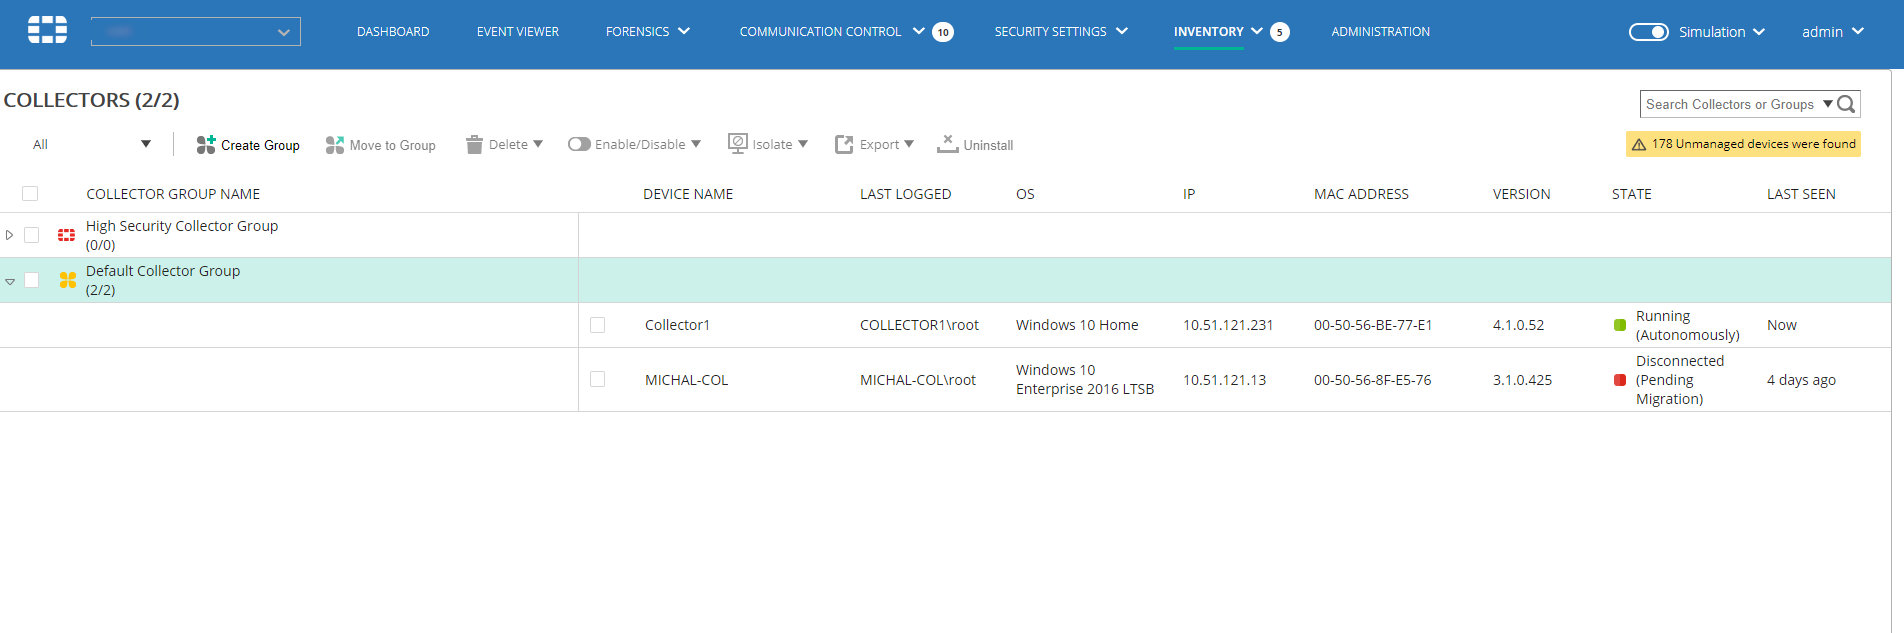
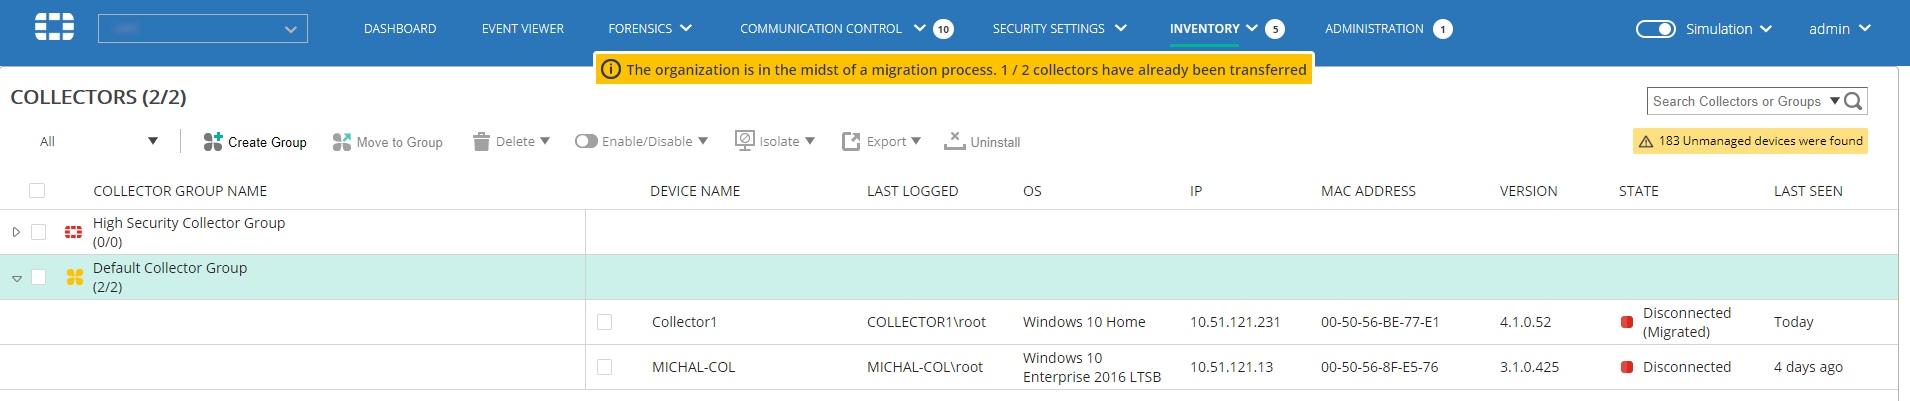
Note that until this step is completed, the Collectors are still registered to the organization in the source environment and their status and security events are displayed there. In the destination environment, Collectors are displayed with the Pending Migration state, as shown in the Inventory window. This state indicates that the Collector has not yet been transferred from the source environment to this environment. Collectors in the Pending Migration state are still registered to the source environment.
- Specify the Aggregator Address in the To field. Each Collector is connected to one Aggregator. In this field, you specify the IP address or DNS name and the port of the Aggregator that will service the Collectors in the destination environment.

- Click the Transfer button. The Collectors are transferred from the organization in the source environment to the organization in the destination environment. A progress indicator counter displays as the Collectors are transferred.
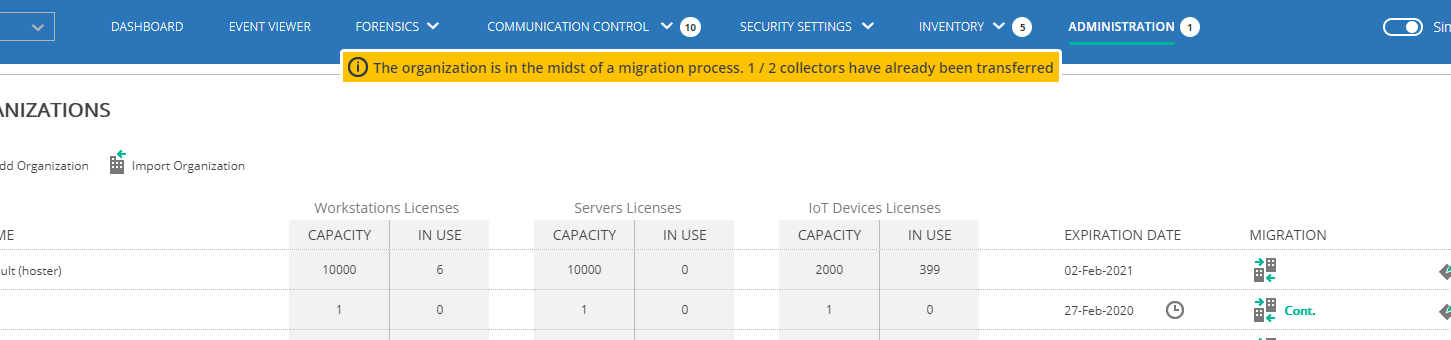
The progress indicator counter continues to display until the organization is deleted in the source environment, which is recommended after all Collectors have been transferred from the source environment to the destination environment. See step 16 below.
If you click the Abort button at this step, any Collectors already transferred from the source environment to the destination environment remain in the destination environment.
After a Collector has been transferred from the source environment to the destination environment, its state is Migrated in the source environment, and is Running (functional) in the destination environment.
Collector protection remains in effect throughout the entire migration process.
- (Optional) Click the Stop Transfer button to pause the Collector transfer process. You can resume the transfer process by clicking the Transfer button again.
If a user enters the source organization while a migration process is in progress for it, a warning displays. Any changes made by this user will not be migrated or included in the destination organization. Any changes made to an organization while it is being migrated are ultimately lost.

- After all the Collectors were successfully migrated from the organization on the source environment to the organization on the destination environment, delete the source organization. To do so, select the Administration tab and then click Organizations in the left pane. In the Organizations window, click the Delete button in the row of the source organization to be removed.
Collector protection and functionality remain throughout the entire migration process.