


Google Cloud Platform
FortiCWP offers an API-based approach, pulling data directly from Google Cloud via a RESTful API. FortiCWP uses your service account credentials to generate API queries.
Prerequisites
To use FortiCWP with Google Cloud Platform, you must have a G Suite account,service account, and the JSON private key associated with the service account. The service account must have “G Suite Domain-wide Delegation” enabled and Project Owner/Organization Administrator roles for monitoring.
Steps to setup Google Cloud with FortiCWP
- Configure G Suite Account
- Configure Service Account
- Enable required APIs
- Enable activity and alert monitoring
- Installation
Your G Suite account can be either an existing account or a new account. If you have just created a new account, you must wait for at least 24 hours for the account to take effect before granting it access to FortiCWP. The G Suite account to which you connect from within FortiCWP must have the Super Admin role in your G Suite account.
Configure G Suite Account
Use the following steps to check if your account has the Super Admin role:
- Go to https://admin.google.com/ and log in with your Google Suite account credentials.
- In the upper-left corner, click the navigation menu
 , and select Directory>Users.
 - Click on user account of interest.
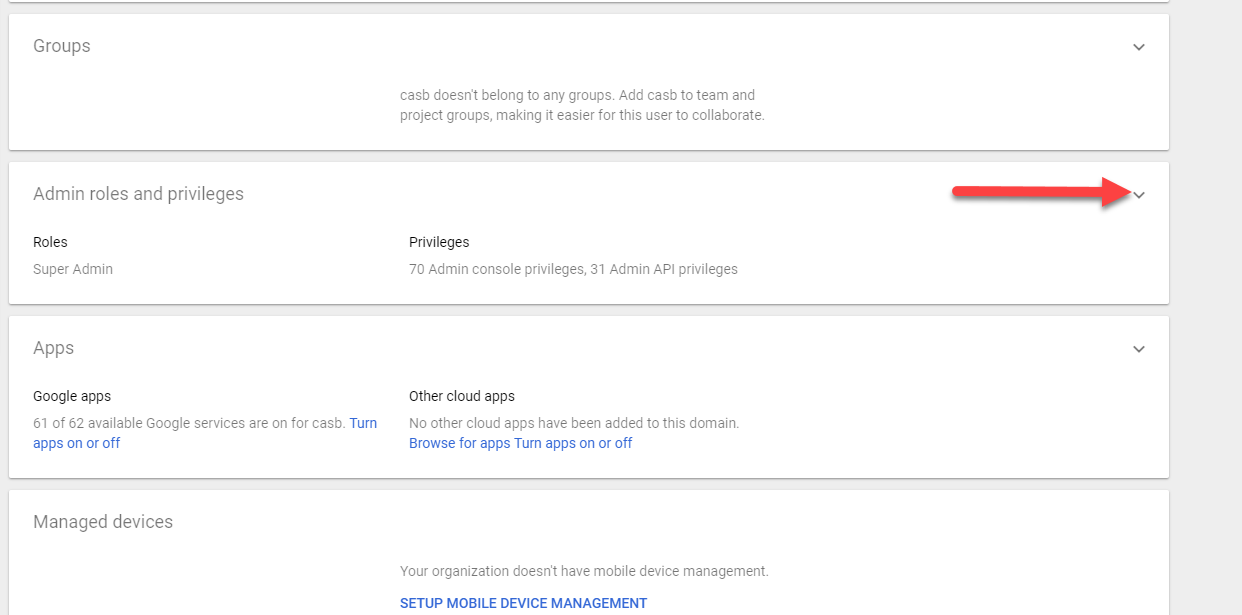
- Scroll down to the Admin roles and privileges section, click the draw-down button.
- In the Roles section, make sure that the Super Admin role has been assigned. Otherwise, hover over the Roles section, click the Edit icon, and select Super Admin in the pop-up window.


Configure Service Account
For your service account, you may either use an existing or new account.
New Service Account Creation
- Go to https://console.developers.google.com and log in with your Google Suite account.
- Click on the drop-down menu > Select a project.
- Select an existing project you want to monitor or Create a New Project by clicking New Project.
- Click the Navigation Menu on the top left corner, go to IAM & admin > Service accounts.
- Click +Create service account button.
- Enter a Service account name of your preference and click create. Service account ID will populate automatically.
- Click Continue when prompted for entering service account permissions.
- Click on +Create Key and select JSON to create a private key. The JSON private key will be downloaded automatically, then click Done
- Once service account is created, select the service account created and click on under Actions
 icon > Edit.
 - Enable G Suite Domain-wide Delegation.


|
|
Keep the service account ID for later during Google cloud authentication during installation. |
|
|
Keep the JSON key later for Google cloud authentication during installation. |


Using Existing Service Account
- Select the project that contains the service account to be used.
-
- Click the Navigation Menu in the upper-left corner of the page, and select IAM & Admin > Service Accounts.
- If you don’t have a JSON private key, then click Actions icon > Edit , and select +Create Key.
- Select JSON in the Key type field, and click CREATE.The JSON private key will automatically downloaded.
Note:Make sure Domain-wide delegation is enabled. If not, click on Actions icon > Edit to enable it.

Note: Be sure to keep this key and your service account ID for use later during Google cloud authentication.
Once your service account is ready, you must grant it API access to the G Suite API.
Grant Service Account API Access
- Click the Navigation Menu in the upper-left corner of the page, and then select IAM & admin > Service Accounts.
- In the Domain-wide delegation column, click View Client ID.
- In the pop-up window, save the client ID for step 7.
- Go to https://admin.google.com and log into the same Google account.
- Scroll down and click on More Controls > Security.
- In Security, scroll down and select Advanced Settings.
- Click Manage API client access.
- In the Client Name field, enter the Client ID saved in Step 3. Your Client ID must be a string of numbers.
- In the One or More API Scopes field, enter:


"https://www.googleapis.com/auth/admin.directory.user,https://www.googleapis.com/auth/admin.reports.audit.readonly".
After getting your service account ID and JSON private key, grant the service account with Owner and Organization Administrator role for the projects to be monitored.
Grant Service Account Owner Role
- Select the project to be monitored.
- Click the Navigation Menu on the upper-left corner, select IAM & admin > IAM.
- Click the ADD button on the top.
- In the New Members field, enter the service account ID you want to use.
- In the Select a role field, select Project > Owner.
- Click the SAVE button.
- Repeat the steps above for all the projects to be monitored.

Additionally, on the same service account, grant Organization Administrator.
Grant service account Organization Administrator role
- Select the project to be monitored.
- Click the Navigation Menu on the upper-left corner, select IAM & admin > IAM.
- Click the ADD button on the top.
- In the New members field, enter the service account ID you want to use.
- In the Select a role field, select Resource Manager > Organization Administrator
- Click the SAVE button.
Note: You can also enter "Organization Administrator" in the filter for fast access.
Enable required APIs
After adding roles to the service account, you must make sure that the following APIs are enabled on all projects for monitoring. This will ensure that FortiCWP can gather information from the Google Cloud.
- Cloud Resource Manager API
- App Engine Admin API
- Cloud Key Management Service (KMS) API
- Compute Engine API
- Cloud SQL
- Google Cloud Storage JSON API
- Google Cloud Storage
- Cloud SQL Admin API
- Stackdriver Logging API
- Admin SDK
- Identity and Access Management (IAM) API
To enable the APIs, do the following:
- Go to the project to be monitored.
- Click the Navigation Menu in the upper-left corner, and select APIs & Services>Dashboard.
- In the Enabled APIs and services list, make sure that the required APIs are listed (enabled).

If any of the APIs is not enabled, use the below steps to enable it:
- Go to the project want to be monitored.
- Click the Navigation Menu in the upper-left corner, and select APIs & Services > Dashboard.
- Click the ENABLE APIS AND SERVICES button on the top.
- In the Search for APIs & Services field, enter the name of a required API.
- From the search results, select the API.
- Click the ENABLE button.
- Wait until Google Cloud has enabled the API.
Note: While you are enabling an API, a dialog may pop up prompting you to enable billing. If that happens, follow the prompts onscreen to enable billing.
Enable activity and alert monitoring
If you would like to enable FortiCWP activity and alert monitoring, you must turn on audit logging using the following steps:
- Go to the project to be monitored.
- Click the Navigation Menu in the upper-left corner, and select IAM & admin>Audit Logs.
- Select Google Cloud Storage in the list.
- Enable all log types, i.e., Admin Read, Data Read, and Data Write.
- Click the SAVE button.

Installation
Once you have all the prerequisites in place, you can start installing Google Cloud using the following steps:
- In the upper right hand corner of the FortiCWP main page, click the
 setting button or go to Administrator > Cloud Accounts.
 - From the Cloud Accounts page, click add button
 next to Google Cloud. The Google Cloud Authentication dialog will open.
 - In Google Cloud Authentication dialog, for User Email field, enter your email address which you used to create the service account.
- In Service Account ID field, enter the ID of your service account. Your service account ID should end in ".gserviceaccount.com".
- Give the Google Cloud account an account name on FortiCWP in Account Name field. (optional)
- For Service Account Private Key (JSON File), click Choose to browse and upload your service account's private key (i.e., a JSON file), then click OK.
- Click Add GoogleCloud button to complete authentication.

You will be redirected back to the FortiCWP dashboard. After adding the Google Cloud accounts, please check for installation status under the Google Cloud authentication page. For detail information, please refer to Account Status.