


Configuring FortiAuthenticator
Configure the remote servers
A remote OAuth server is used to obtain group membership from Azure AD. Later, a FortiToken can be associated with those users.
To configure the remote OAuth server:
- Go to Authentication > Remote Auth. Servers > OAUTH, and click Create New.
- Configure the following information:
- Name: Enter a name for your OAuth server, for example: AzureCSE.
- OAuth source: Azure Directory.
- Client ID: Enter your Azure Application ID.
- Client Key: Enter your Azure key.

- Click OK.
To configure the remote SAML server:
- Go to Authentication > Remote Auth. Servers > SAML, and click Create New.
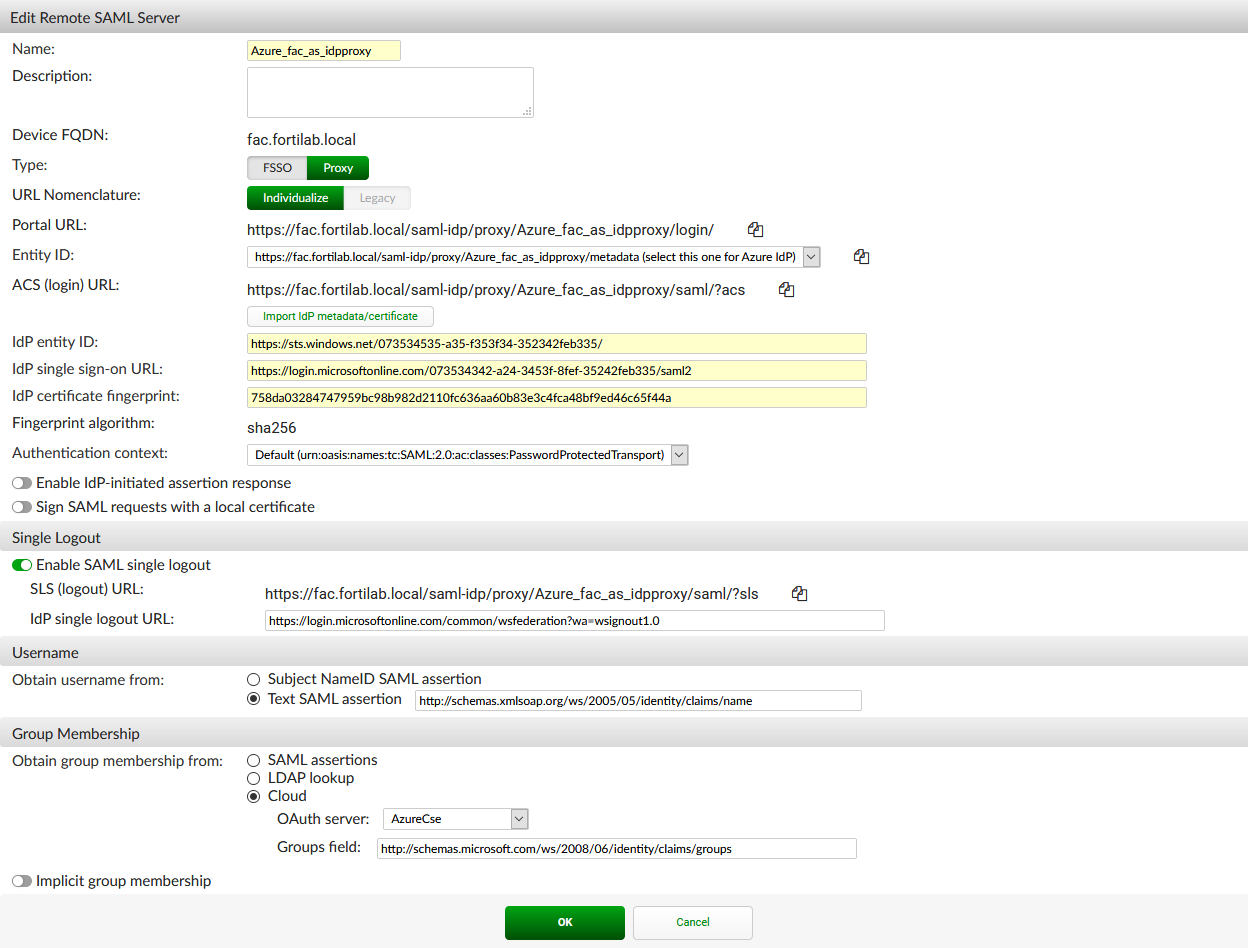
- Under Remote SAML Server, configure the following:
- Name: Enter a name for the server. This name must match the server name configured in Azure. In this example, the server name is Azure_fac_as_idpproxy.
- Type: Proxy.
- Entity ID: Select the Azure IdP option.
- Import IdP metadata/certificate: Import the certificate that you previously exported from Azure.
- IdP entity ID: Enter the Azure AD Identifier from your Azure configuration.
- IdP single sign-on URL: Enter the Login URL from your Azure configuration.
- Under Single Logout, configure the following:
- Enable SAML single logout: Optionally, you can enable this setting to enable SAML single logout.
- IdP single logout URL: Enter the Logout URL from your Azure configuration.
- Under Username, configure the following:
- Obtain username from: Select Text SAML assertion and use the configured username claim URL from your Azure configuration.
- In Group Membership, configure the following:
- Obtain group membership from: Select Cloud and choose your remote OAuth server. Group membership of a particular user will be retrieved dynamically through OAuth upon authentication.
- Click OK.
Configure the SAML IdP settings on FortiAuthenticator
To create the Azure realm:
- Go to Authentication > User Management > Realms, and click Create New.
- Configure the following information:
- Name: Enter a name for your user realm, for example: azurecse
- User source: Select your remote SAML server as the user source.

- Click OK.
To enable SAML IdP on FortiAuthenticator:
- Go to Authentication > SAML IdP > General, click Enable SAML Identity Provider portal, and configure the following:
- Server address: Enter the IP or FQDN of your FortiAuthenticator.
- Realms: Select the SAML realm as the default.
- Default IdP certificate: Select a default IdP certificate.
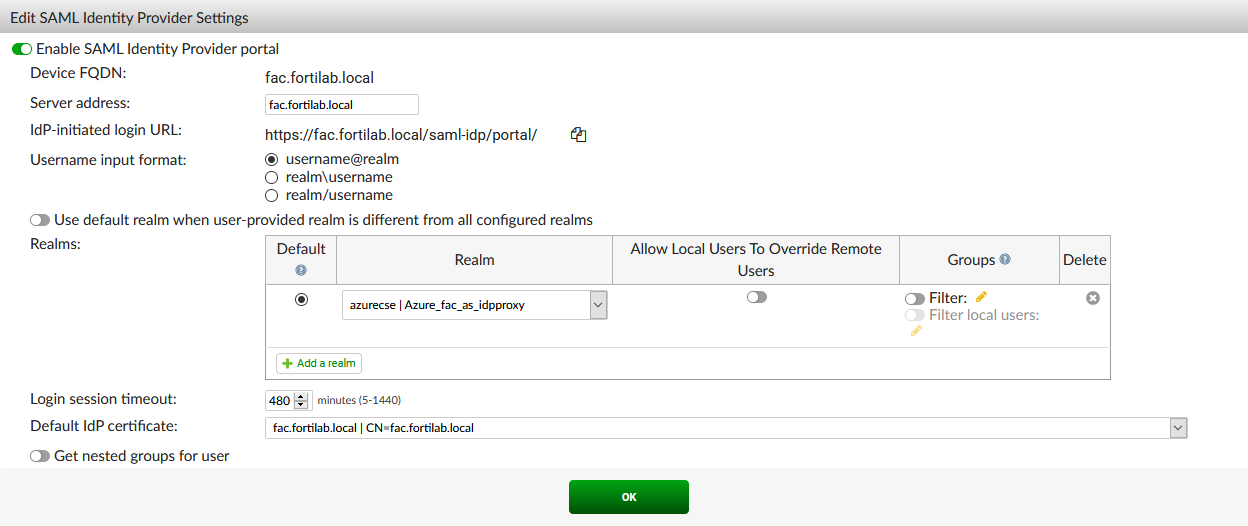
- Click OK.
You will also need to download your IdP certificate for use later. It can be downloaded from Certificate Management > End Entities.
To add FortiGate as a SAML service provider:
- Go to Authentication > SAML IdP > Service Providers, and click Create New.
- Under Edit SAML Service Provider, configure the following:
- SP name: Enter a name for this service provider, for example: fgt1sslvpn.
- IdP prefix: Enter a custom IdP prefix or click Generate prefix to automatically populate this field.
- Under Assertion Attributes, configure the following:
- Subject NameID: Remote SAML Server > Subject NameID.
- Format: urn:oasis:names:tc:SAML:2.0:nameid-format:unspecified.
- Under SAML Attributes, add the following attributes. The user and group information will be propagated by the FortiAuthenticator IdP in SAML assertions to FortiGate. These must match with the user-name and group-name keywords defined for the SAML user. See Configure the SAML user.
- Attribute 1: SAML attribute: groups, User attribute: SAML Group membership.
- Attribute 2: SAML attribute: username, User attribute: SAML Username.
- Click Save.


Once the settings have been saved, you will see that additional options are available.
You can return to complete the configuration of the SAML service provider settings on FortiAuthenticator once you have configured your FortiGate SAML user. You will need to enter the SP entity ID, SP ACS (login) URL, and SP SLS (logout) URL from the FortiGate configuration.
To update the SAML replacement message:
- Go to Authentication > SAML IdP > Replacement Messages.
- Select SAML IdP > Login Page, and then select idp-proxy in the Restore Default dropdown menu.
You can now edit the content in the right pane to include the Portal URL obtained from your remote SAML server. The URL must be replaced in three places as indicated by[proxy_portal_url]in the text.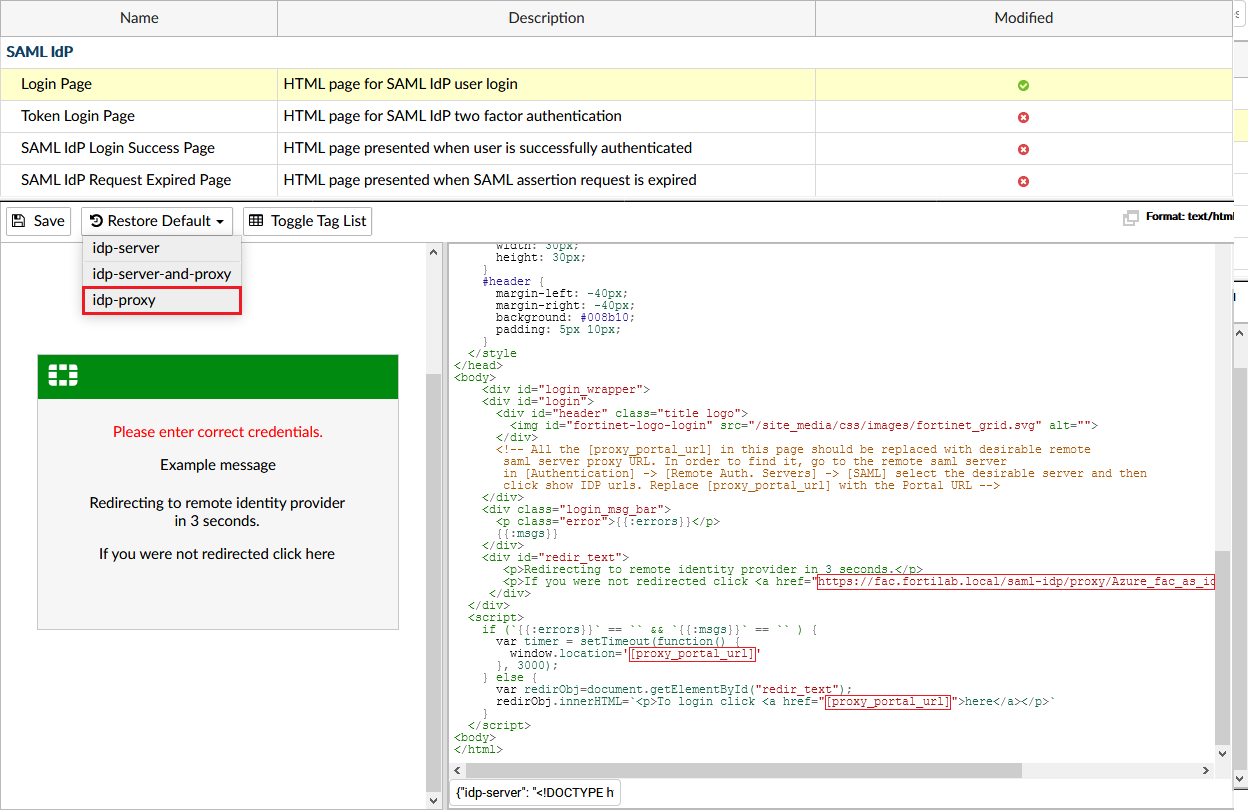
- Click Save.
Configure FortiToken
To include tokens in a user's authentication:
- Go to Authentication > User Management > Remote Users, select SAML, and click Import.
- Under Import Remote SAML Users, configure the following settings:
- Remote SAML server: Select your remote SAML server, for example: Azure_fac_as_idpproxy.
- Group: Select All users or choose a user group.
- Click OK.
- Edit an imported user to define the token. Enable Token-based authentication, and select your token type.
- Click OK.