


Appendix A: GUI Reference
Solution 1 Example Configuration
Steps
- Configure basic networking settings like interface IP (example: 123.1.1.50) and routing.
- To deploy the Layer4 SLB, first create new real severs, with the address as the IP of the listening FortiGate interface.

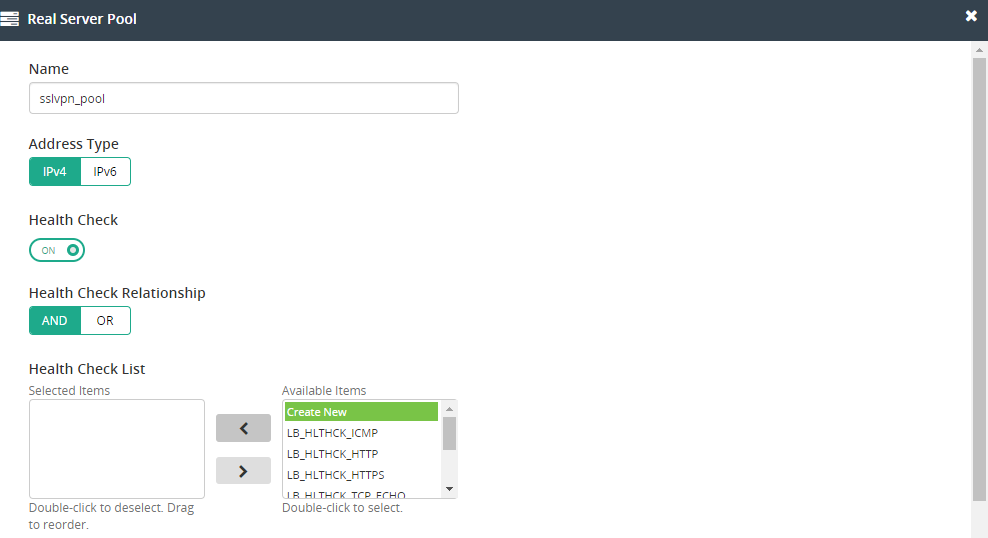
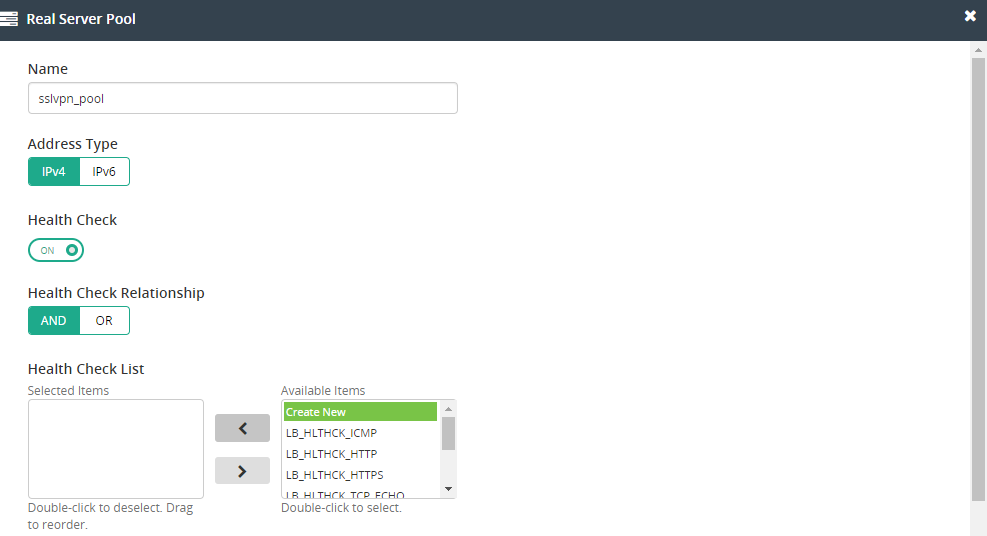
- Create a new Real Server Pool and add real servers into it.

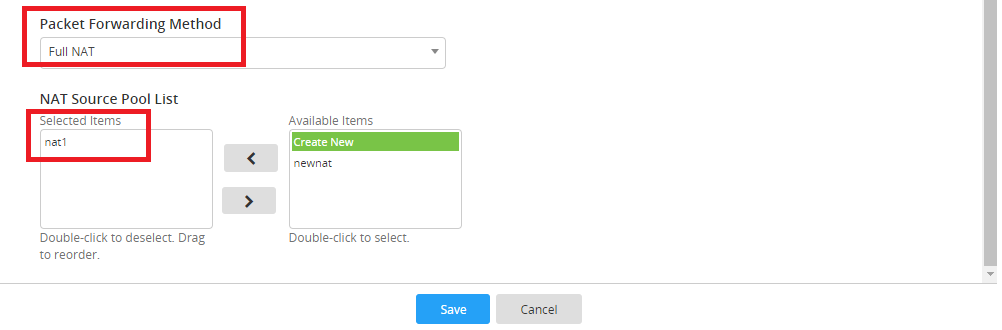
- Create a NAT source Pool in Server Load Balance > Virtual Server > NAT Source Pool.

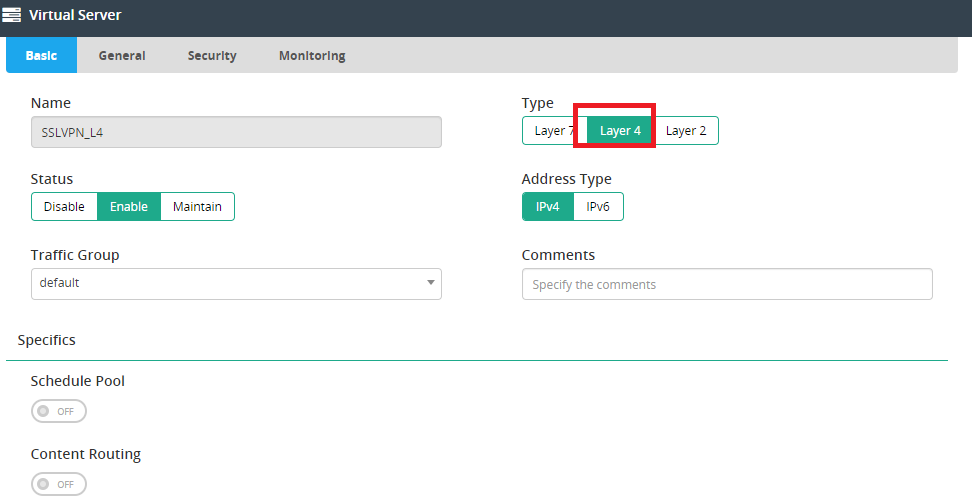
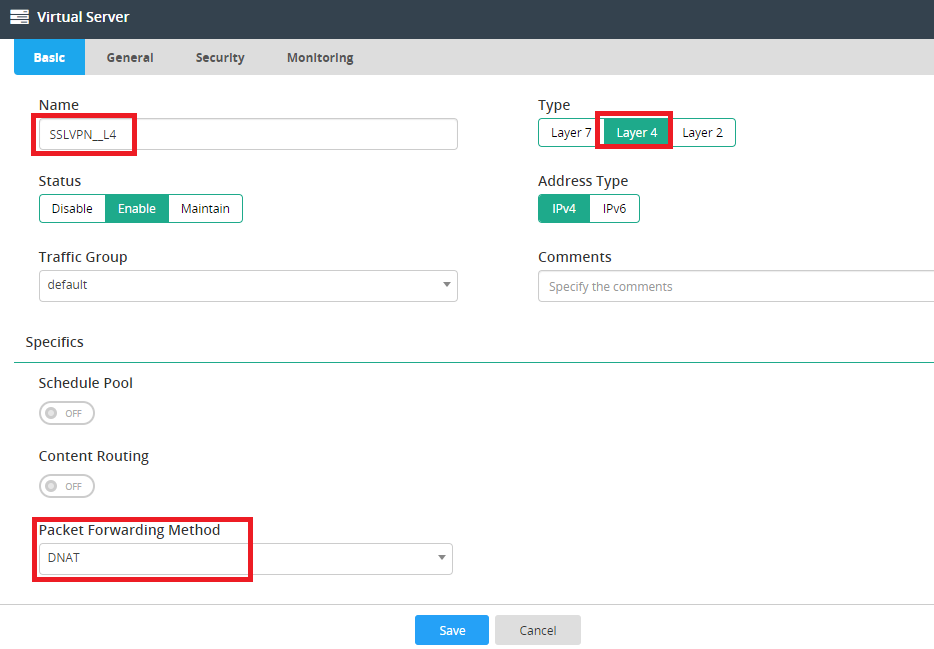
- Finish the Basic and General configurations for the Virtual Server settings, including:
- Select Layer 4 type.
- Select Full NAT Packet FORWARDING Method and specify the net source pool.
- Specify address, port, and interface in general configuration.
- Select TCP Profile and ROUND_ROBIN method and make sure to specify the persistence method (e.g. SRC_ADDR, HASH_SRC_ADDR), then select the configured real server pool.

- To view the result, do the following:
- Open the FortiClient Console and go to Remote Access.
- Make sure Auto-connect is enabled on FortiGate.
- Add a new connection.
- Set VPN Type to SSL VPN.
- Set Remote Gateway to the IP of the FortiADC VIP (example: 123.1.1.50).
- Select Customize Port and set it (example: 10443).
- Save your settings.
- Use the credentials you've set up to connect to the SSL VPN tunnel.
Solution 2 Example Configuration
Steps
- Change the network settings to match the topology in the in-line example, including:
- FortiGate network settings modification and related configurations that might also need to be modified.
- Set the gateway to ADC for the outbound traffic.
- Configure basic networking settings like WAN interface IP (example: 123.1.1.1), LAN interface IP and route to take over the original FortiGate WAN related function.
- To deploy the Layer 4 SLB, first create new real severs, with the address as the IP of the listening FortiGate interface.

- Create separate Real Server Pools for IPsec and SSL VPN balancing and then add real servers into them.
-
IPsec VPN: Specify port as 0 in the pool member service.


-
SSL VPN: Specify the port you configured on FortiGate in the pool member service (example: 10443)

-
IPsec VPN: Specify port as 0 in the pool member service.
- Finish the Basic and General configurations
- IPsec VPN Virtual Server settings:
- Select Layer 4 type.
- Use the default DNAT Packet FOWARDING Method.
- Specify address, port (500, 4500), and interface in general configuration.
- Select UDP Profile and ROUND_ROBIN method and make sure to specify the persistence method (e.g. SRC_ADDR, HASH_SRC_ADDR), then select the configured real server pool.


- SSL VPN Virtual Server settings:
- Select Layer 4 type.
- Use the default DNAT Packet FOWARDING Method.
- Specify address, port, and interface in general configuration.
- Select TCP Profile and ROUND_ROBIN method and make sure to specify the persistence method (e.g. SRC_ADDR, HASH_SRC_ADDR), then select the configured real server pool.

- IPsec VPN Virtual Server settings:
- To view the result, do the following:
- Open the FortiClient Console and go to Remote Access.
- Make sure Auto-connect is e nabled on FortiGate.
- Add a new connection.
- Set VPN Type to SSL VPN.
- Set Remote Gateway to the IP of the FortiADC VIP (example: 123.1.1.1).
- Select Customize Port and set it for the SSL VPN users (example: 10443).
- Save your settings.
- Use the credentials you've set up to connect to the VPN tunnel.
Solution 3 Example Configuration
This example illustrates the solution for when all the client’s incoming traffic comes from one location.

This example assumes the following:
• You have FortiGate VPN servers in two locations.
• Every FortiGate VPN server supports a VPN service that can connect to the company HQ.
The FortiGSLB has one pool with these two FortiGate VPN servers and it can load balance the incoming traffic geographically and monitor all VPN servers’ status at any time.
If the traffic comes from one location, the FortiGSLB can load balance the traffic to the nearest available server and redirect it to another VPN server once that VPN server becomes unavailable. Clients from all places can enjoy the best performance of VPN server and fast connection to company HQ even while travelling.
Steps
- Create New VPN in FortiGate (VPN) or use the existing VPN.
- Create FQDN VPN-hq.fgt.com in FQDN services > choose DNS-Query-Origin Virtual Server Pool Selection Method
- Create FQDN member > Create new Virtual Server Pool1
- Create pool member > Create new generic server fgt-VPN1 > Create new Data Center DC1 > Create new Server member VPN1-DC1. Add FortiGate VPN IP VPN1-DC1 Public IP and enable health check Default_HLTHCK_ICMP or other types.
- Create new Location List1 for Virtual Server Pool1
- Create FQDN member > Create new Virtual Server Pool2
- Create pool member > Create new generic server fgt-VPN2 > Create new Data Center DC2 > Create new Server member VPN2-DC2. Add FortiGate VPN IP VPN2-DC2 Public IP and enable health check Default_HLTHCK_ICMP or other types.
- Create new Location List2 for Virtual Server Pool2
Note:The virtual server from the generic servers (FortiGate) will be added into Pool and Server directly and will work in FQDN services.
Sample topology view at FortiGSLB
We have added each FortiGate VPN server into the FortiGSLB pool. GSLB will load balance client traffic geographically using pool locations.

After completing these steps, the customer can monitor the VPN service status from both Location1 and Location2 on the FQDN service detail page. The FortiGSLB will load balance the traffic to the server that have the nearest location. If the nearest location VPN server is down, the FortiGSLB will direct the traffic to other available location. If both VPN service servers are not available, the FortiGSLB will direct traffic to the default VPN server.