


High Availability with two FortiGates
In this recipe, a backup FortiGate unit will be installed and connected to a previously installed primary FortiGate to provide redundancy if the primary FortiGate fails. If you have not already installed a FortiGate, see Installing a FortiGate in NAT/Route mode.
Before you start the FortiGates should be running the same FortiOS firmware version and interfaces should not be configured to get their addresses from DHCP or PPPoE.
This recipe is part of the Cooperative Security Fabric collection. It can also be used as a standalone recipe.
This setup, called FortiGate High Availability (HA), improves network reliability. The previously installed FortiGate will continue to operate as the primary unit and the new FortiGate will operate as the backup FortiGate.
For a more advanced HA recipe that includes CLI steps and involves using advanced options such as override to maintain the same primary FortiGate, see High Availability with FGCP (Expert).

1. Setting up registration and licensing
Make sure both FortiGates are running the same FortiOS firmware version. Register and apply licenses to the new FortiGate unit before adding it to the cluster. This includes activation of FortiCloud and licenses for FortiGuard, FortiSandbox, and FortiClient, as well as entering a license key if you purchased more than 10 Virtual Domains (VDOMS). All FortiGates in the cluster must have the same level of licensing for FortiGuard, FortiCloud, FortiClient and VDOMs. FortiToken licenses can be added at any time because they are synchronized to all cluster members. If the FortiGates in the cluster will be running FortiOS Carrier, apply the FortiOS Carrier license before configuring the cluster (and before applying other licenses). Applying the FortiOS Carrier license sets the configuration to factory defaults, requiring you to repeat steps performed before applying the license.

You can also install any third-party certificates on the primary FortiGate before forming the cluster. Once the cluster is formed third-party certificates are synchronized to the backup FortiGate.
2. Configuring the Primary FortiGate for HA
Connect to the primary FortiGate GUI and from the System Information Dashboard widget change the HostName to identify this as the primary FortiGate in the HA cluster.

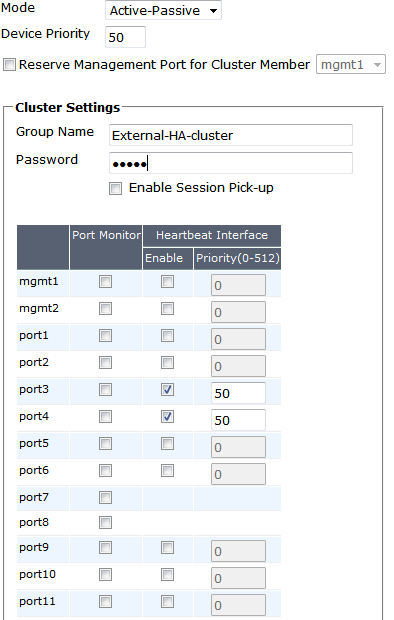
Also on the System Information widget, configure HA Status (or go to System > HA). Set the Mode to Active-Passive. Set theDevice Priority to a higher value than the default to make sure this FortiGate will always be the primary FortiGate. Also set a Group Name and Password.
Make sure that the two Heartbeat Interfaces (port3 and port4) are enabled and their priorities are both set to 50.
Since the backup FortiGate is not available, when you save the HA configuration the primary FortiGate will form a cluster of one FortiGate but will keep operating normally. If these steps don't start HA mode, make sure that none of the FortiGate's interfaces use DHCP or PPPoE addressing.

If there are other FortiOS clusters on your network you may need to change the cluster group id using this CLI command.
config system ha
    set group-id 25
end
3. Connecting the backup FortiGate
Connect the backup FortiGate to the primary FortiGate and the network as shown in the network diagram at the top of the recipe. Making these network connections will disrupt traffic so you should do this when the network is quiet.
If possible, make direct Ethernet connections between the heartbeat interfaces of the two FortiGate units. This example uses two FortiGate-600Ds and the default heartbeat interfaces are used (port3 and port4). You can use any interfaces for HA heartbeat interfaces. A best practice is to use interfaces that do not process traffic, but this is not a requirement.
Switches must be used between the cluster and the Internet and between the cluster and the internal networks as shown in the network diagram. You can use any good quality switches to make these connections. You can also use one switch for all of these connections as long as you configure the switch to separate traffic from the different networks.

4. Configuring the backup FortiGate for HA
Connect to the backup FortiGate GUI and from the System Information Dashboard widget change the HostName to identify this as the backup FortiGate.

Also on the System Information widget, configure HA Status (or go to System > HA) and duplicate the HA configuration of the primary FortiGate (except for the Device Priority): set the Mode to Active-Passive, set theDevice Priority to a lower value than the default to make sure this FortiGate will always be the backup FortiGate. Also set the same Group Name and Password as the primary FortiGate.
Make sure that the two Heartbeat Interfaces (port3 and port4) are enabled and their priorities are both set to 50.
When you save the backup FortiGate's HA configuration, the FortiGates will find each other and form a cluster of two FortiGates. Network traffic may be disrupted for a few seconds while the cluster is negotiating. If these steps don't start HA mode, make sure that none of the FortiGate's interfaces use DHCP or PPPoE addressing.
Change the cluster group id if you changed it for the primary unit using this CLI command.
config system ha
    set group-id 25
end
5. Viewing the cluster status
Connect to the primary FortiGate GUI. The System Information widget displays the HA status and some information about the cluster. For example, the System Information widget can indicate when the configurations of the cluster units in not synchronized.
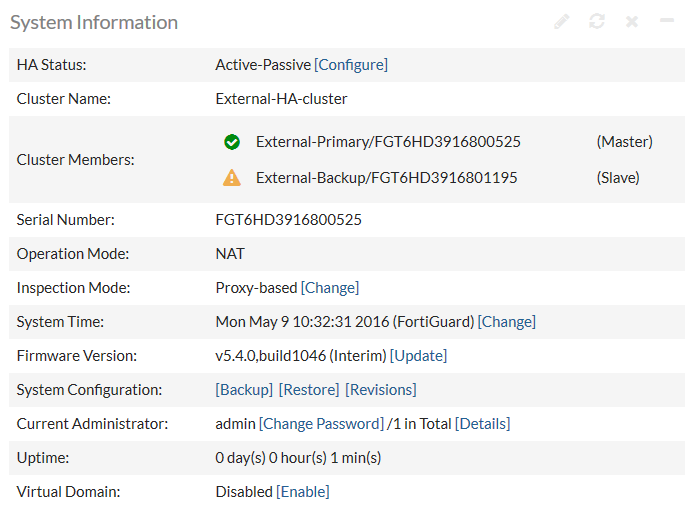
From on the System Information widget, select HA Status (or go to System > HA) to view the cluster status.

Select View HA Statistics for more information on how the cluster is operating and processing traffic.

6. Results
Traffic is now passing through the primary FortiGate. However, if the primary FortiGate becomes unavailable, traffic should failover and the backup FortiGate will process traffic.
Failover also causes the primary and backup FortiGate to reverse roles, even when both FortiGates are available again.
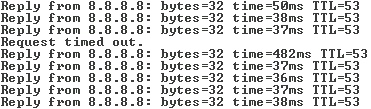
To test this, ping the IP address 8.8.8.8 using a PC on the internal network. After a moment, power off the primary FortiGate. If you are using port monitoring, you can also unplug the primary FortiGate's Internet-facing interface to test failover. You will see a momentary pause in the ping results, until traffic diverts to the backup FortiGate, allowing the ping traffic to continue.
7. (Optional) Upgrading the firmware for the HA cluster
When a new version of the FortiOS firmware becomes available, upgrading the firmware on the primary FortiGate automatically upgrades the backup FortiGate's firmware. Both FortiGates are updated with minimal traffic disruption. For information about accessing firmware images, see Updating your FortiGate's firmware
Always review the Release Notes and Supported Upgrade Paths tool before installing new firmware. These can be found in the Fortinet Document Library.
From the System Information widget, select Backup beside System Configuration. Always remember to back up your configuration before upgrading the firmware.

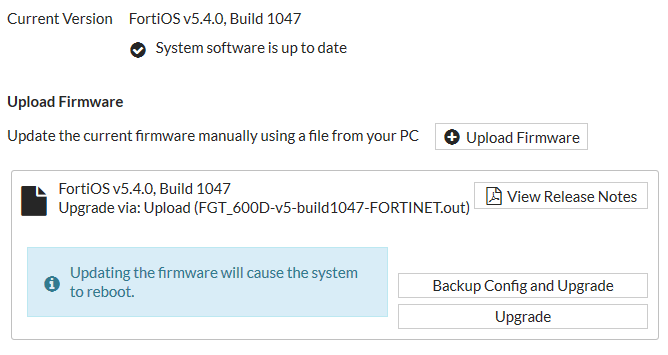
From the System Information widget select Upgrade beside Firmware Version. Find the firmware image file that you downloaded and select OK to upload and install the firmware build.
The firmware loads onto both the primary and the backup FortiGates with minimal traffic interruption.
After the upgrade is process is complete, verify that the System Information widget shows the new firmware version.

For further reading, check out FGCP configuration examples and troubleshooting in the FortiOS 5.4 Handbook.