


Extending WiFi range with mesh topology
In this example, a second FortiAP are used to extend the range of a WiFi network. The second FortiAP is connected to the FortiGate WiFi controller through a dedicated WiFi backhaul network.
In this example, both FortiAPs provide the example-staff network to clients that are in range.
More mesh-connected FortiAPs could be added to further expand the coverage range of the network. Each AP must be within range of at least one other FortiAP. Mesh operation requires FortiAP models with two radios, such as the FortiAP-221C units used here.

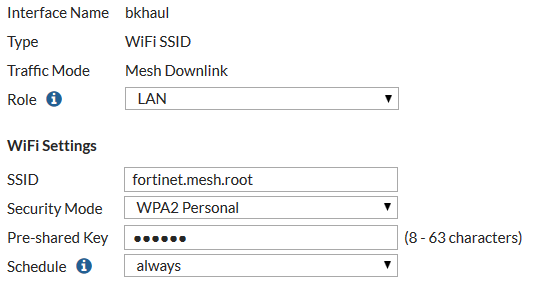
1. Creating the backhaul SSID
Go to WiFi Controller > SSID.
Create a new SSID. Set Traffic Mode to Mesh Downlink.
You will need the pre-shared key when configuring the mesh-connected FortiAP.
2. Creating the client SSID
Go to WiFi Controller > SSID. Create the WiFi network (SSID) that clients will use.

Configure DHCP to provide IP addresses for your clients.

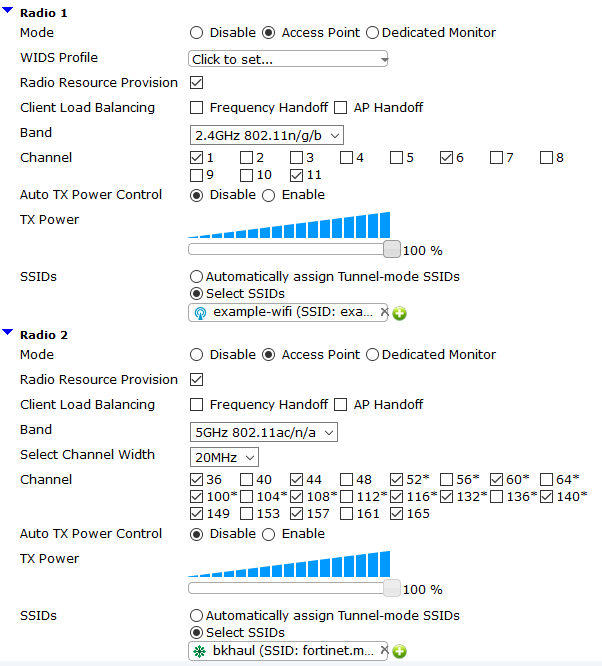
3. Creating the FortiAP Profile
Go to WiFi Controller > FortiAP Profiles and create a profile for the Platform (FortiAP model) that you are using.
Configure Radio 1 for the client channel on the 2.4GHz 802.11n/g Band.
Configure Radio 2 for the backhaul channel on the 5GHz 802.11ac/n Band.
4. Configuring the security policy
Go to Policy & Objects > IPv4 Policy and create a new policy.

5. Configuring an interface dedicated to FortiAP
Go to Network > Interfaces and edit an available interface (in this example, port 15). Set Addressing mode to Dedicate to Extension Device.

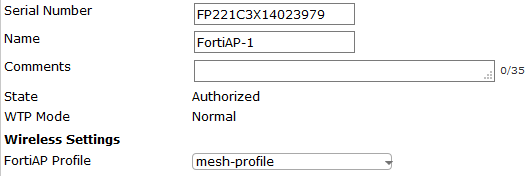
6. Preauthorizing FortiAP-1
Go to WiFi Controller > Managed FortiAPs and create a new entry.
Enter the serial number of the FortiAP unit and give it a name. Select the FortiAP profile that you created earlier.
Doing this will allow FortiAP-1 to go online as soon as it is connected to the FortiGate. Optionally, you could connect the FortiAP to the FortiGate and then manually authorize it at that point, as will be done with FortiAP-2.
7. Configuring FortiAP-2 for mesh operation
Connect FortiAP-2's Ethernet port to the FortiGate network interface that you configured for FortiAPs.
Go to WiFi Controller > Managed FortiAPs. Click Refresh every 15 seconds until FortiAP-2 is listed. Select the AP, then select Authorize.

Edit FortiAP-2. Under Managed AP Status, select Connect to CLI.

Log in with the username admin, then enter the following CLI commands, substituting your SSID and password where necessary:
    cfg -a MESH_AP_TYPE=1
    cfg -a MESH_AP_SSID=fortinet.mesh.root
    cfg -a MESH_AP_PASSWD=hardtoguess
    cfg -c
    exit
Disconnect FortiAP-2 from the FortiGate.
8. Connecting and authorizing the FortiAPs
Connect FortiAP-1. Go to WiFi Controller > Managed FortiAPs. Click Refresh every 15 seconds until FortiAP-1 is listed.

Power up FortiAP-2. Periodically click Refresh. With a minute or two, Radio 2 of FortiAP-1 will indicate 1 client and FortiAP-2 will be listed as mesh-connected.

Go to WiFi Controller > Managed FortiAPs. Edit FortiAP-2. Enter the Name and select the FortiAP Profile that you created earlier.
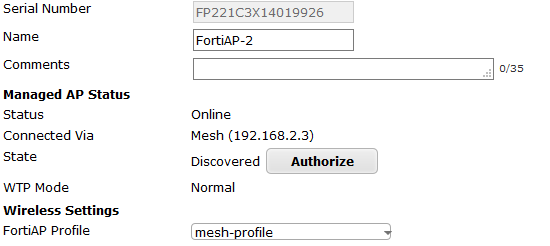
Click Refresh to update the display as needed. Within a minute or two, FortiAP-2 will be listed as Online.

9. Results
Go to Monitor > WiFi Client Monitor. Both backhaul and client SSIDs are shown. Click Refresh as needed to see updated information.
Connect to the network near FortiAP-2. The FortiAP column shows the client is associated with the mesh-connected FortiAP-2.

Connect to the network near FortiAP-1. The FortiAP column shows the client is associated with FortiAP-1.
